Get the Know-How of Jazz Rhythm Guitar and Venture Into Any Session With Confidence
Advance your chordal and rhythmic accompaniment with this easy-to-follow guide on jazz guitar comping styles
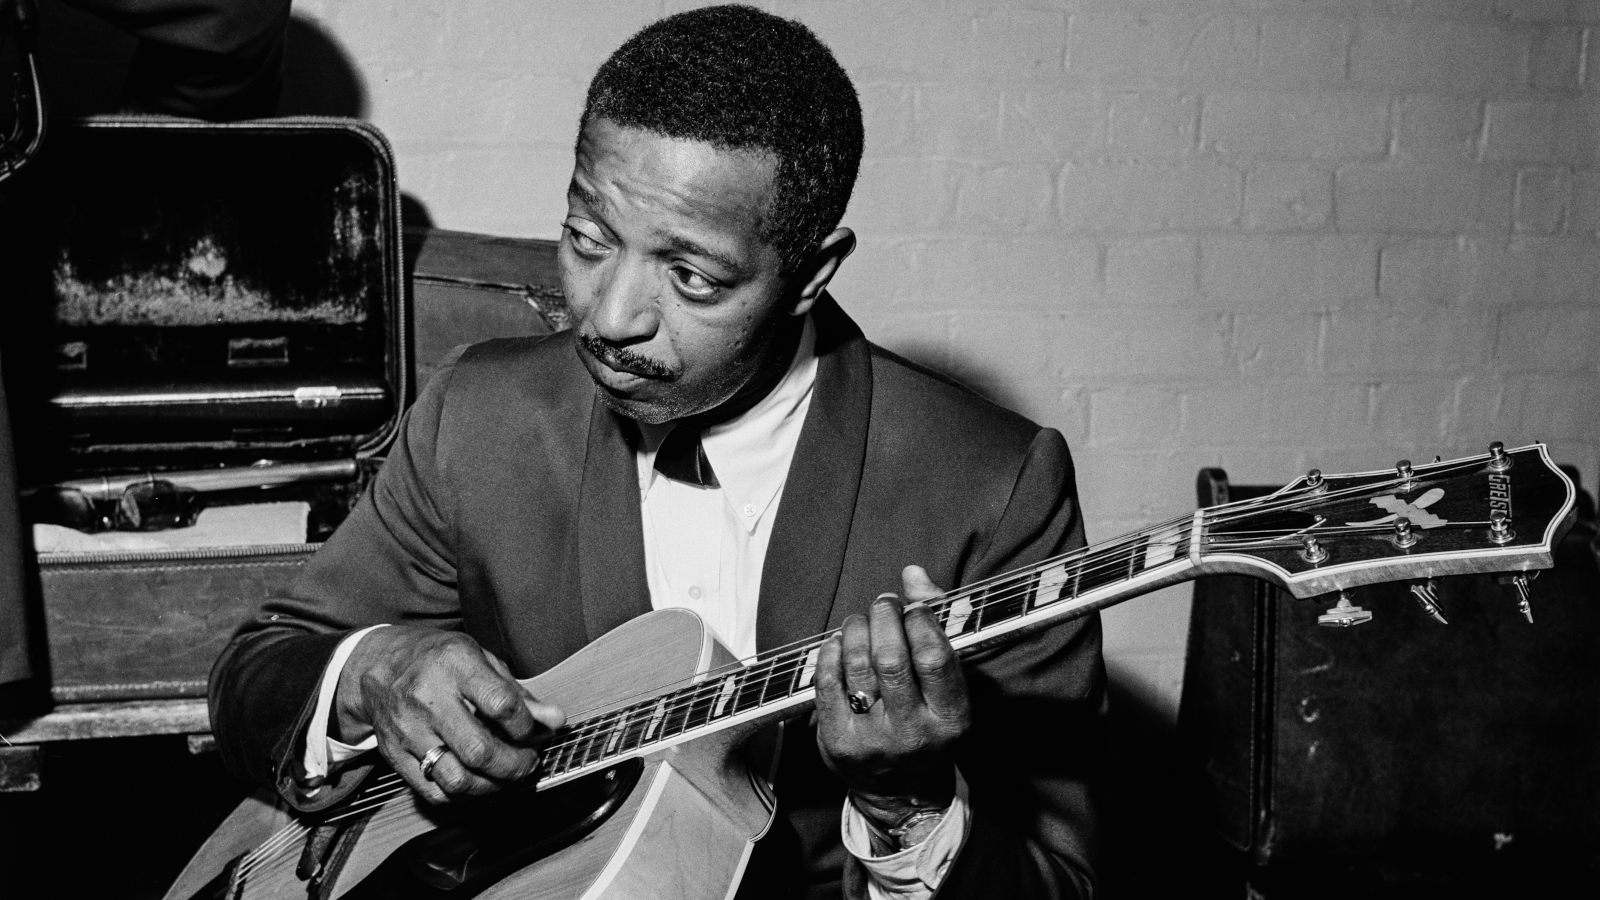
The first time I was handed a jazz chord chart, I was 13 years old and trying to prove to the director of my middle-school jazz band that I could cut it as the ensemble’s guitarist. I had been on his bad side ever since I nearly flunked out of his symphonic band as an alto saxophonist, so when I requested an audition, he practically laughed me out of the room.
Nevertheless, he handed me a chord chart – also referred to as a “lead sheet” – and told me to bring my A-game to the audition.
To cut a long story short, I bombed the audition, not because I couldn’t play but because I had no understanding of how to properly approach the material. Instead of following the changes given to me, which were all standard seventh chords, I played triadic major and minor chords, which are in most cases stylistically inappropriate for jazz.
The director asked me to play “Freddie Green-style,” and I just shrugged and wondered silently who Freddie Green was. After my embarrassing performance, I knew I needed to buckle down and study jazz rhythm guitar if I wanted to be a part of that scene.
While the audition gave me a good idea of where to start, I had no idea just how deep the rabbit hole would go. That experience inspired this lesson: a guide to jazz guitar comping styles.
Comping is the jazz idiom’s stylized term for chordal and rhythmic accompaniment, and there are as many approaches to comping as there are approaches to jazz itself.
In this lesson, we’ll explore the many considerations you need to take when choosing your approach, which inevitably boils down to one question: “How do I best support the melody or the soloist?”
All the latest guitar news, interviews, lessons, reviews, deals and more, direct to your inbox!
Choosing Your Rhythm
Rhythm is one of the most important tools in your comping tool kit. The right rhythmic accompaniment can make your band or the soloist shine, whereas the wrong one can make everything feel stilted and off balance.
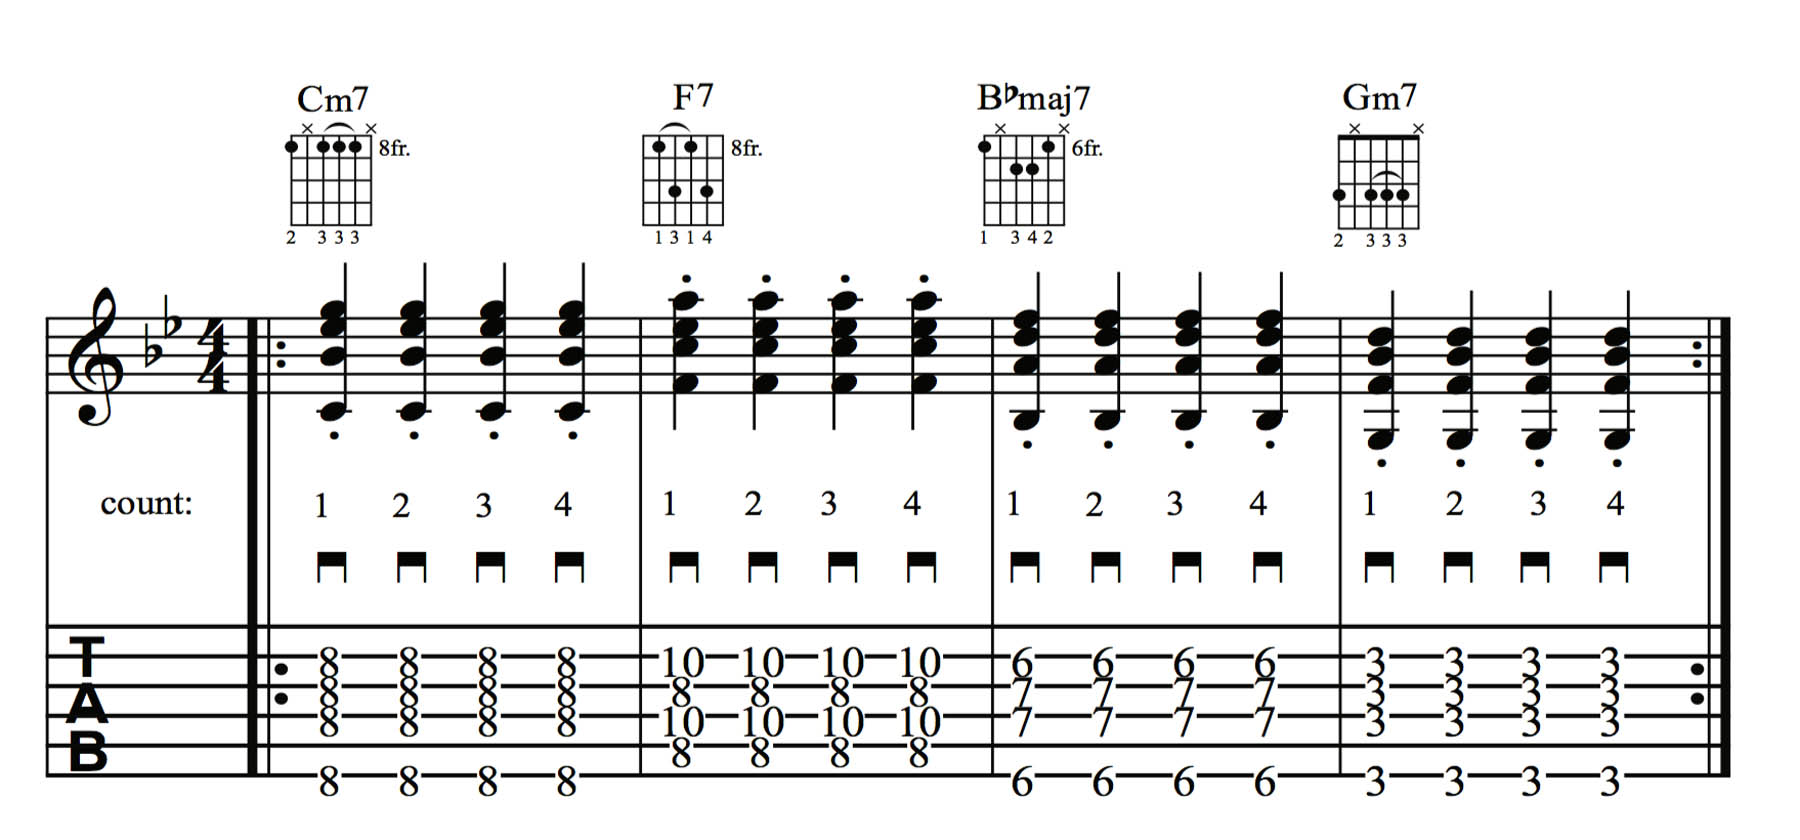
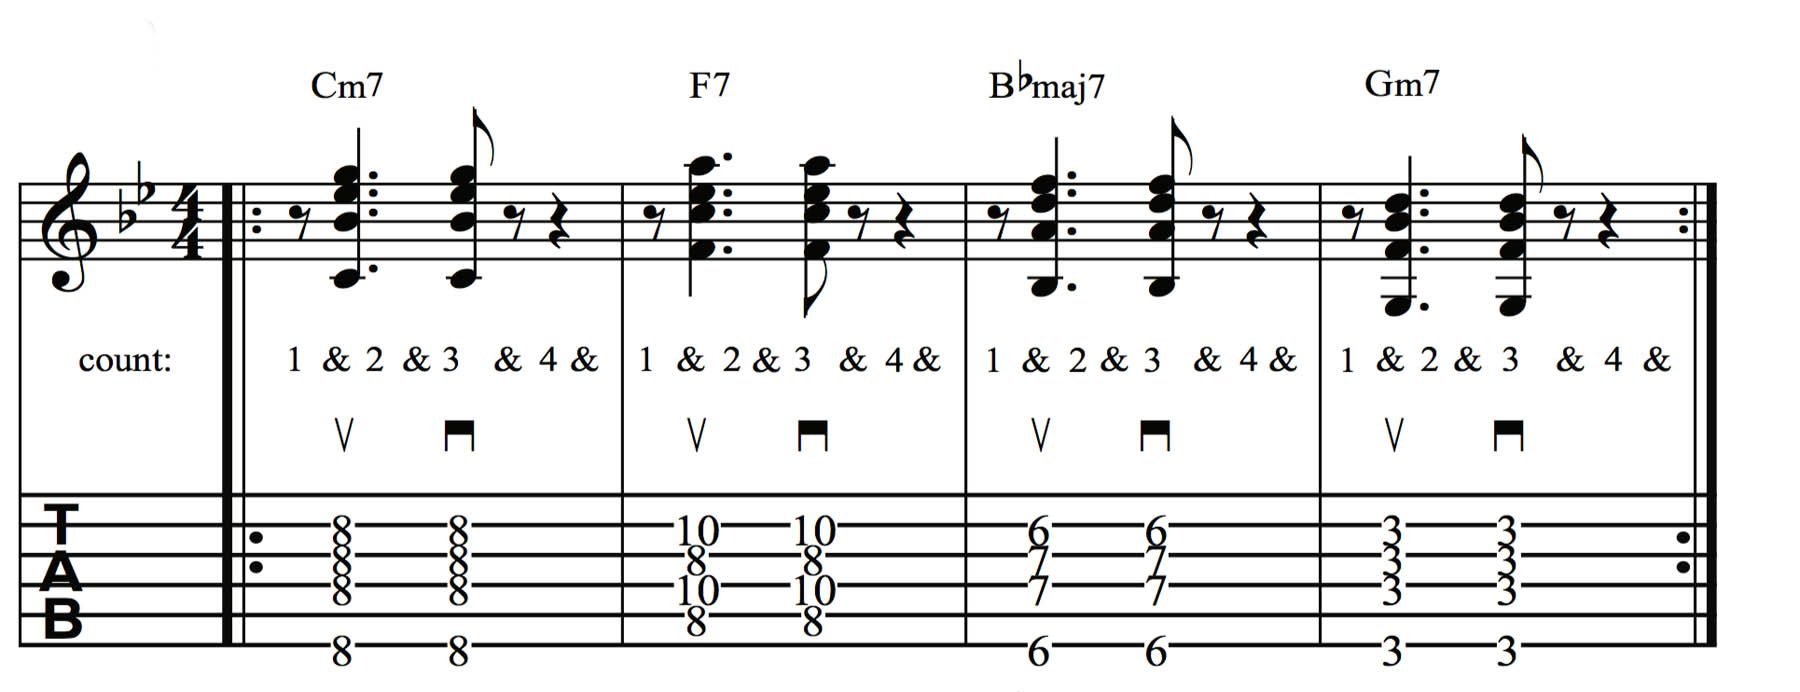
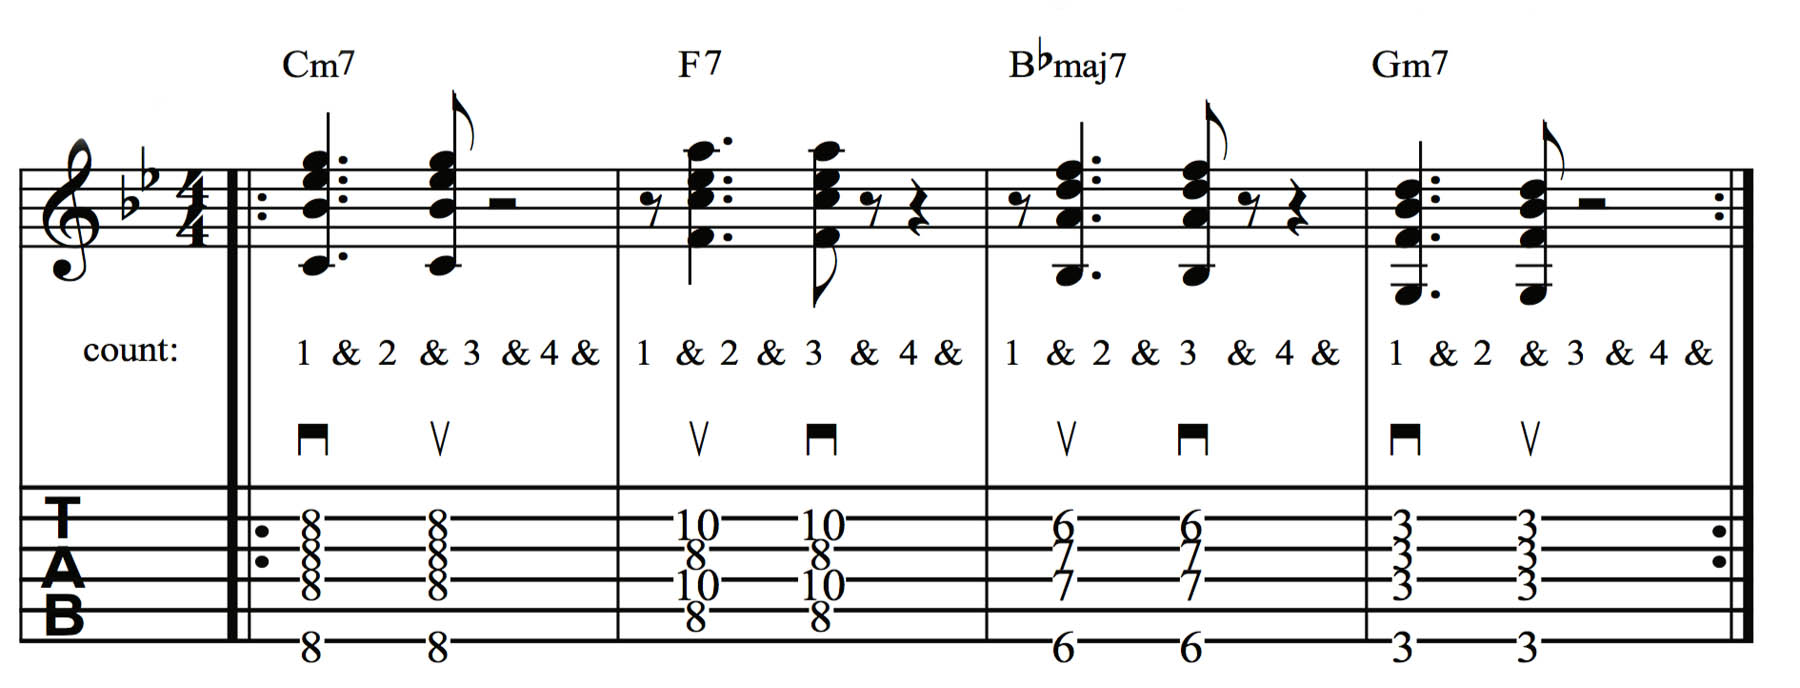
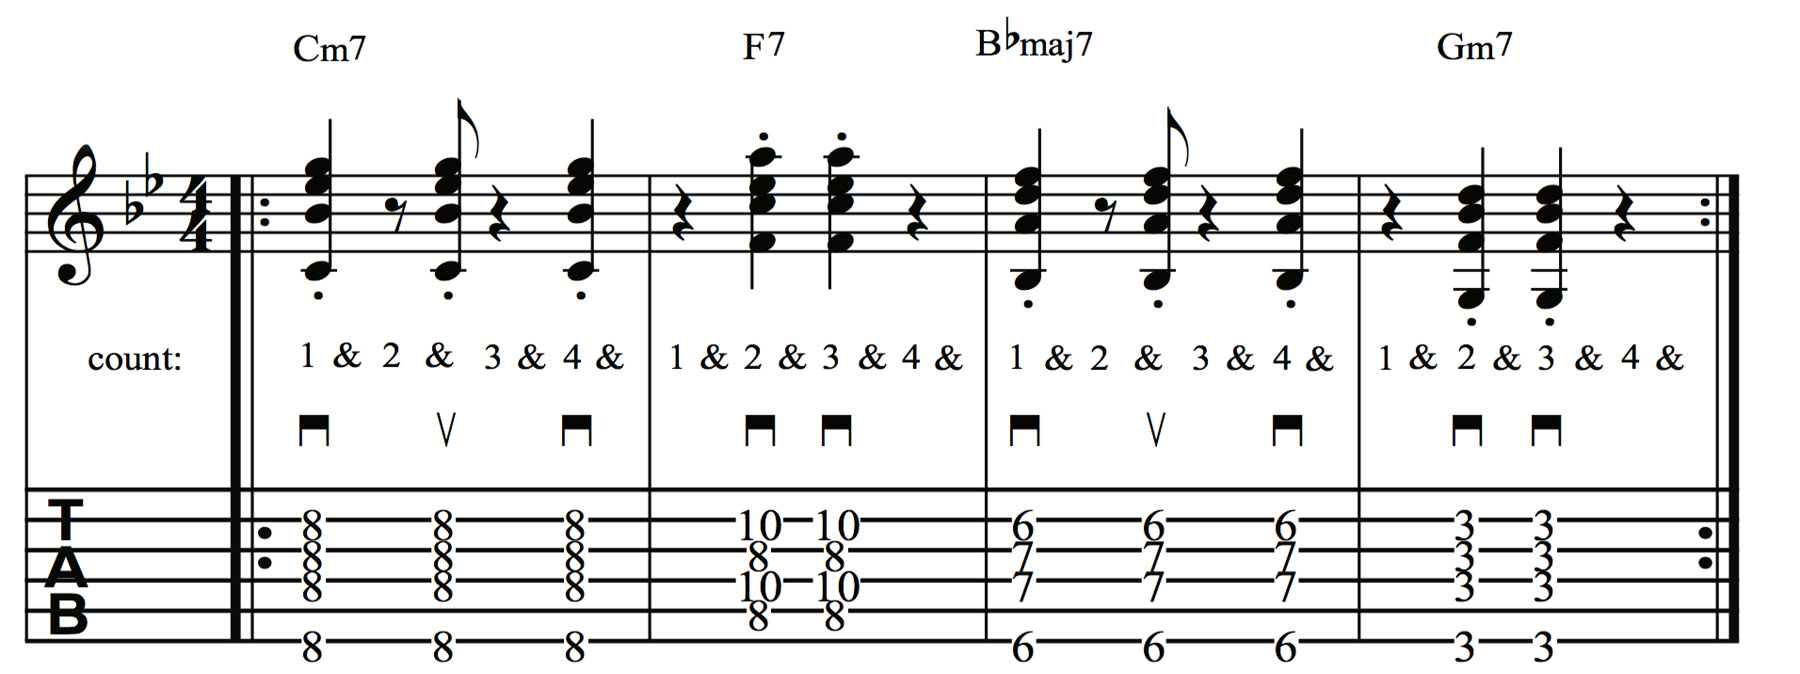
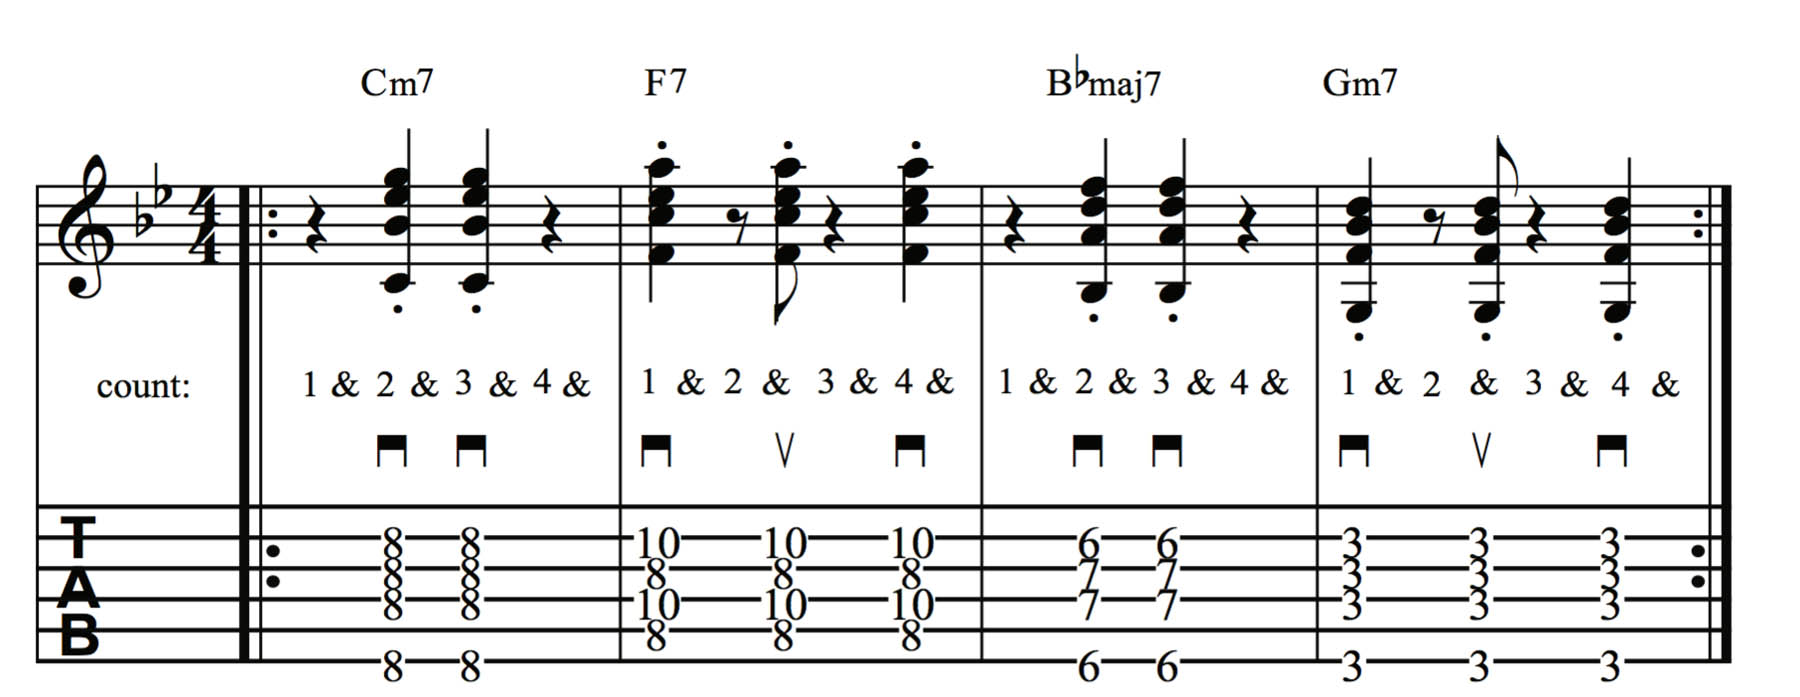
In this section, our examples will follow the common jazz chord progression ii - V - I - vi in the key of Bb (Cm7 - F7 - Bbmaj7 - Gm7). Let’s use it to break down some of the most common jazz guitar rhythms.
Freddie Green style: Freddie Green was the definitive and most influential jazz rhythm guitarist of the early 20th century. Over Green’s 50-year tenure with the Count Basie Orchestra, his style became defined by seventh chords played in a staccato, quarter-note rhythm, which came to be known as a “flat-four feel,” as demonstrated in Ex. 1.
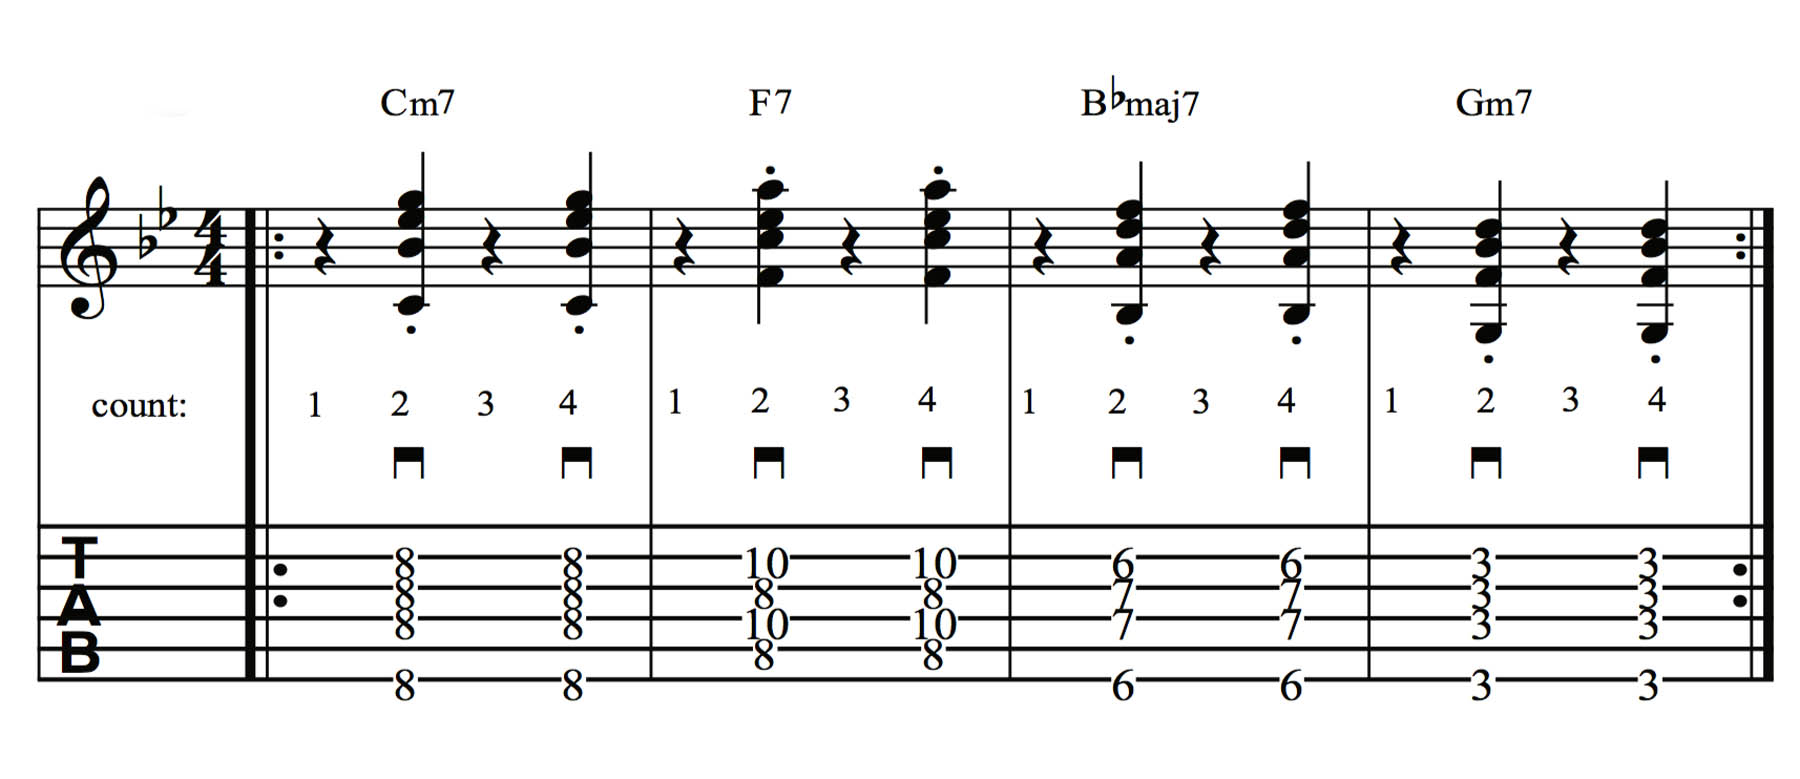
Two and Four: A more sparse approach to Freddie Green style, this rhythmic pattern encompasses playing quarter notes on beats 2 and 4 only, with rests on beats 1 and 3, as in Ex. 2a. Think of this approach as matching the typical backbeat snare drum hits heard in a rock, blues, country or R&B groove.
When playing this example and all those that follow, be sure to completely silence the strings during the rests and also right after playing a chord with a staccato articulation (indicated by a small black dot appearing directly above or below a note head).
This is efficiently done with any fretted note or chord shape by loosening or relaxing your fret hand’s grip on the strings, so that they break contact with the frets, but without actually letting go of the strings, as doing so could cause them to ring open.
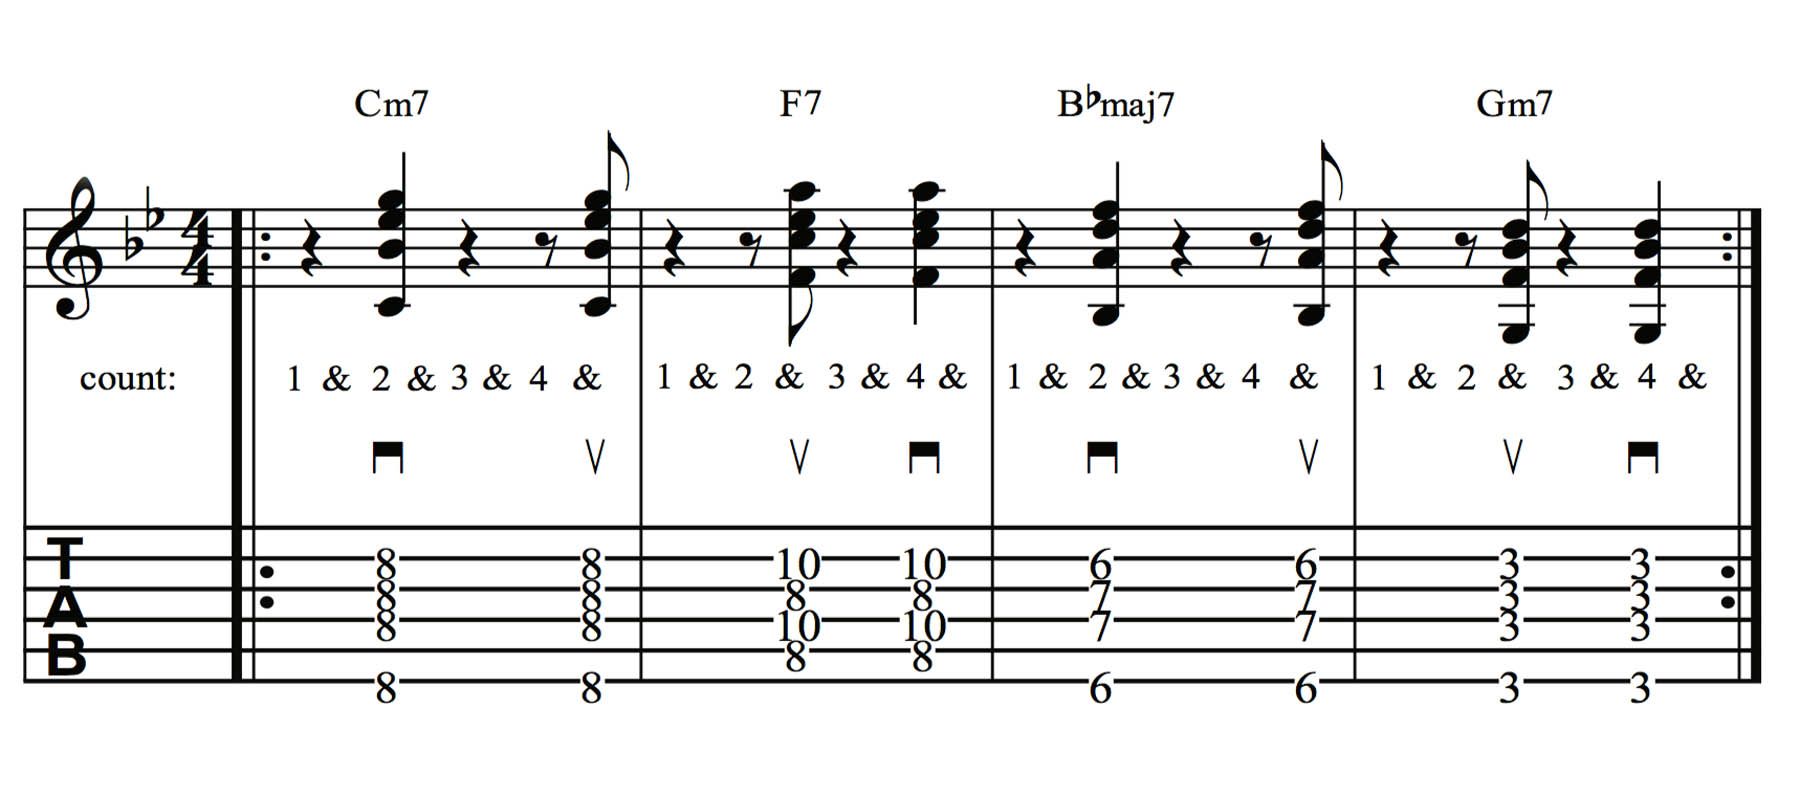
A more rhythmically complex variation on this pattern incorporates syncopation. This entails accentuating the “weak” parts of the beat, meaning any subdivision that falls between the beats, and playing one or both of these hits on the following eighth-note upbeat, which would be on the “and” count instead of the downbeat, as shown in Ex. 2b.
Be sure to tap your foot squarely on each beat as you play and to observe the helpful counting prompts that are included here as a guide.
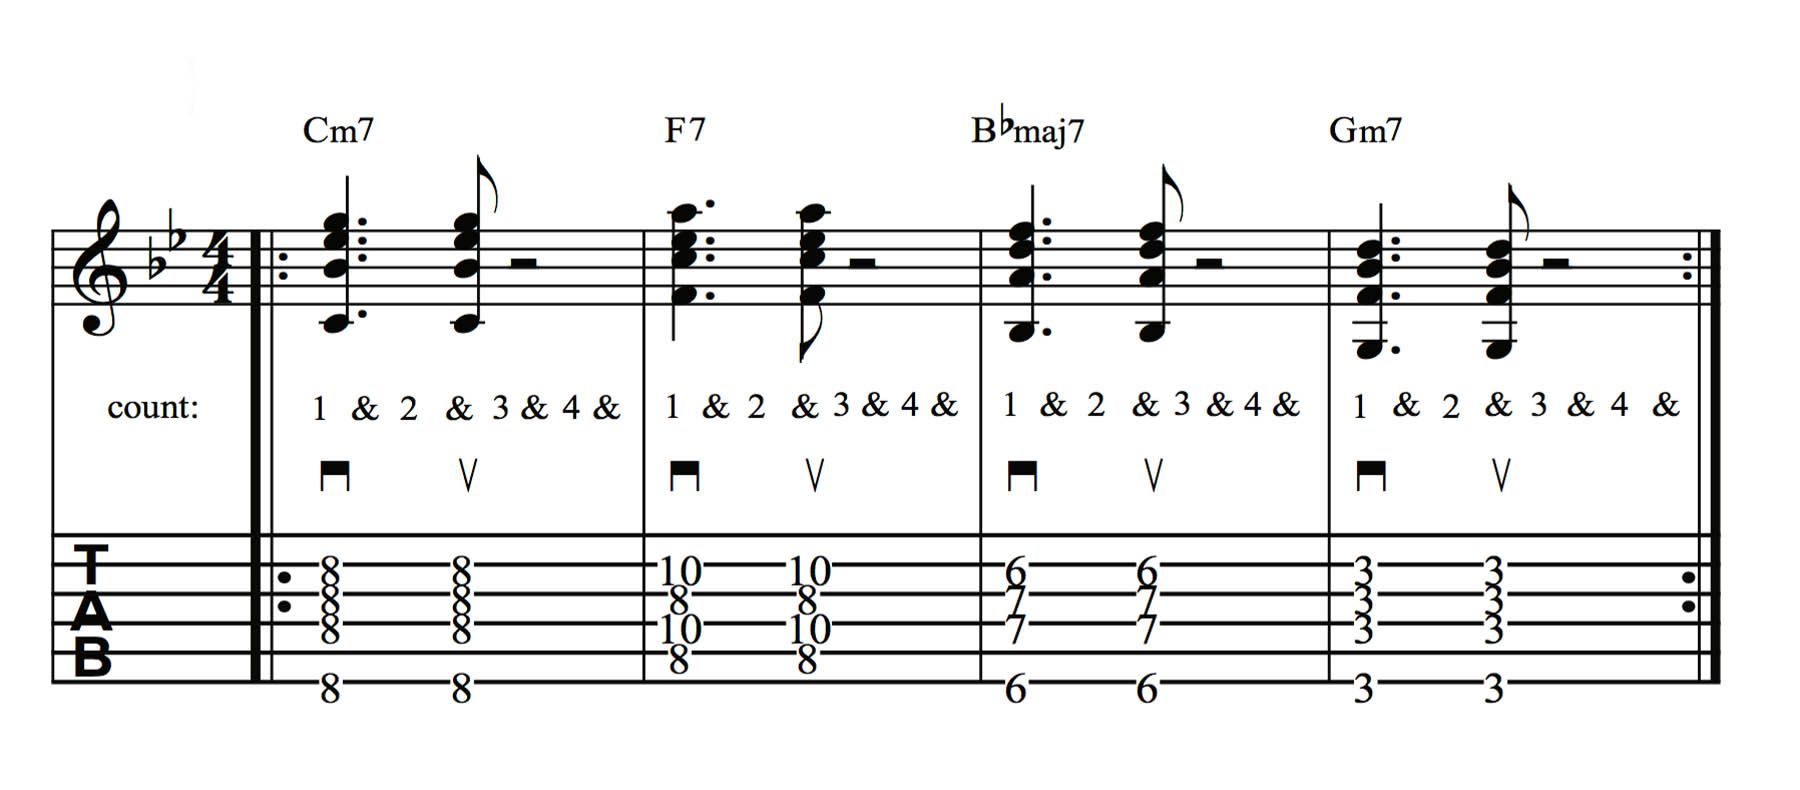
Charleston Rhythm: The Charleston Rhythm first originated with the Charleston dance popularized in the 1920s and consists of a dotted quarter note followed by an eighth note.
Ex. 3a depicts the basic version of the pattern, with a dotted quarter note on beat 1 and an eighth note falling on the “and” of beat 2 (“1 and 2 and 3 and 4 and”), followed by a rest on beats 3 and 4.
Ex. 3b is a variation on the Charleston rhythm, in which the pattern is displaced a half a beat forward, with the dotted quarter note now falling on the “and” of beat 1 and the eighth note falling squarely on beat 3.
Ex. 3c alternates between both of these rhythms to create more variation, interest and motion through the chord progression.
Clave: Common to each of the many varieties of Latin and Afro-Cuban jazz, the clave is a rhythmic pattern of eighth notes based around five accented hits, alternating on and off the beat and spread out over either one or two measures, or bars.
While there are a number of approaches to the clave, the most common is the son clave, which consists of one bar with three accents, followed by another bar with two accents. These rhythmic groupings can be arranged as “3-2” or “2-3.” When spread across two bars, the three hits come in on beat 1, the “and” of beat 2, and on beat 4 in the first bar, followed in the next bar by two hits, on beats 2 and 3.
This is demonstrated in Ex. 4a, with the 3-2 son clave, and Ex. 4b shows the popular 2-3 variation. If this rhythmic motif sounds familiar, it’s because the 3-2 son clave is also known as the “Bo Diddley beat,” one of the most iconic rhythms in rock and pop music.
Once you have these rhythms down, try combining them. The key is to complement the song and the melody instrument and not overplay.
Choosing Chord Voicings
The harmonic language of jazz primarily involves the use of seventh chords, which are four-note entities consisting of a root, 3rd, 5th and 7th. In addition to these chord tones you can use chord tensions to add to the harmonic density and “bite” of a chord.
These tensions, which are 9ths, 11ths and 13ths, can be found an octave above the 2nd, 4th and 6th scale degrees above the chord’s root, or “1.” The way in which you arrange the notes of a given chord on the fretboard is known as a voicing.
There are a number of factors that go into deciding what kind of voicing to use, such as the specific sub-style of jazz you’re playing, the instrumentation of the ensemble in which you’re playing, and the approach taken by the soloist.
Here is a rundown of the different types of chord voicings:
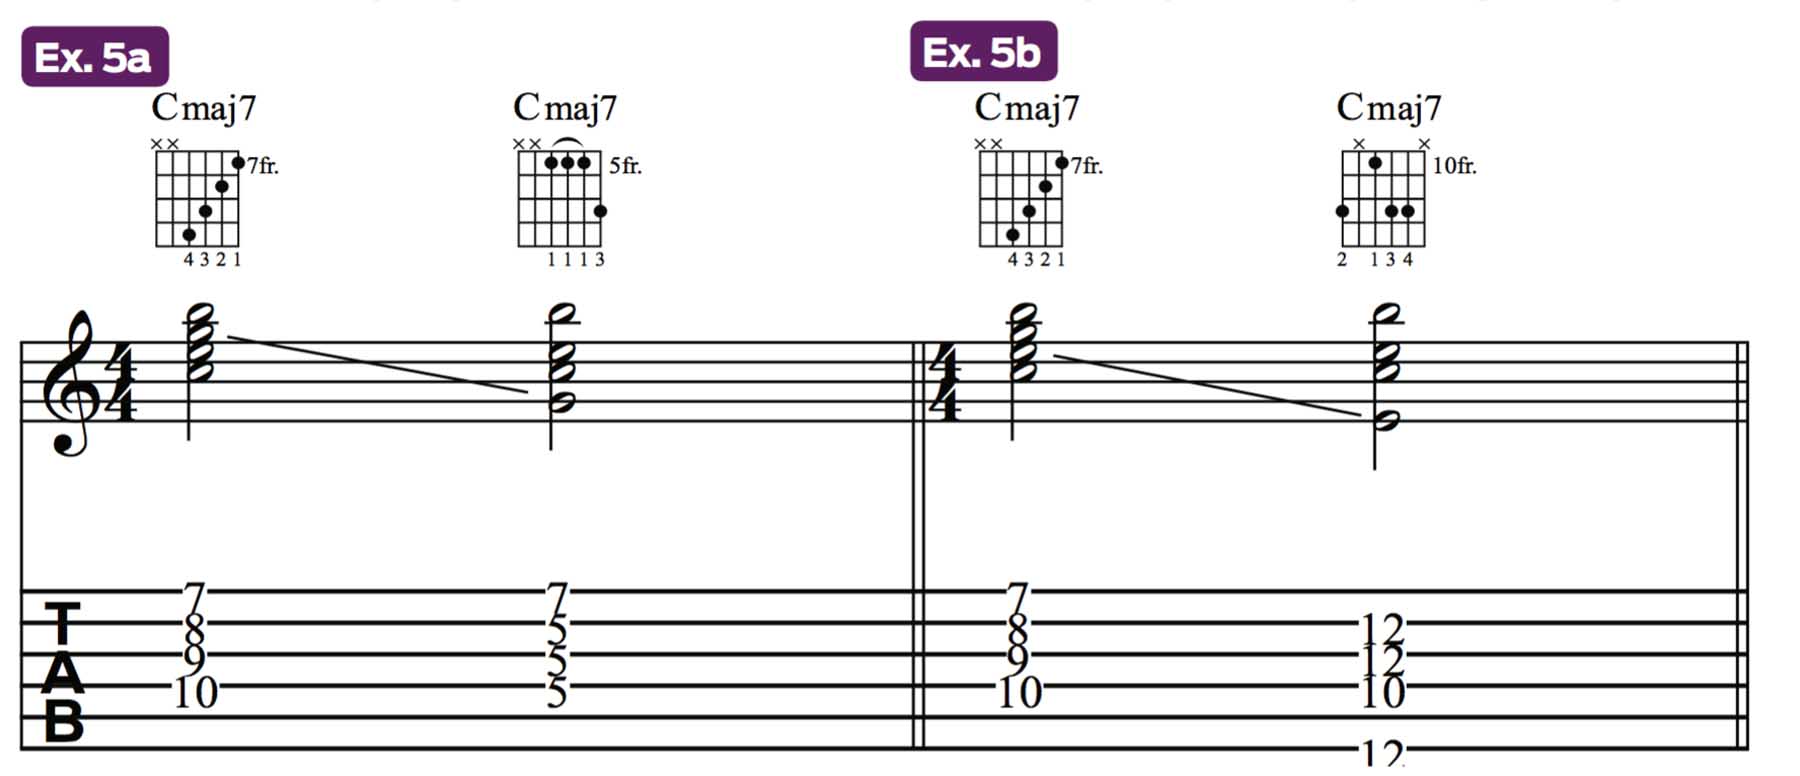
The most common seventh-chord voicings for guitar are what are called “drop 2” and “drop 3.” These voicings are formed by taking a seventh chord voiced in “stacked thirds,” such as a root-position Cmaj7 (C, E, G, B), and “dropping” the second or third note from the top down an octave.
Dropping the second note from the top, in this case, G, which is the 5th of Cmaj7, gives us a second-inversion (5th on the bottom) drop-2 voicing G, C, E, B, as shown in Ex. 5a.
If we were to instead drop the third note from the top, E, the 3rd of the chord, we get the drop-3 voicing E, C, G, B, illustrated in Ex. 5b.
These drop-2 and drop-3 voicings, with their incorporation of wider intervals (4ths, 5ths and 6ths) are the foundation of most guitarists’ understanding of seventh chords.
Due to the way the guitar is tuned, they lay on the fretboard better and are more easily fingered than stacked-3rds voicings, what are called “close-position” voicings, which are more ideally suited for a piano keyboard. And with more space between the notes, these open drop-2 and drop-3 voicings let you hear and appreciate the individual chord tones more easily.
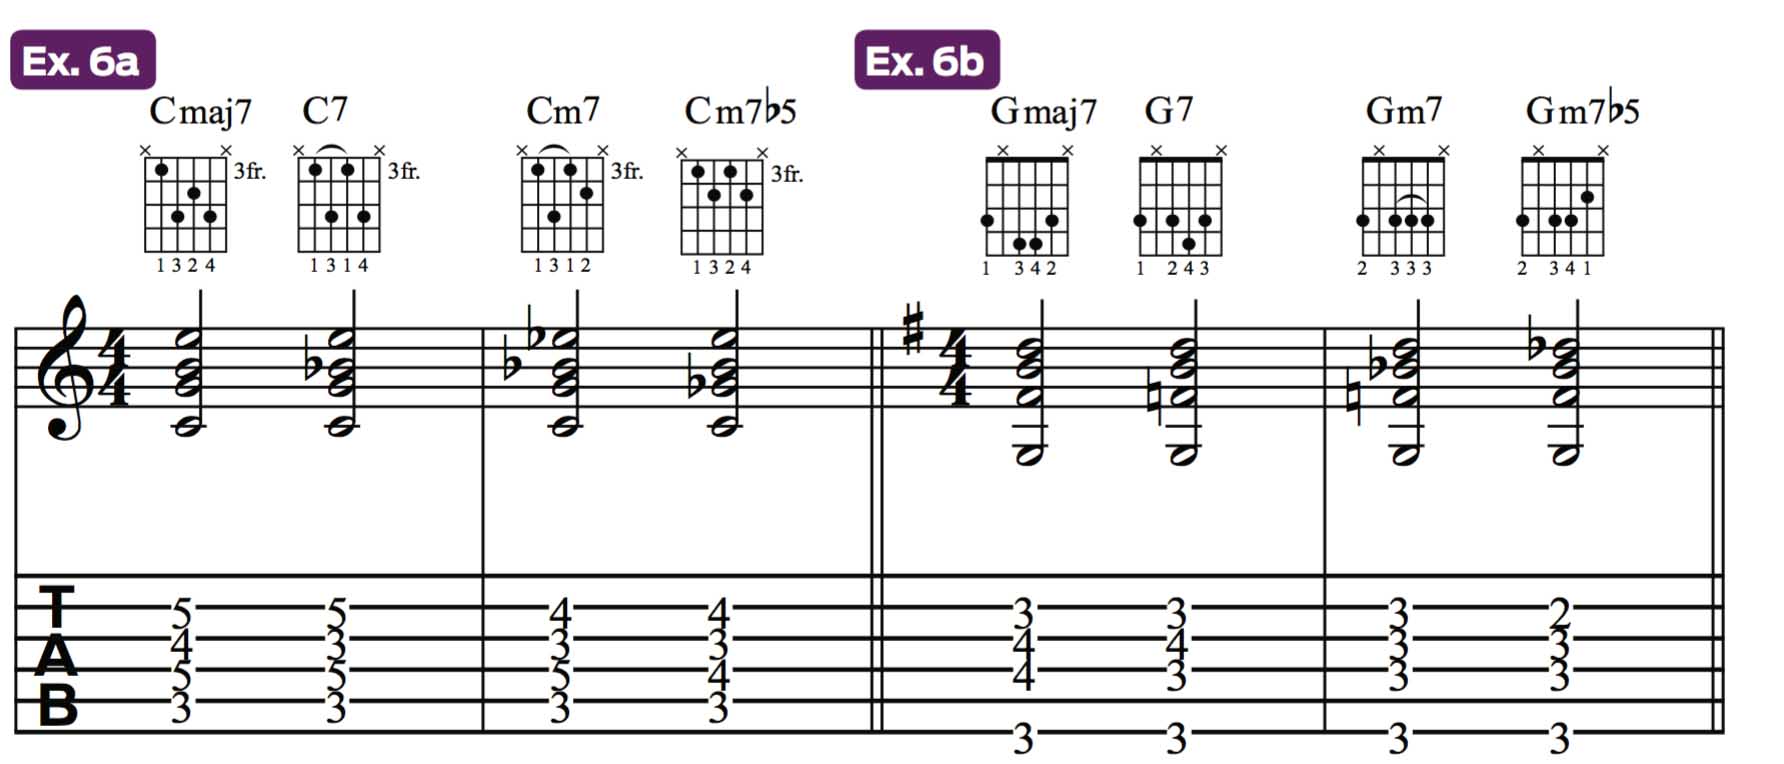
Using a common C root note on the 5th string for the sake of comparison, Ex. 6a shows the four different seventh chord qualities found within the major scale – major 7, dominant 7, minor 7, minor 7b5 – laid out as root-position drop-2 voicings (low to high: root - 5th - 7th - 3rd).
Using a G root note on the 6th string in the same position, Ex. 6b depicts root-position drop-3 voicings (voiced, low to high, root - 7th - 3rd - 5th). These are the most commonly used guitar voicings for these chords, and they serve as the most fundamental voicings to use for jazz comping.
Ambitious players will often expand on these voicings by using tensions or inversions. Inversions are voicings that rearrange the tones of a chord, moving the root so that it is no longer the lowest tone.
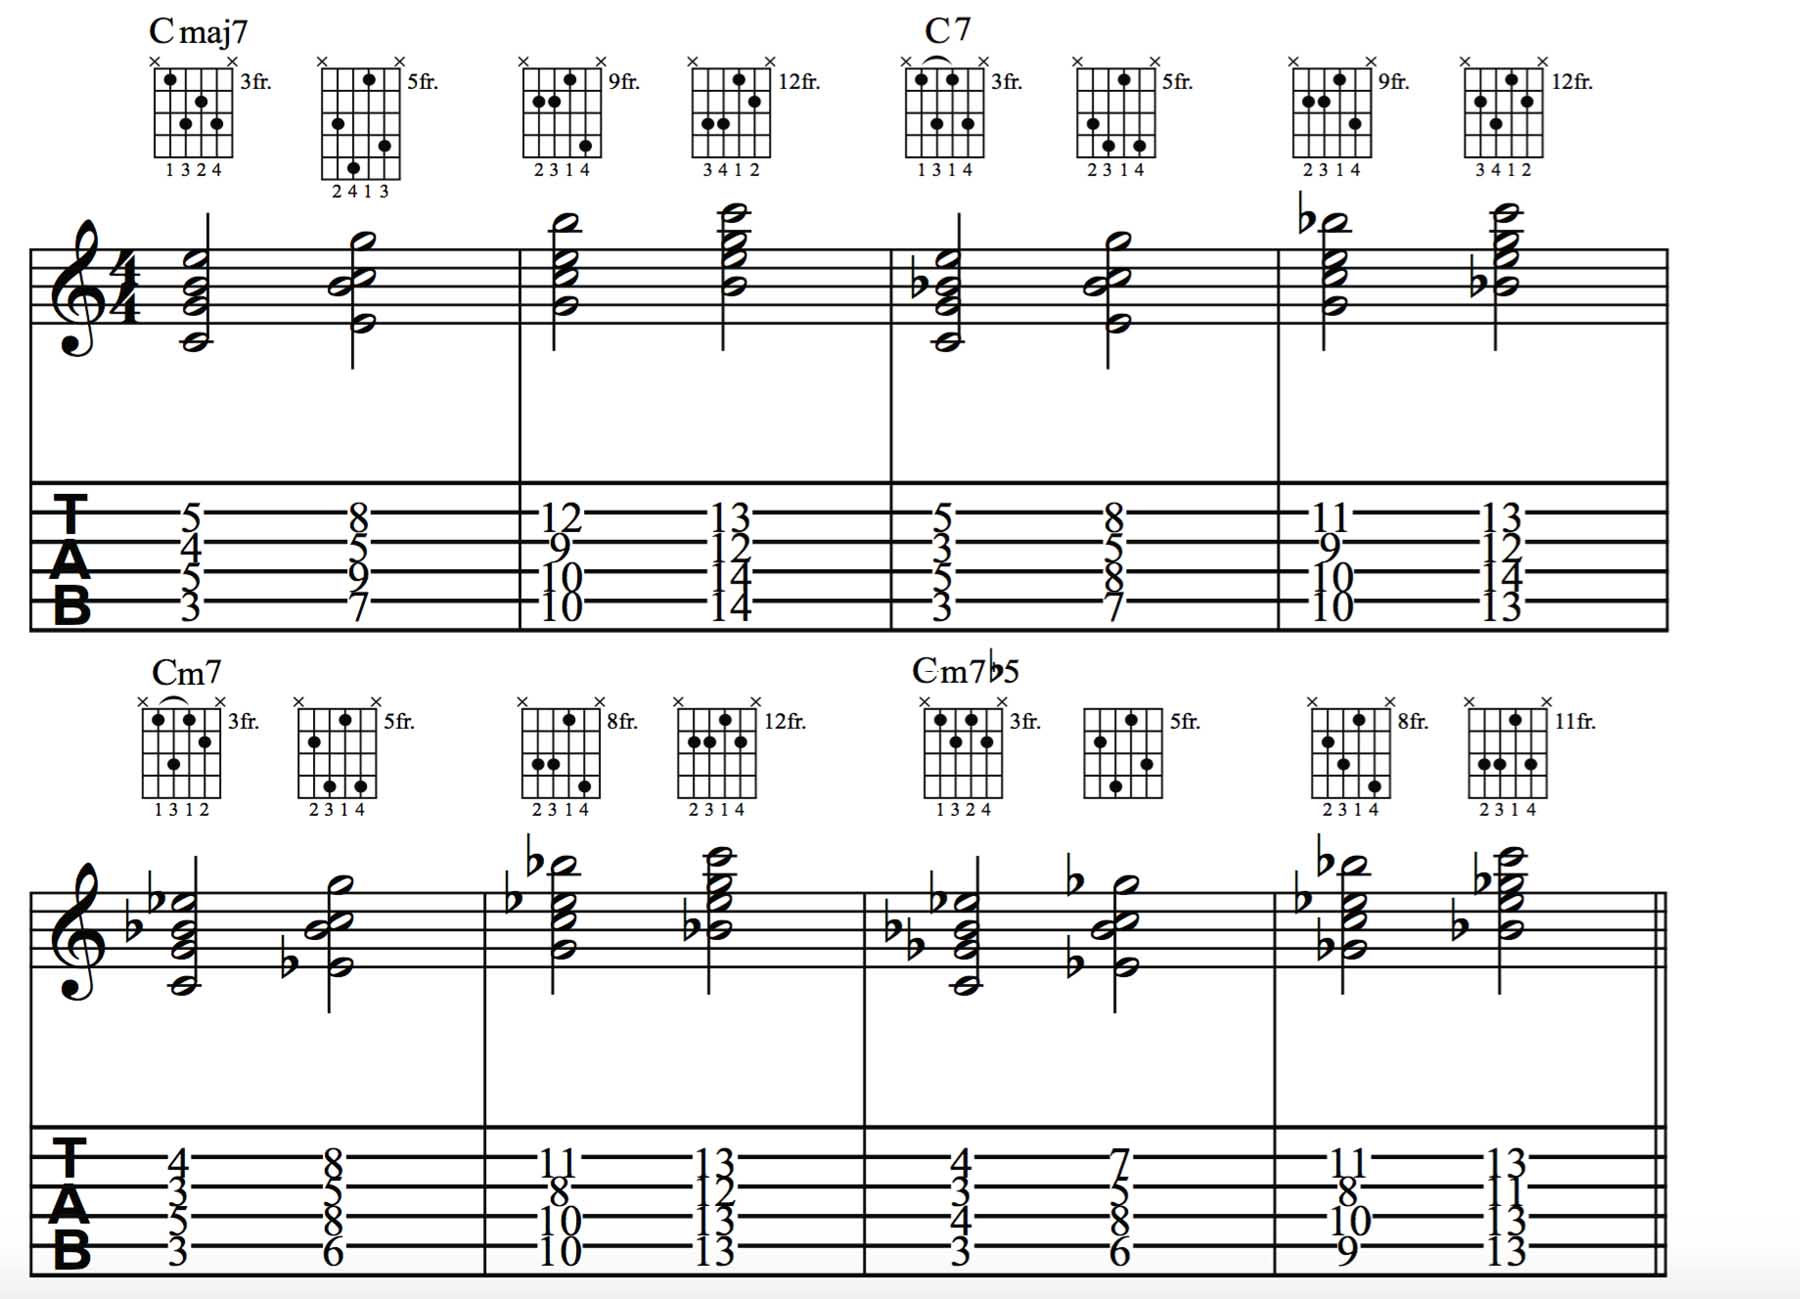
Ex. 7a expands on the drop-2 voicings from Ex. 6a by presenting the four seventh-chord qualities (major 7, dominant 7, minor 7 and minor 7b5) in each of their inversions, moving up the fretboard on the same group of strings.
We start with the root-position voicing of each chord, and from there each voice will move up the same string to the next available chord tone, proceeding to first inversion (voiced, low to high: 3rd - 7th - root - 5th), second inversion (5th - root - 3rd - 7th) and finally third inversion (7th - 3rd - 5th - root).
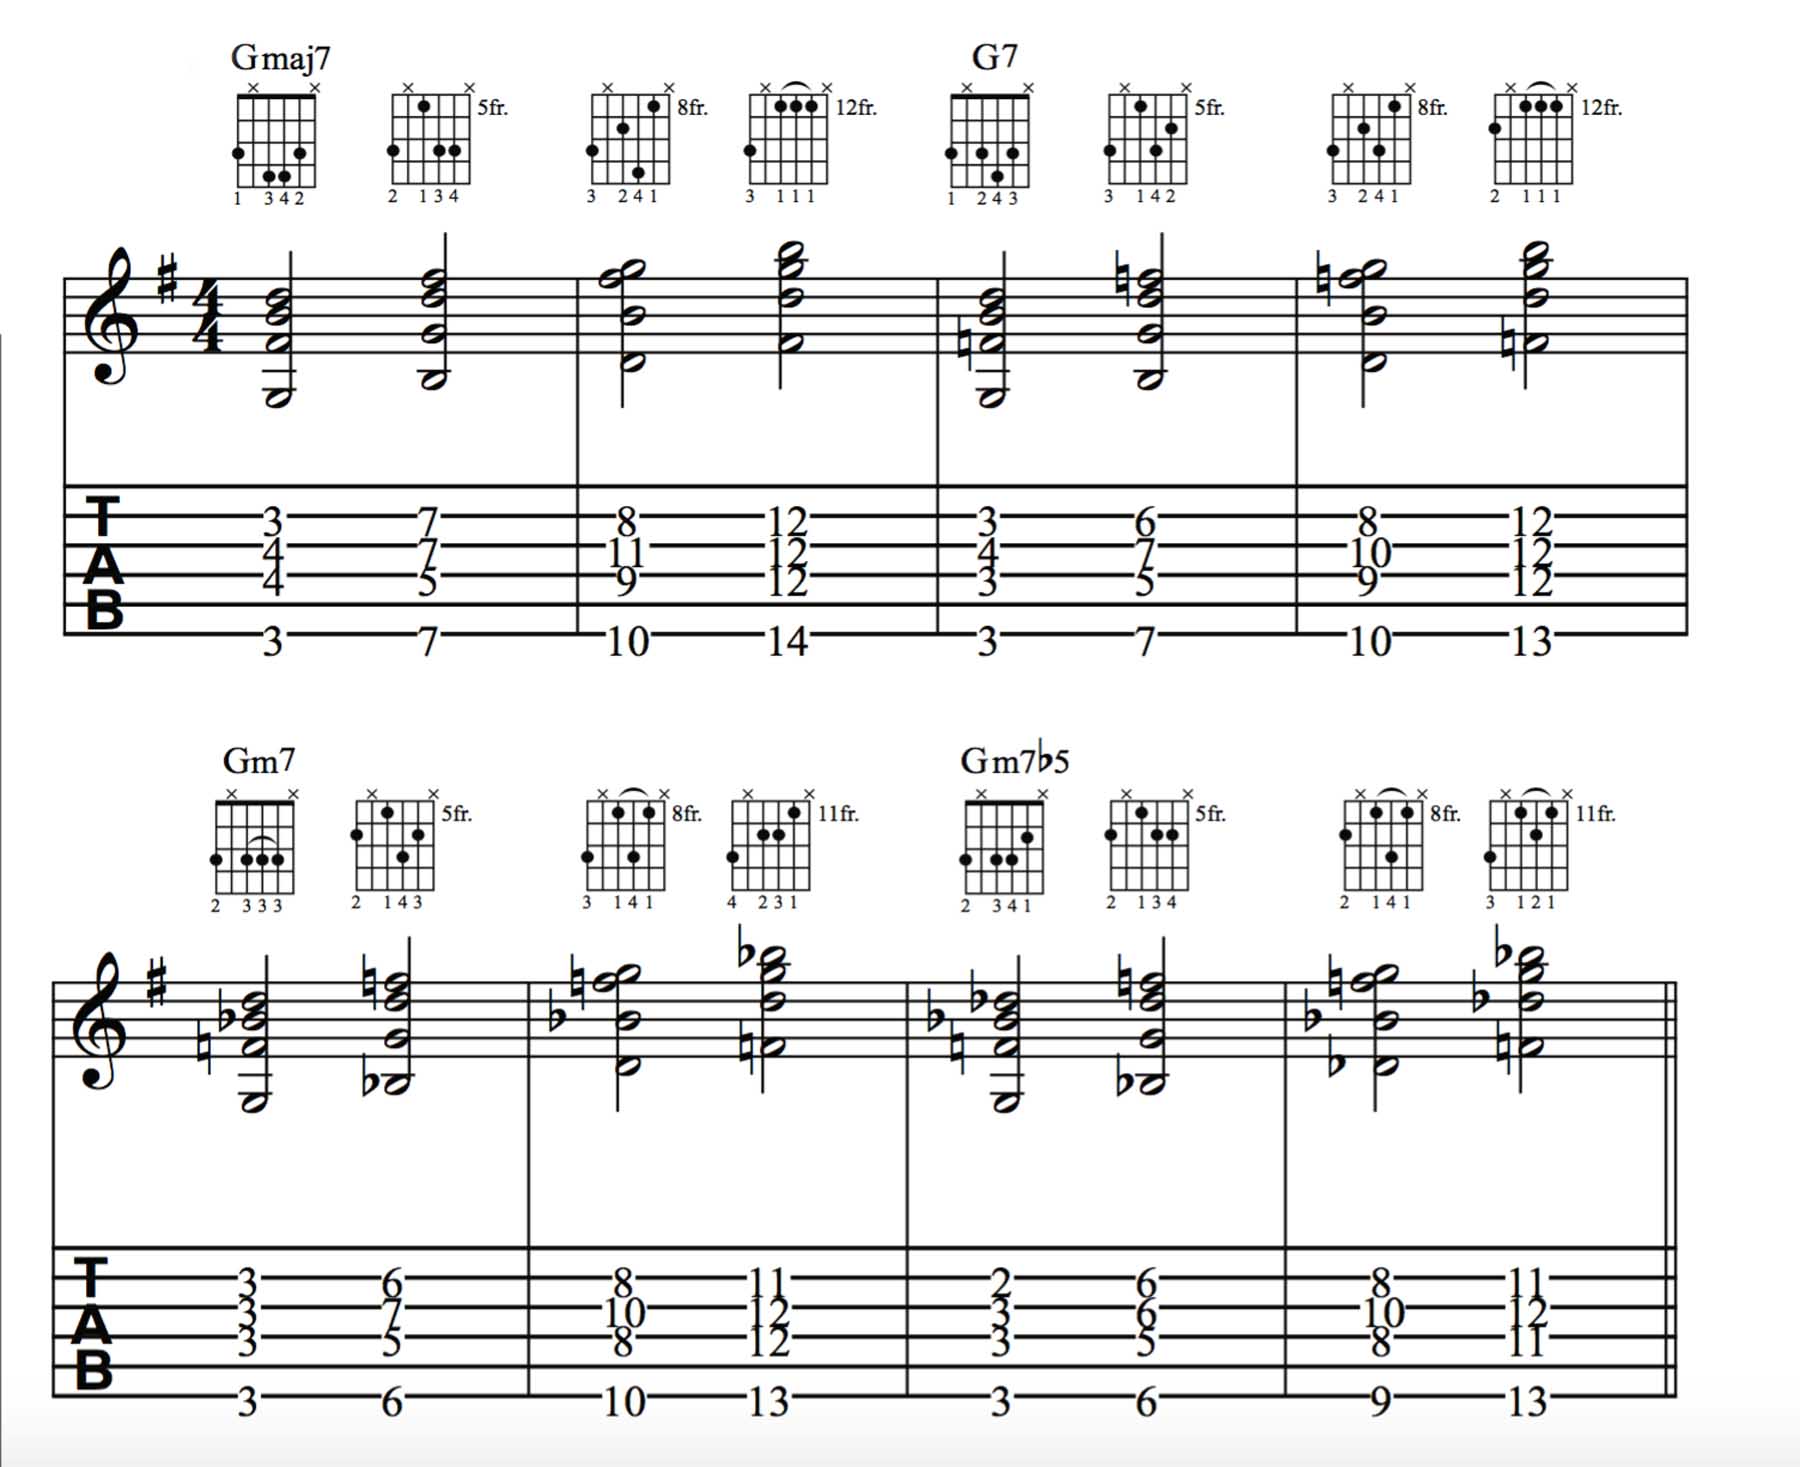
Ex. 7b takes this same idea and applies it to the drop-3 voicings from Ex. 6b, starting from a G root on the 6th string.
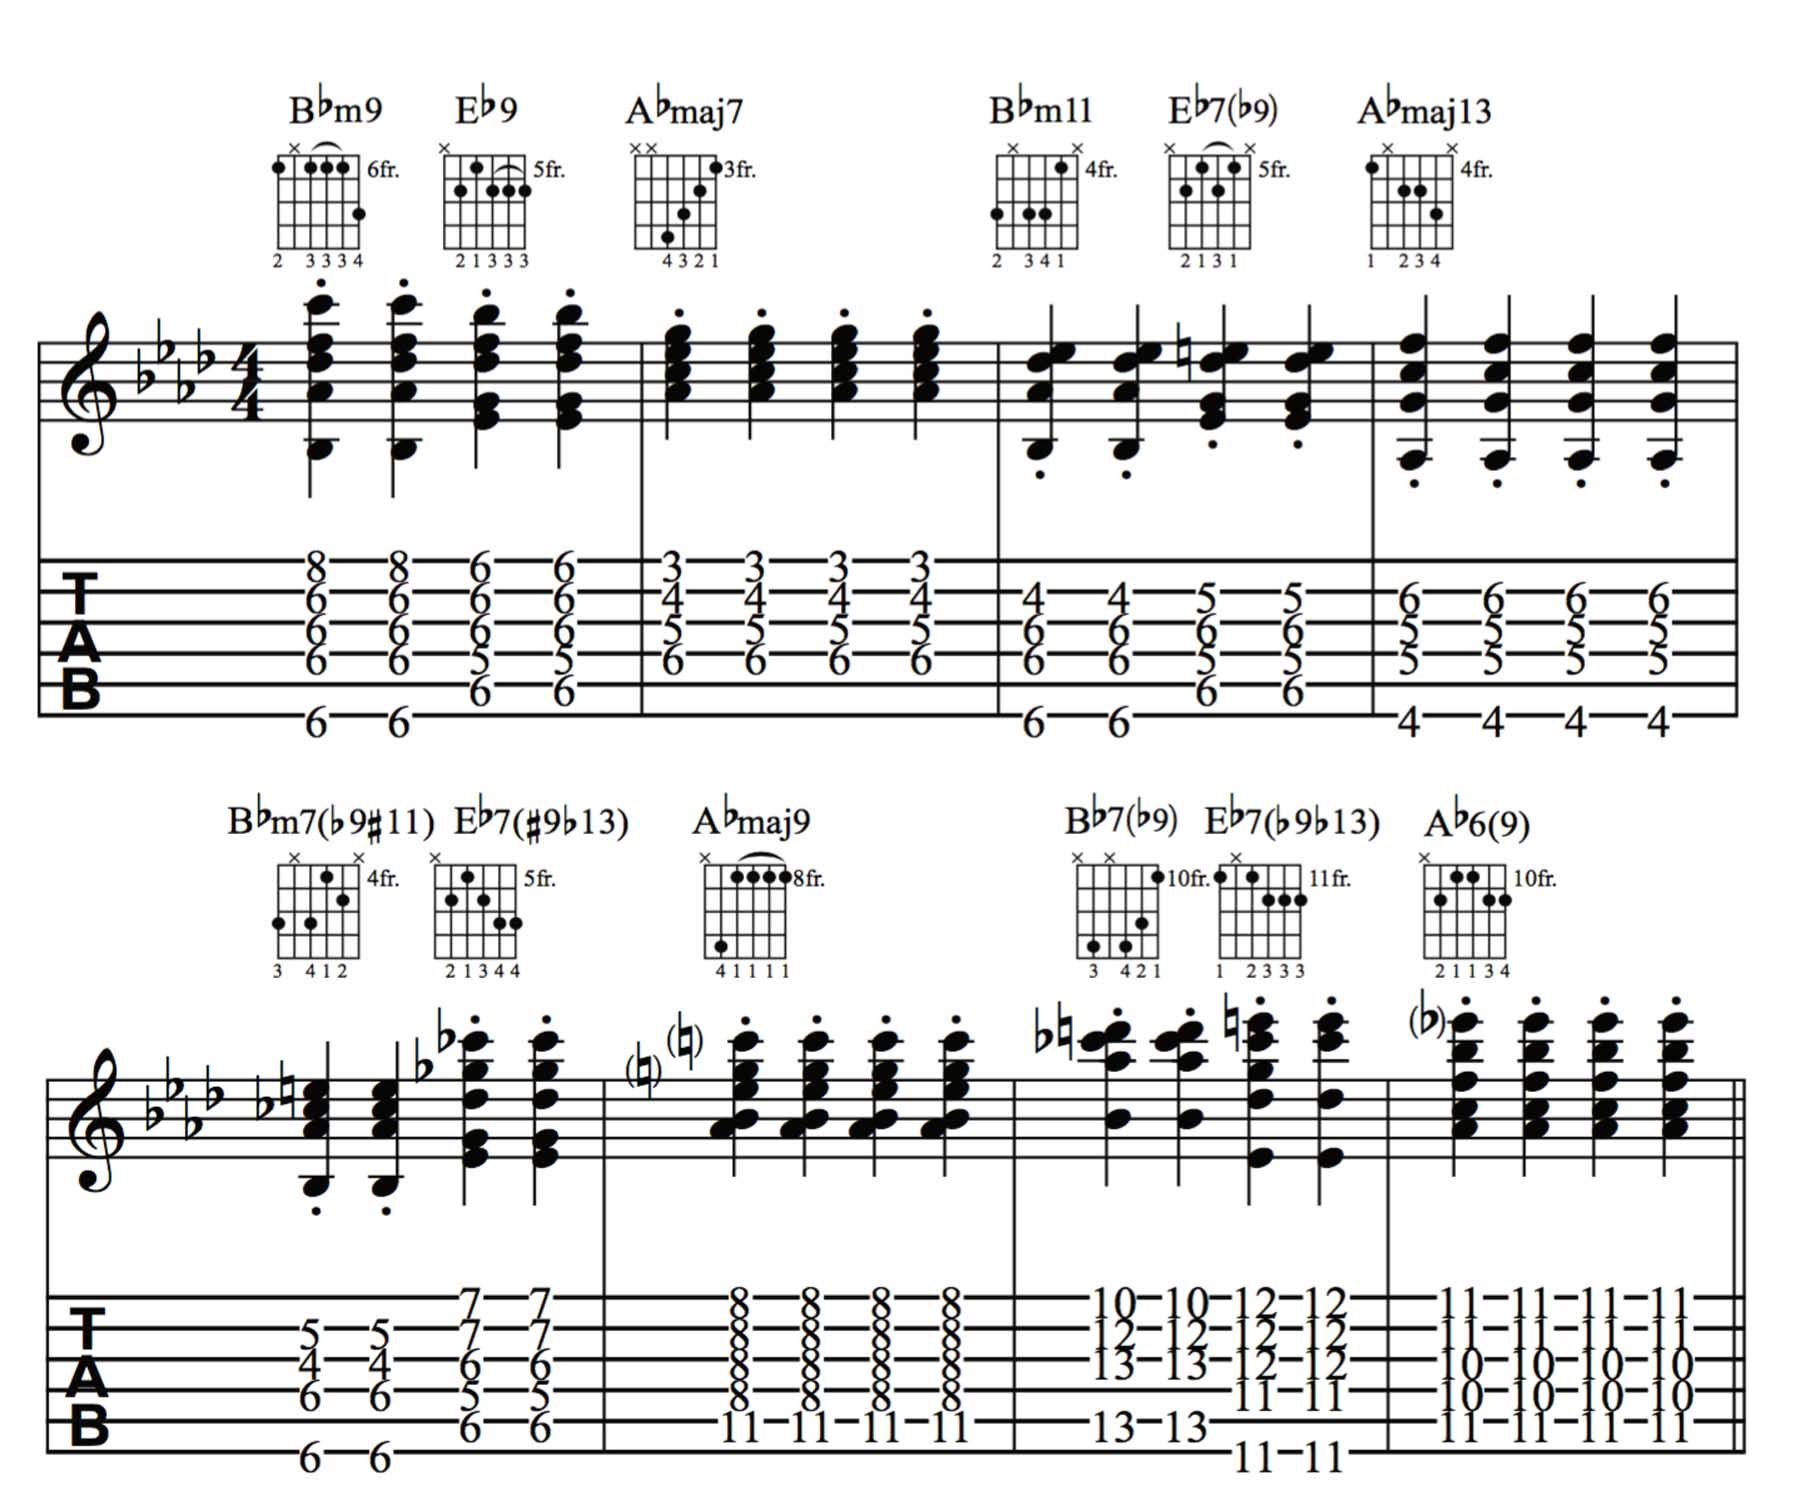
Ex. 8 demonstrates how chord tensions may be used to add color to a ii - V - I progression in the key of Ab (Bbm7 - Eb7 - Abmaj7). As you move through the exercise you’ll notice that the choice of tensions become increasingly more complex.
At the start, tensions are purely diatonic to the key of Ab (Ab major scale: Ab, Bb, C, Db, Eb, F, G, Ab), but gradually, the tensions chosen are nondiatonic, or outside of the key. The further you venture out of the key, the more tonally complex your voicings become, so take care when choosing your tensions. More on that later.
One special consideration to take when choosing your voicing is how much of the chord to use. It is often unnecessary to use all of the tones of a chord when comping. If you’re playing with a bassist, for example, they'll typically play the roots of the chords, so you may opt to play rootless voicings.
If you’re playing with a pianist or organ player, more expansive and dense voicings will likely clash with what they are doing, so it’s likely best to only play the essential tones of each chord. The million dollar question is “What is essential?” When whittling down your voicings, the first notes to remove are the root, then the 5th, unless it’s flatted or sharped, leaving the 3rd and the 7th.
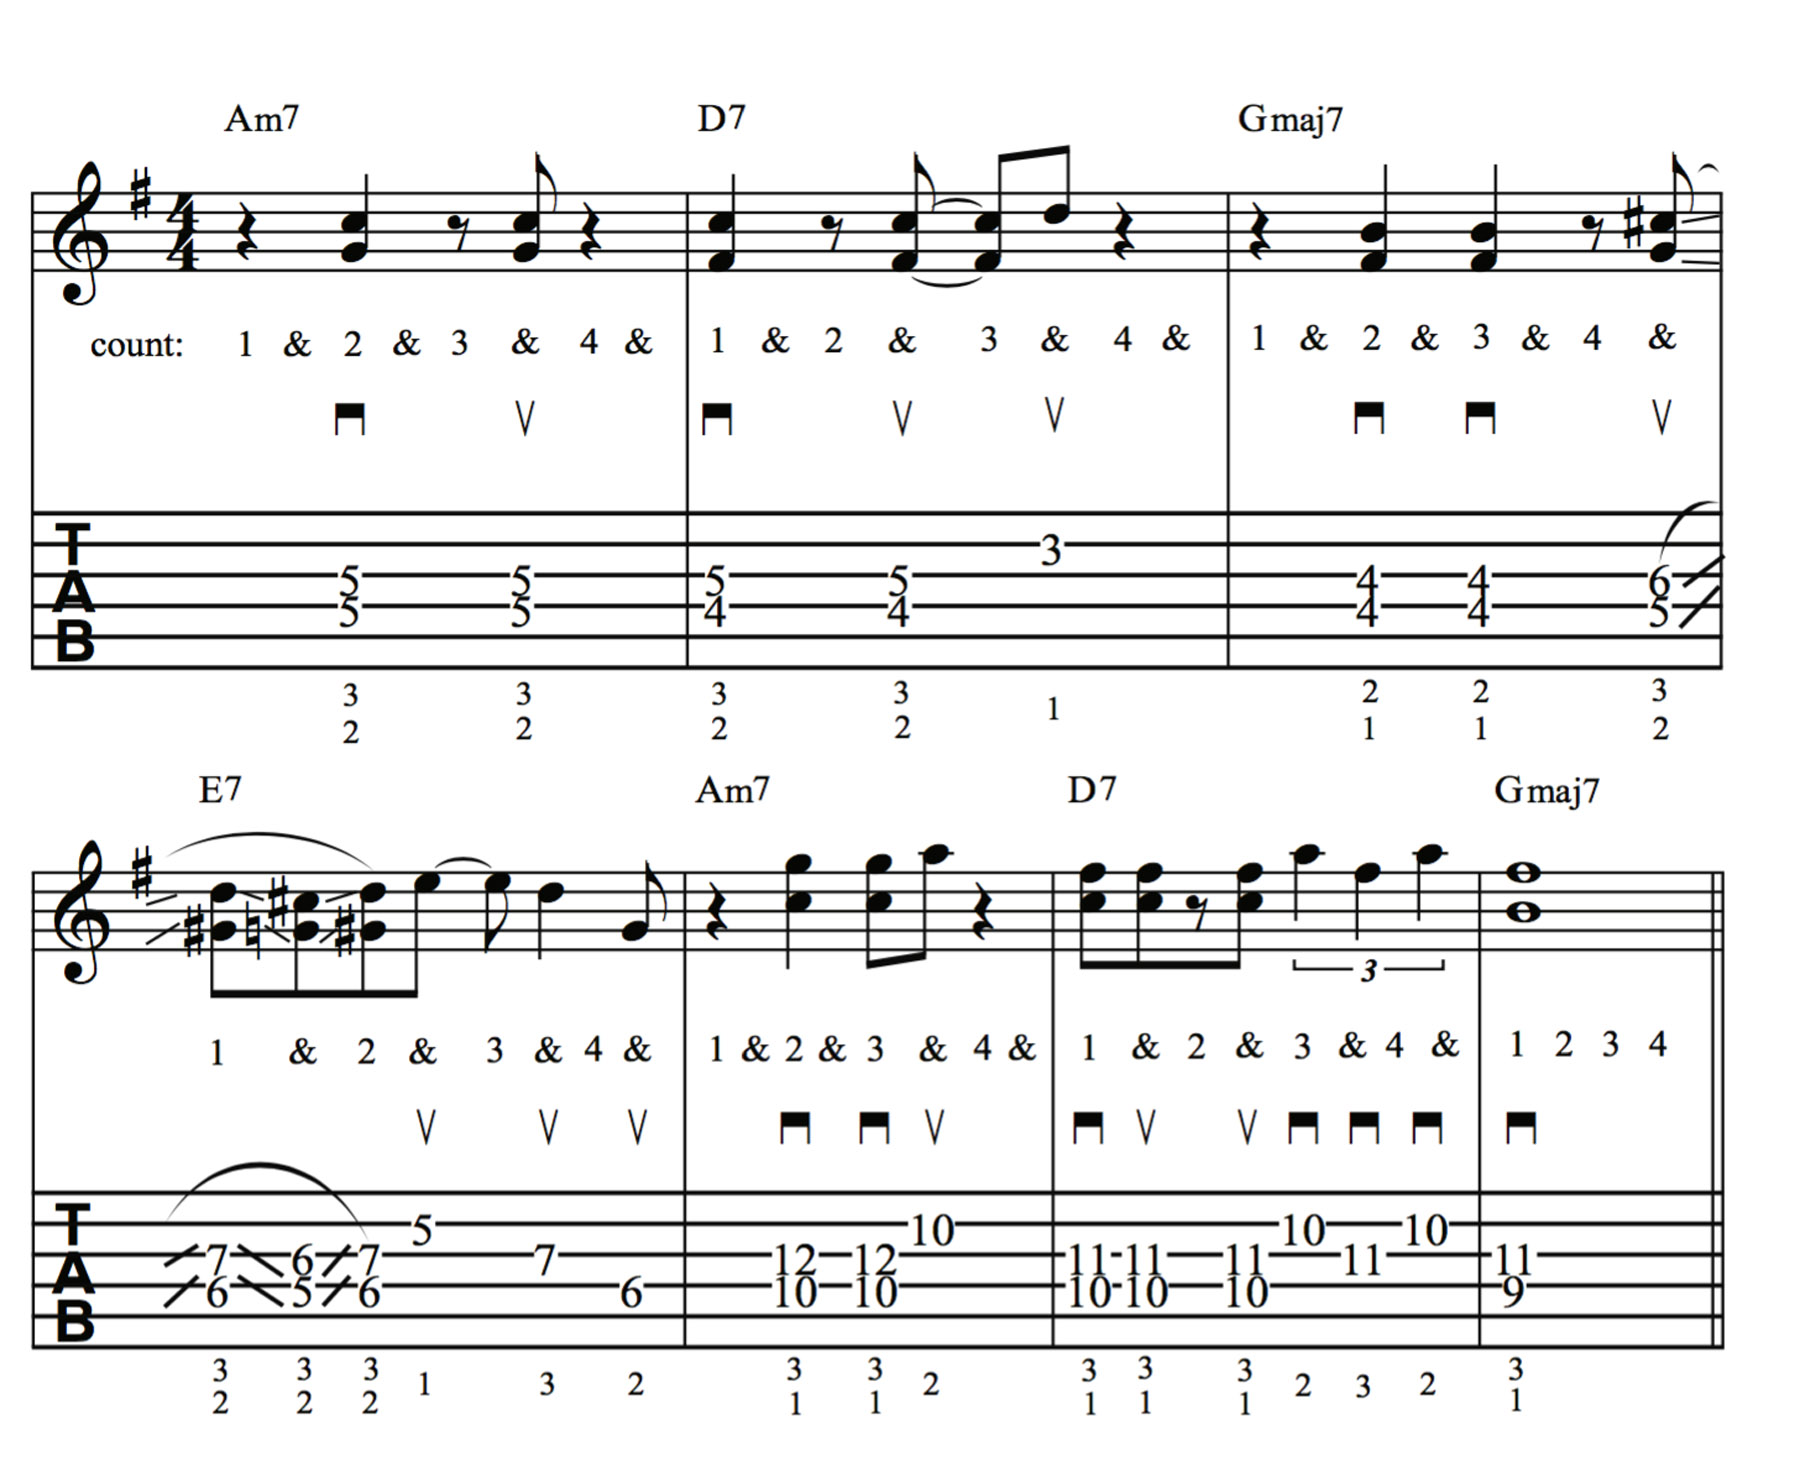
These tones are known as guide tones, and they do the most to convey the tonal quality of any chord. Ex. 9a is a ii - V - I - VI progression in the key of G (Am7 - D7 - Gmaj7 - E7) shown as an embellished guide-tone line. Note how the progression moves in a predominantly stepwise manner.
The benefit of using a guide-tone line when comping is that it highlights the harmonic movement of a progression in the simplest, most straightforward possible manner while leaving ample sonic space for other musicians to fill.
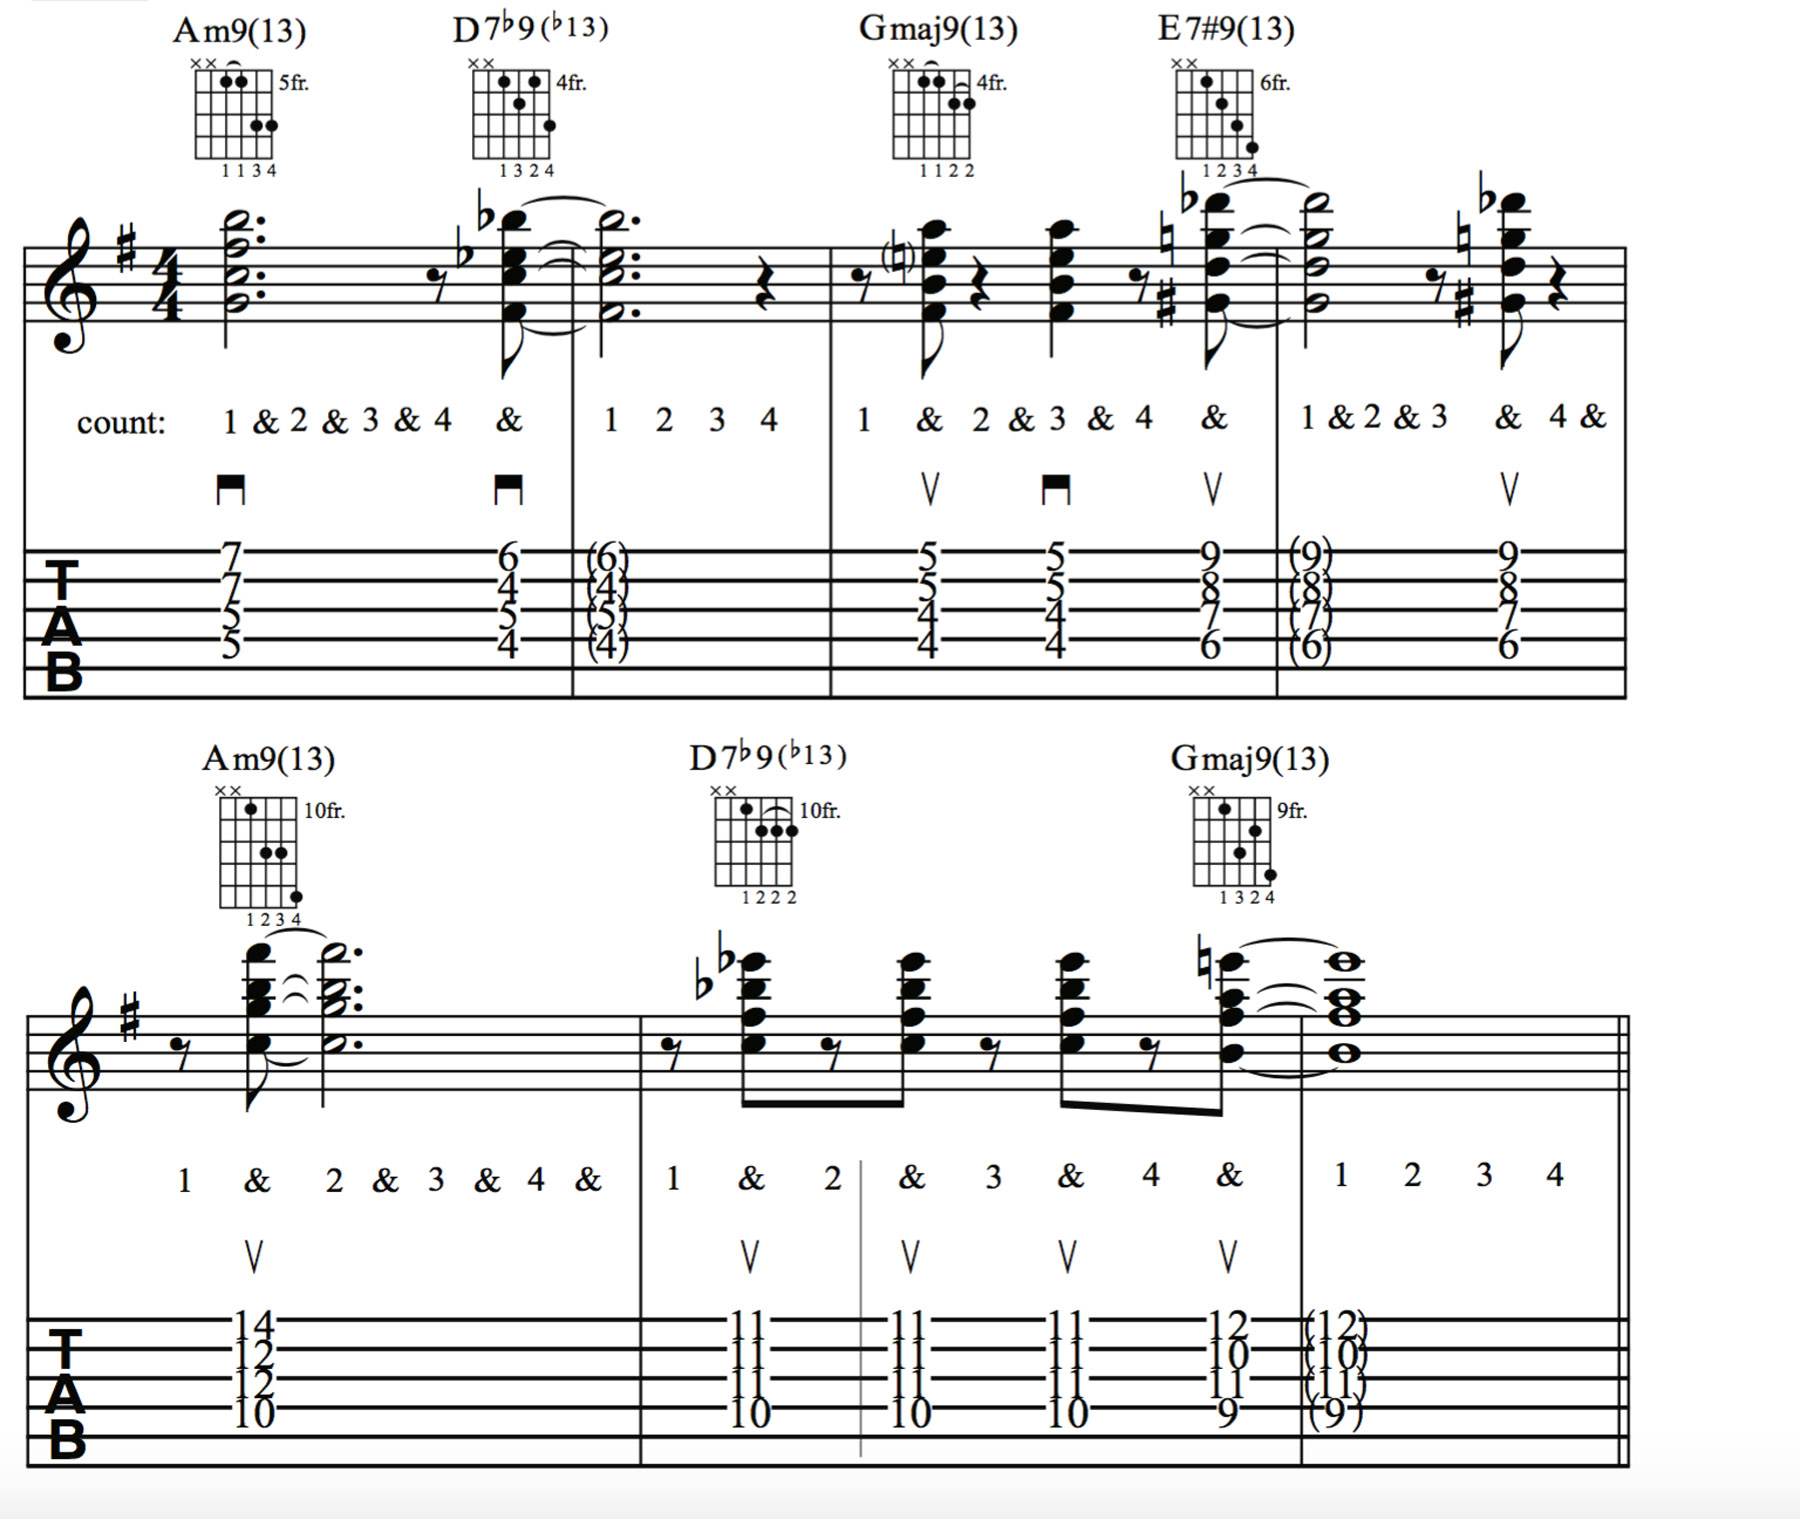
Modern jazz guitarists, however, will often add tensions to guide tones to keep their voicings compact without sacrificing tonal color or complexity. Ex. 9b takes the same progression and gives it a little extra tonal spice by adding tensions to each voicing.
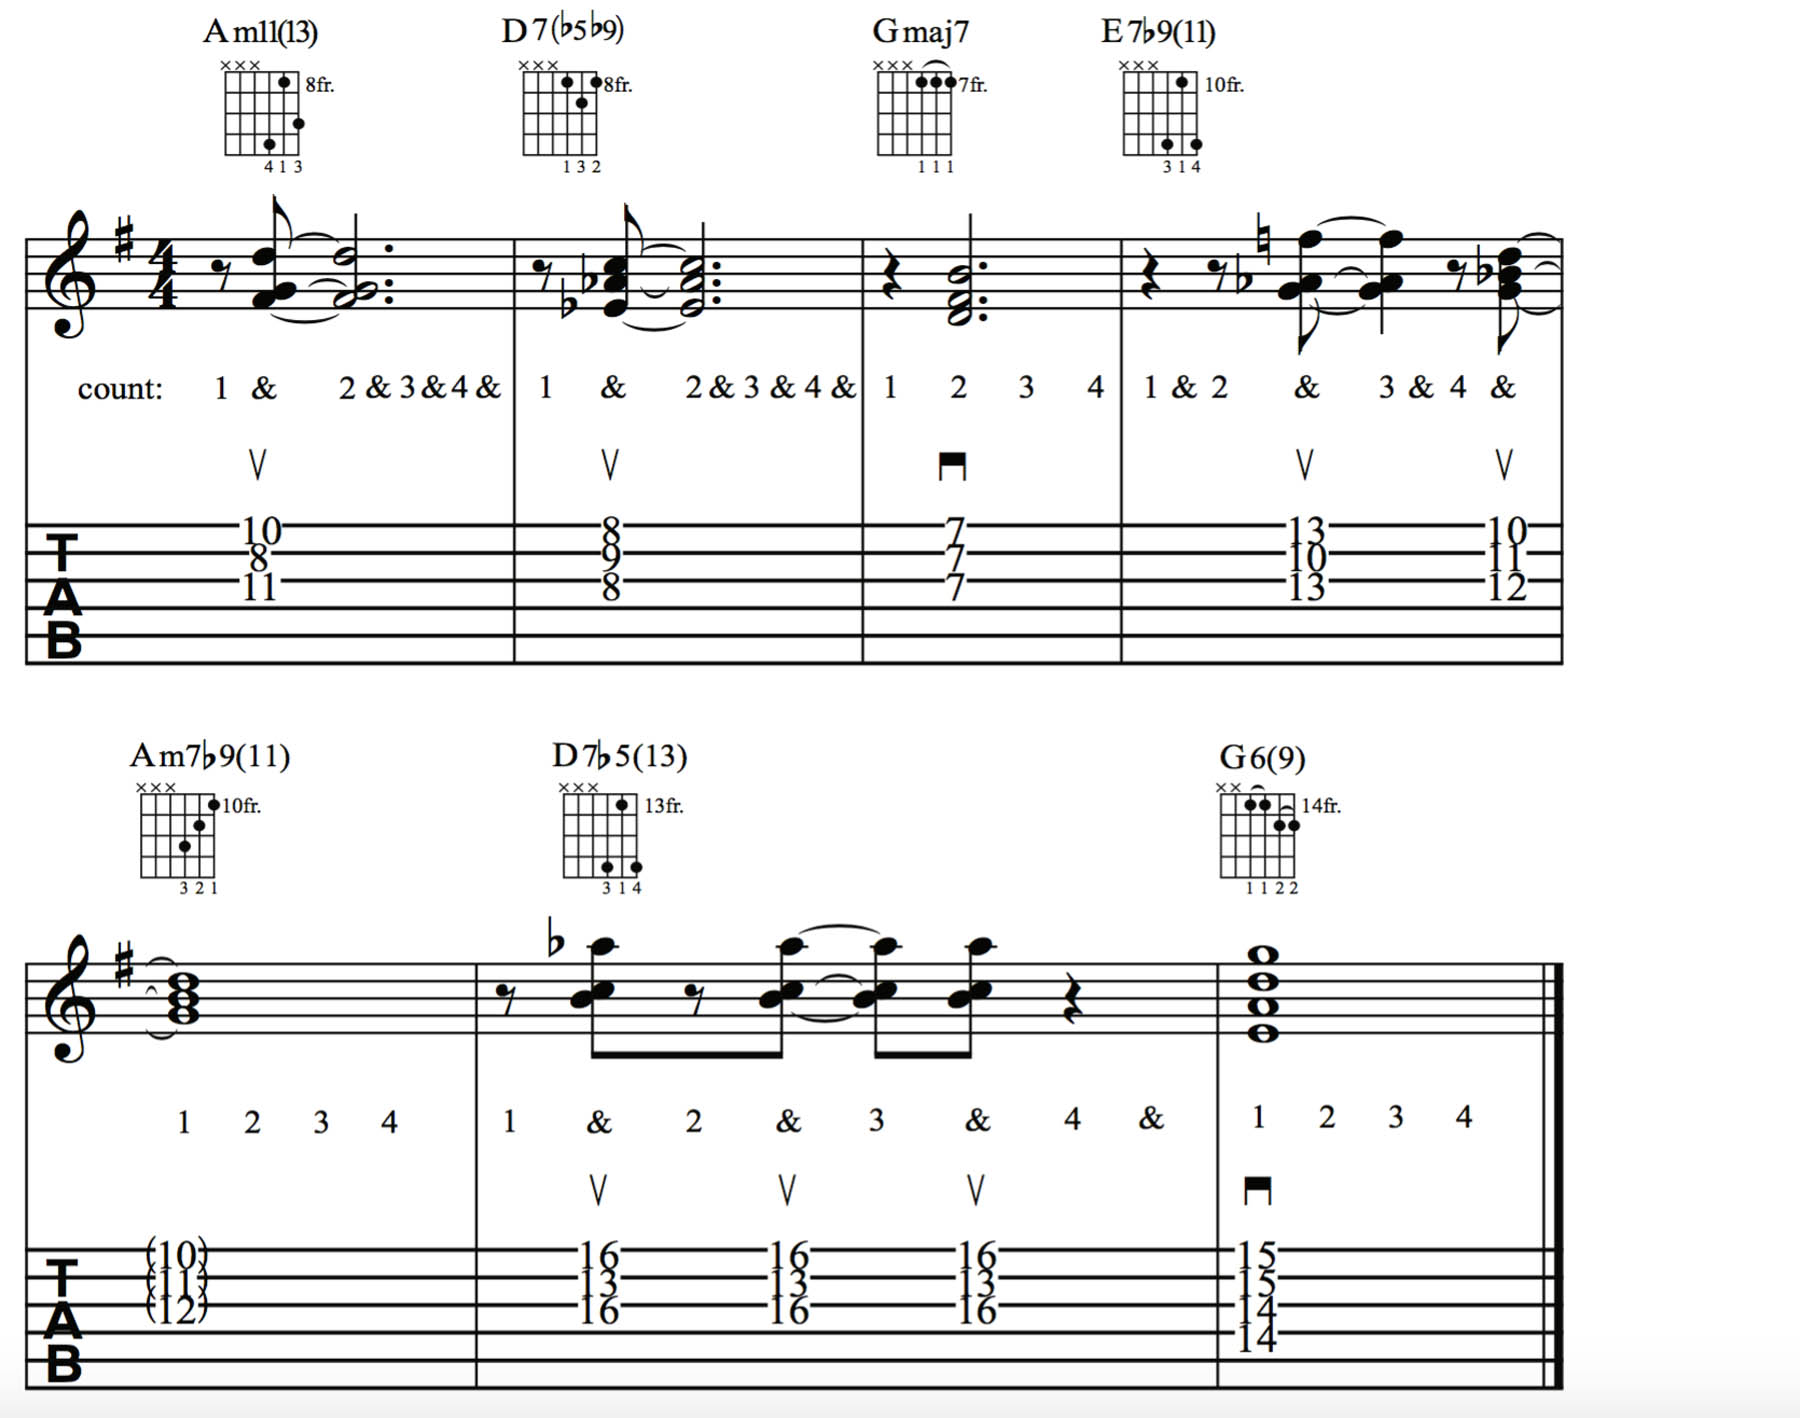
Truly adventurous compers may eschew primary chord tones almost entirely and opt for small, tension-heavy voicings. Ex. 9c focuses on voicings centered around variations of 9ths, 11ths and 13ths of each chord, clustering them together with chord tones for maximum harmonic dissonance.
This approach will sound very “out there” on its own, but paired with the proper harmonic support it can sound extraordinarily dramatic and musical, so try it once you are fully comfortable with comping and have the tonal space in the music to stretch out.
Other Considerations
So how do you know which approaches to apply? It all depends on the specific circumstances you find yourself playing in. A few factors that affect your comping approach include:
• The style of jazz. For big-band swing play fuller voicings, like drop-2s and 3s, Freddie Green Style. For Latin or Afro-Cuban jazz, try syncopated rhythms like the clave. And for any sort of post-bop, modern jazz, it truly depends on the dynamic of the group you’re playing with.
• Your band’s instrumentation and dynamic. This is one of the most crucial, yet most overlooked factors governing one’s approach to comping. The basic rule of thumb is that the more accompaniment instruments there are in the band – piano, organ, bass, drums, etc. – the less you need to play.
This can inform your choice of voicings and/or rhythmic phrasing. If, for example, you’re jamming with a piano player who plays flowing Bill Evans-style polychords, the ideal approach would be smaller, higher-pitched voicings played sparsely, so as to leave room for the massive piano chords.
If, however, the pianist is playing sparsely, with smaller voicings and short choppy rhythms, you can play more densely voiced chords in a more consistent rhythm.
• The melody and the soloist. This is the most important consideration - the factor that determines everything. The melody, or the choices made by the soloist, dictates the kinds of voicings you can use, what tensions are available to you and your rhythmic options.
In essence, you are playing an interactive game of “follow the soloist.” If they start playing a recurring rhythmic motif, latch onto it. If they’re playing breathlessly fast bebop passages replete with tensions galore; make sure you leave space in the rhythm for them, either utilizing long-held chords or lots of extended rests, but go nuts when it comes to your voicings! If you’re playing a ballad with a flowing, melancholy melody; it’s best to match it with long, flowing chords and, if you like, to use any tensions that the melody indicates.
The key is to suit your playing to the feel of the song and the players around you. This lesson only begins to scratch the surface of all the possibilities, but now you have the know-how to work out your own comping ideas and venture into any jazz session with confidence.
Performance Tips
1. All examples in this lesson may be played with a swing-eighths feel (usually referred to simply as a swing feel). Swing-eighths is based on an undercurrent of eighth-note triplets, as you would have in 12/8 meter, with the first eighth note of each beat held for what would be the first two eighth notes of an eighth-note triplet and the second eighth note (on the upbeat) played on what would be the third note of the triplet.
This results in a lopsided-sounding “long-short” rhythm for each pair of eighth notes. (Recall the shuffle feel heard in “Pride and Joy” by Stevie Ray Vaughan and the blues standard “Sweet Home Chicago.”) Alternatively, you could play any of the examples with what’s called an even eighths, or straight eighths, feel, which would work beautifully with a Latin groove, such as the bossa nova beat, which is quite common in jazz.
All examples in this lesson may be played with a swing-eighths feel
2. You’ll notice that we’ve included pick strokes in some of the examples, with the indication that any chord that falls on an eighth-note upbeat is to be strummed with an upstroke. To best feel the rhythm and the desired groove, you’ll want to keep your pick hand moving back and forth across the strings in a continuously alternating and unbroken down-up-down-up pattern, with no pausing, or “freezing,” during the rests.
This technique, often referred to as eighth-note pendulum strumming, keeps the hand in perpetual motion, with silent, “phantom” downstrokes and/or upstrokes used between strums (but not notated or heard) for the sake of keeping the hand moving back and forth across the strings in a flowing manner.
Another useful technique and alternative pick-hand approach is to not strum the strings at all, but rather pluck the notes of each chord simultaneously, using either hybrid picking (pick-and-fingers technique), or straight fingerpicking, which works best for five-note voicings. This plucking technique gives you a simultaneous, non-staggered note attack, akin to the way a piano player or organist would comp.
