Ever Feel Lost on Certain Parts of the Fingerboard? These Ten Invaluable Pointers Are Your Key to Unlocking It All
Don’t waste years struggling to remember every single note on the fingerboard – this awesome lesson will get you there fast
Ever feel a little out of touch or just plain lost on certain parts of the guitar fingerboard? You’re certainly not alone.
Consider this: A standard-tuned, 6-string guitar with a 22-fret ’board has a range just shy of four octaves and contains five middle Cs, while a full-size piano keyboard covers over seven octaves yet it has only one middle C. What’s up with that?!?
It’s simply the nature of the instrument. By design, the keyboard relegates any given pitch to a single key, while the guitar fingerboard offers anywhere from one to five different string and fret locations for the same note.
These multiple repetitions of the same pitch afford guitarists many options for where to play any given note, but they also cause considerable confusion for beginners or players who often feel lost above the 5th fret, particularly on the inside four strings.
Memorizing the address, (i.e., location) of each and every note on the fingerboard can take years, but there are ways to hasten the process. Wanna know how to find and maintain your bearings anywhere on the fretboard?
First, you’ve gotta...
1. Know Your Basics
Let’s begin by reviewing some rudimentary musical knowledge. The basic units of measurement in Western music are the half-step, or semitone, which translates on the guitar to a distance of one fret, and the whole-step, or whole tone, which covers two frets.
All the latest guitar news, interviews, lessons, reviews, deals and more, direct to your inbox!
The musical alphabet consists of seven natural notes: A, B, C, D, E, F and G. All of these adjacent notes are spaced a whole-step apart, with two exceptions, B-to-C and E-to-F, which are half-steps.
With all that in mind, it’s time to…
2. Map the Territory
Compare the guitar fingerboard to a piano keyboard, the birthplace of music theory, and you’ll find that while the keyboard separates natural notes and accidentals (sharps and flats – more on those in a minute) into tidy white and black keys that lie along a horizontal plane and repeat every octave, the guitar offers no such easy path to note recognition.
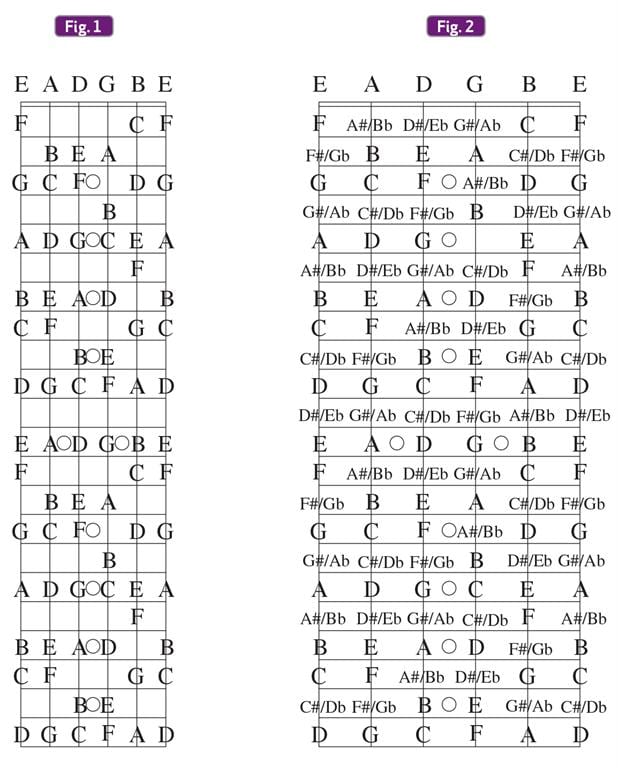
Many traditional beginner methods cover notes up to the 3rd or 5th fret, but above that, we are essentially left to our own devices. Placed on a full fingerboard grid, or matrix, the natural notes manifest as shown in FIGURE 1 (above).
Granted, that’s a lot of notes to memorize, but the first thing to remember is that unless you change tunings, every note’s address is permanent. They ain’t going nowhere.
Now, what about all those empty spaces?
3. Add Accidentals on Purpose
The remaining five tones within any octave (an increment of 12 half-steps) are annotated using accidentals, or sharp and flat symbols. A sharp (#) raises a note by one half-step, while a flat (b) lowers it a half-step.
Enharmonic notes occur when two different accidentals are used to indicate the same pitch, i.e., A#=Bb, C#=Db, D#=Eb, F#=Gb and G#=Ab. The grid illustrated in FIGURE 2 (above) fills in the holes in FIGURE 1 with all of the missing accidentals, completing the “big picture.”
Think of it as your universe. Now, let’s start breaking down this giant clusterfuck and find out what’s really going on here.
4. Repeat Yourself
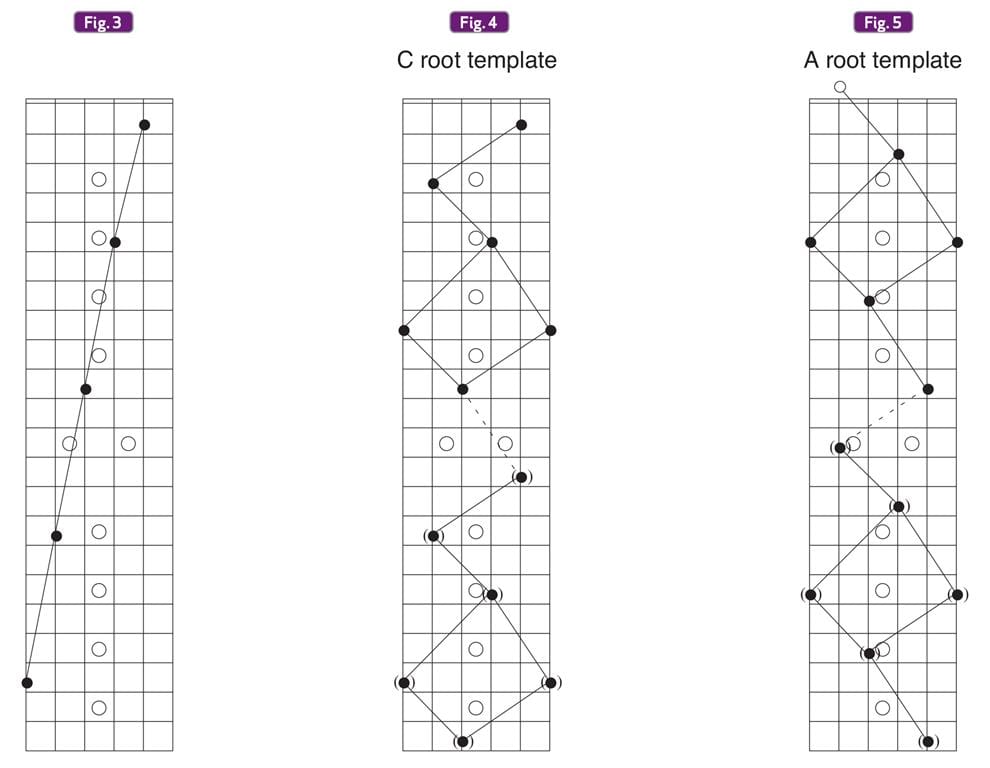
FIGURE 3 (above) diagrams the guitar’s five middle Cs on five different strings. (Fact: Standard guitar notation sounds an octave lower than written.) Notice how the notes on any pair of adjacent strings are equidistant (five frets apart) except between the second and third strings, where the distance is reduced by one fret.
Once you realize that this relationship is always maintained regardless of what note you start with, you can find unisons on higher or lower strings by using the same formula, except in the extreme low and high registers where notes only appear once.
(Lick of the Day: Pick any pitch that appears four times and play it sequentially on four adjacent strings. Repeat many times in either direction as quickly as possible.)
Next, we add some octaves and…
5. Enter the Matrix
Any given note can be found in various octaves at six locations between open position and the 12th fret. Because the fretboard repeats itself one octave higher starting at the 13th fret, so do any notes and shapes you apply to it.
In FIGURE 4 (above) we pinpoint on the matrix all Cs below the 12th fret, and connect them to form a six-point template that can be moved to any position on the fingerboard. Like a constellation, this “Big Dipper” maintains its shape as it floats around to different positions in the note matrix.
As the “dipper” moves towards the nut, any points in the shape that vanish below open position reappear an octave higher below the 12th fret. Conversely, any points that rise above the 12th fret reappear starting at the 1st fret.
Let’s get moving and…
6. Travel the Spaceways
See how the roots in FIGURE 5 (above) appear on the fifth and third strings? That’s because we’ve shifted the entire root template down one link and added the missing link one octave higher.
This maps out all six A’s between the open and twelfth positions and creates a visual variation in our “Big Dipper,” but all we’re really doing is starting the same template from a different reference point.
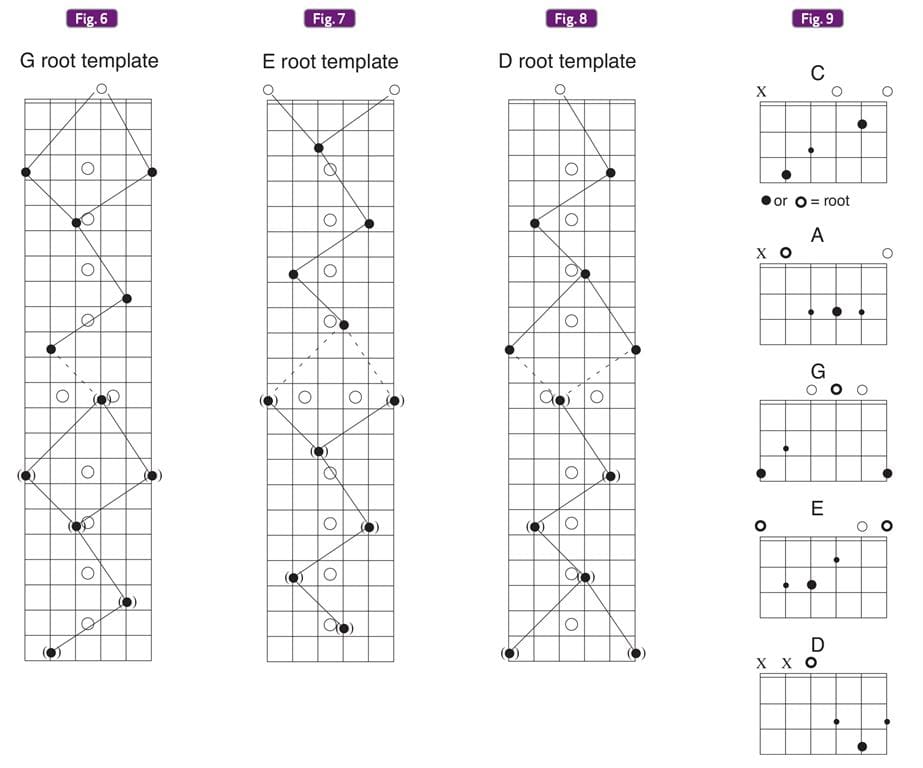
FIGURE 6 (below) bumps the template down another link to reveal six G’s, and FIGURES 7 and 8 (below) continue the process with E’s and D’s respectively, until we come full circle back to C.
Place the template anywhere on a 12-fret grid to immediately locate all six locations for any note, and then repeat it beginning 12 frets higher to cover the full range of the guitar.
Why use C, A, G, E and D as reference points? Glad you asked!
7. Rediscover Your Roots
Our “Big Dipper” also provides a moveable template of all root locations and connections for the five basic open-string, major chord shapes – C, A, G, E and D. (What’s that spell?)
These are determined and named by their lowest possible fretboard positions, and each shape utilizes a different configuration of root notes, as confirmed by the memory-refreshing chord grids in FIGURE 9 (above).
Always, and without exception, you’ll find the roots of these chord shapes located as follows:
- “C” shape = roots on fifth and second strings
- “A” shape = roots on fifth and third strings
- “G” shape = roots on sixth, third and first strings
- “E” shape = roots on sixth, fourth and first strings
- “D” shape = roots on fourth and second strings
(Did I mention always and without exception?) Line ’em all up on the grid, and…
8. Connect the Dots
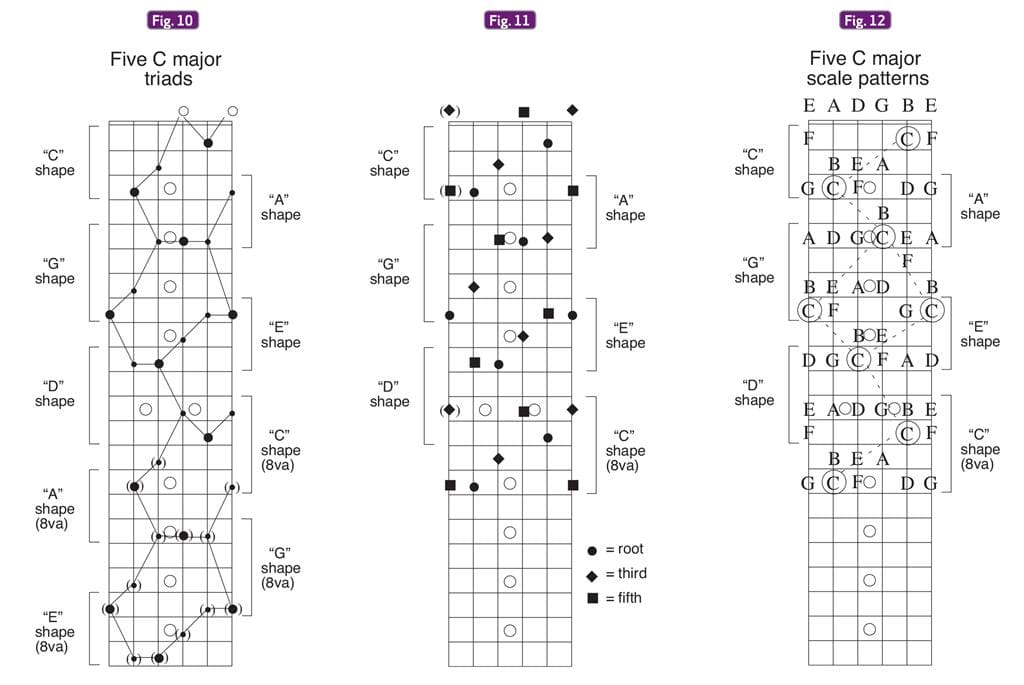
FIGURE 10 (below) shows how the C, A, G, E and D shapes connect to form five different C-chord voicings between the 1st and 13th frets. This unifies the fretboard and illustrates how each shape connects via one or two root notes.
Sing it with me now: “The “C” shape’s connected to the “A” shape, the “A” shape’s connected to the “G” shape, the “G” shape’s connected to the “E” shape, the “E” shape’s connected to the “D” shape, the “D” shape’s connected to the “C” shape,” and so on.
Now, look deeper and…
9. Shift Your Gaze
By using a different graphic symbol for each chord tone as in FIGURE 11 (below), it’s easy to see how these five connecting C-chord shapes originate in open position with the circular C roots, the diamond-shaped Es and the square Gs all happening simultaneously.
Practice breaking each chord tone into its own discrete “dipper” – for Cmaj7, play all roots (Cs), followed by all 3’s (Es), all 5’s (Gs) and all 7’s (B’s) – to create unique arpeggios.
10. Redefine the Map
Finally, let’s have another look at Figures 1 and 2 from a more informed perspective. FIGURE 12 (below) organizes the 12-fret template of natural notes into five distinct C major scale patterns, each of which adheres to the root positions of its related chord shape.
The entire template may be shifted up or down to transpose the whole fretboard to any key – up a half-step for C#/ Db, up a whole-step for D, up one-and-a-half steps for D#/Eb, and so on.
Of course these are all virtual dots and position markers, so we have to train ourselves to visualize these patterns on demand. The “Big Dipper,” five major chord shapes and five major scale patterns (which also contain all seven modes) provide a universal point of reference originating from any note in any position.
Commit them to memory and you’ll never feel lost again!
