If you’ve ever perused the web seeking electric guitar or acoustic guitar material, chances are you’ve run across a mysterious fretboard mapping theory called the CAGED System.
Maybe you thought, What is this, a wire box that holds a bounty of chord voicings, or maybe a way of playing in solitary confinement?
Well, it’s no big mystery once you unlock the first key of the cage.
Article continues belowOnce understood, the CAGED System can be used to connect the fretboard in a network of interlocking and overlapping chord voicings, arpeggios and scales.
In this lesson, we’ll examine the fundamentals of the CAGED System, how it applies to chords and lining them up along the fretboard, as well as systems for combining shapes for common chord progressions.
BASIC CAGED-SYSTEM CHORD VOICINGS
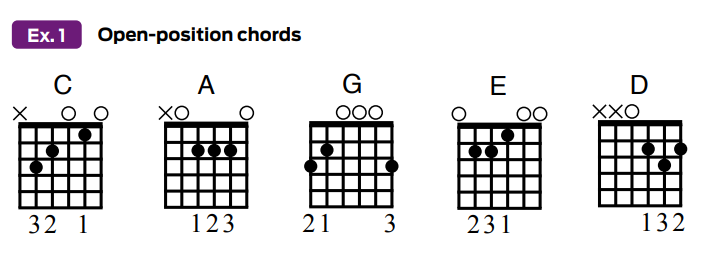
The CAGED System is founded upon five basic open-position chords: C (C, E, G), A (A, C#, E), G (G, B, D), E (E, G#, B) and D (D, F#, A). (See Ex. 1)
Well, would you look at that – the names of the chords spell C-A-G-E-D, providing us with an easy-to-remember acronym.
All the latest guitar news, interviews, lessons, reviews, deals and more, direct to your inbox!
But wait – there’s much more!
THE HUMAN CAPO
It’s possible to move these five open-position chords up the neck to any key.
All you need to do is use your fret-hand index finger as a human capo, as you do when forming barre chords.
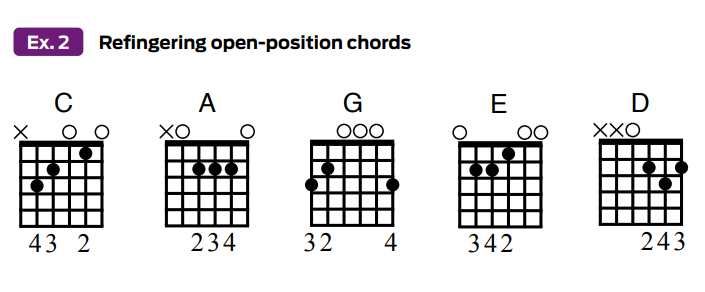
Look at the C chord shape in Ex. 2. Notice the unorthodox fret-hand fingering suggestions.
As you’ll see, this new fingering scheme frees up the index finger to barre across the strings in order to convert the chord into a movable shape.
Slide each of your fretting fingers (4, 3 and 2) up one fret and press your index finger across the top-three strings (G, B and high E) at the 1st fret.
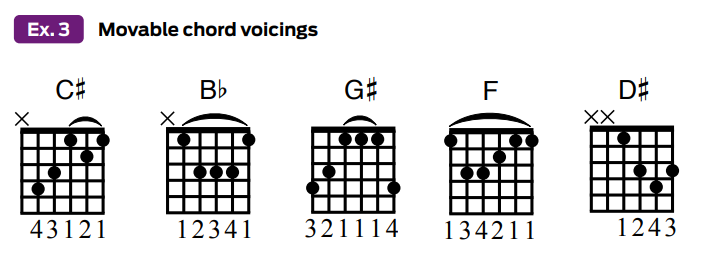
This transposes the C chord up a half step to C# (C#, E#, G#; see Ex. 3).
Once you understand this process, it’s possible to slide this voicing to any key along the fretboard by simply shifting the entire shape up one or more frets.
Let’s tackle the other open-position chords in Ex. 2.
The 2-3-4 fingering for the A chord similarly frees up the index finger for barring the top five strings (the A to the high E) to produce the Bb (Bb, D, F) barre chord shape illustrated in Ex. 3.
Another common fingering is to instead barre the ring finger across the Ex. 1 D, G and B strings.
For the next chord, the G-to-Ab chord conversion, it’s only necessary to barre your index finger across the D, G and B strings. Don’t bother trying to barre the finger across all six strings here, as doing so is unnecessary and only makes the grip cumbersome and arduous to form.
The E chord shape transforms into perhaps the most recognizable barre chord of them all, shown as an F chord in Ex. 3. This shape can be difficult to form at first, as it takes a good amount of index-finger pressure to cleanly barre across all six strings.
The D-to-D# chord conversion may seem a little odd at first, but it doesn’t require an index-finger barre. All you need to do here is fret the root note on the D string with the tip of the finger and avoid strumming the low E and A strings.
THE FIVE-PATTERN SYSTEM
The chief benefit of the CAGED System is it enables you to connect any chord, scale or arpeggio along the entire fretboard using five patterns.
The first step in utilizing the system is to recast the five open-position chords into movable shapes that can be shifted up and down the fretboard to different keys, as we’ve already done in Examples 2 and 3.
Now let’s take these movable shapes and apply them to the key of C.
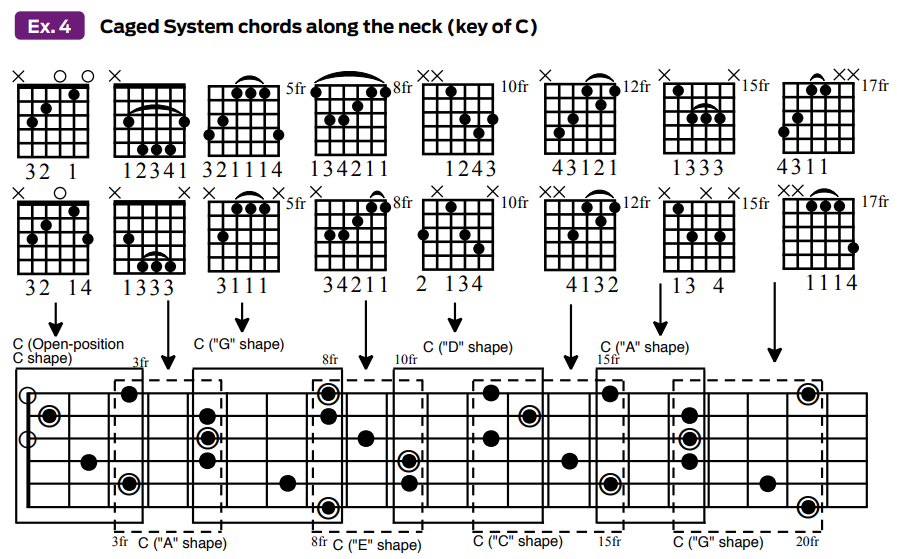
Ex. 4 illustrates this process. Look at the horizontal neck diagram below the chord frames and notice the use of overlaid, overlapping boxes, with every other one having dashed lines.
The first box encompasses the open-position C chord, which starts the procession of voicings. The two chord frames above this box represent both the standard open-position C chord and a variation on it that includes a high G note (the 5th of the chord) on the high E string’s 3rd fret.
The next box (the first one with the dashed lines) houses the movable form of the open A chord shape, transposed to the key of C here, with the low C root note being on the 5th string’s 3rd fret).
Moving to the right, the third box hosts the G-shape pattern of a C chord, with the low C root note being moved up to the 8th fret on the low E string.
Box number four (dashed lines again) contains the E-shape voicing of a C chord, with the low C root again being at the 8th fret on the low E string.
Box number five frames the D-shape pattern of a C chord, with the C root note now being on the D string’s 10th fret.
At box number six (dashed lines) we start over again with the C-shape pattern of a C chord, now 12 frets and one octave above the open-position starting point. This is then followed by the A-shape pattern again, and, finally, the G shape.
Look back over the boxes and you’ll notice the order of chord shapes are C, A, G, E and D, which gives us our CAGED acronym.
Also take note of the fact that each chord shape connects to its neighbor by at least one root note. (In some cases, there are several other overlapping chord tones.)
The chord frames pictured in the top row above the horizontal neck diagram in Ex. 4 are there to help decipher the chord shapes residing within the boxes on the neck diagram.
Of special interest are the second row of chord voicings. These are alternate voicings and inversions of the basic voicings above them.
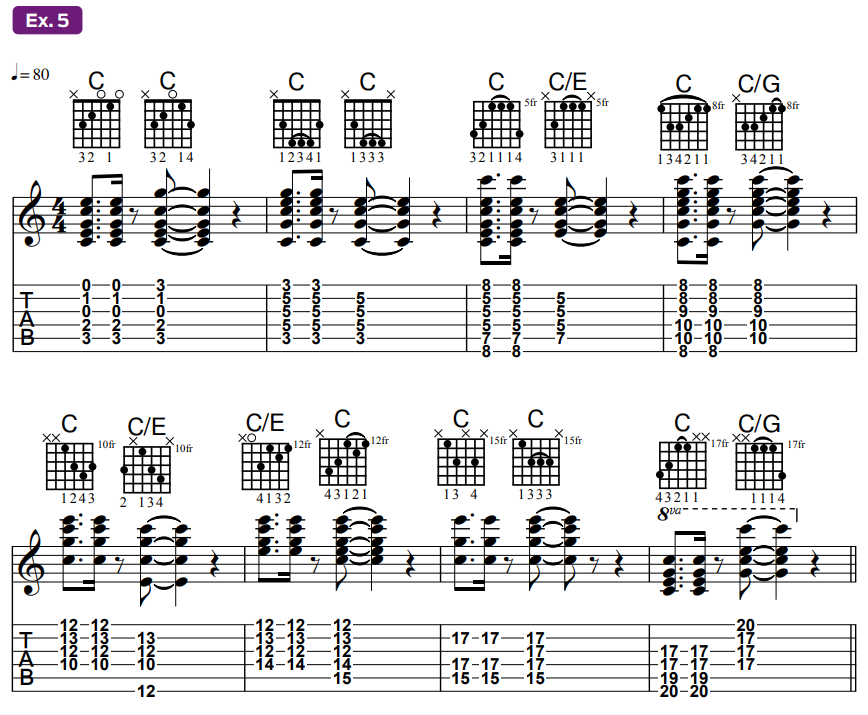
Ex. 5 is a musical exercise that uses all these voicings in ascending order up the fretboard.
Put it together slowly and it should help you to physically understand the connecting potential of the CAGED System.
TONIC OCTAVES
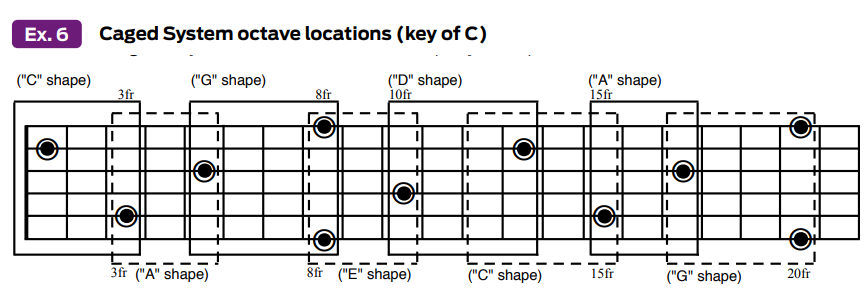
The “key” that will unlock the vast potential of the CAGED System lies in the keen awareness of where the roots, or tonic notes, are located within each of the five patterns.
Look at the neck diagram in Ex. 6, which uses the very same system of overlapping boxes from Ex. 4. Here, all the notes of the C chords are omitted except for the C roots, or tonics.
Notice that each box contains at least two notes: a lower C root and its higher octave.
The G-shape and E-shape patterns both contain a second octave, with three C notes.
It’s highly beneficial to commit these octave shapes to visual and finger memory. Here is a system you can use:
- C-shape pattern: ring finger on the A string; index on the B string.
- A-shape pattern: index finger on the A string; ring finger on the G string.
- G-shape pattern: ring finger on low E string; index finger on the G string; pinkie on the high E string.
- E-shape pattern: index finger on low E string; ring finger on the D string; index finger on high E string.
- D-shape pattern: index finger on the D string; pinkie on the B string.
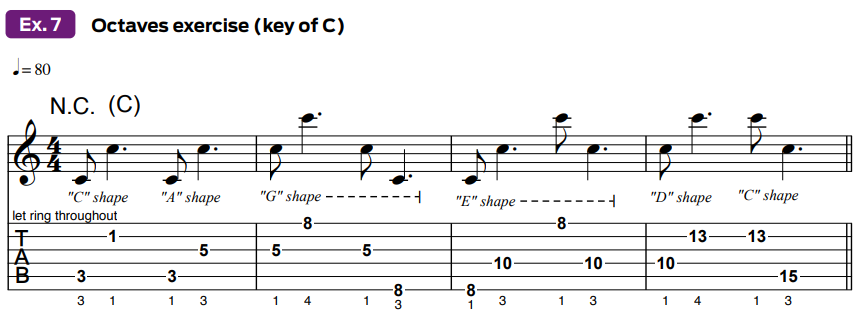
Ex. 7 offers a musical exercise that may help to alleviate the tedious nature of the learning process.
APPLYING THE SYSTEM TO OTHER KEYS
Now that we understand the octave shapes of the CAGED System as applied to the key of C, let’s explore some other keys.

Ex. 8 is a horizontal neck diagram that illustrates the CAGED System octave shapes applied to the key of A.
Notice that the octave system begins with the A-shape pattern, in the open position.
Next is the G shape, followed by the E shape, D shape and C shape.
Then, as happened with Ex. 4, the shapes eventually repeat themselves 12 frets and one octave higher.
Notice anything familiar occurring on the fretboard? You guessed it! The order of pattern shapes remains constant.
Even though we started with the A shape (second letter of the word caged), G came next, then E, D and C to complete the cycle.
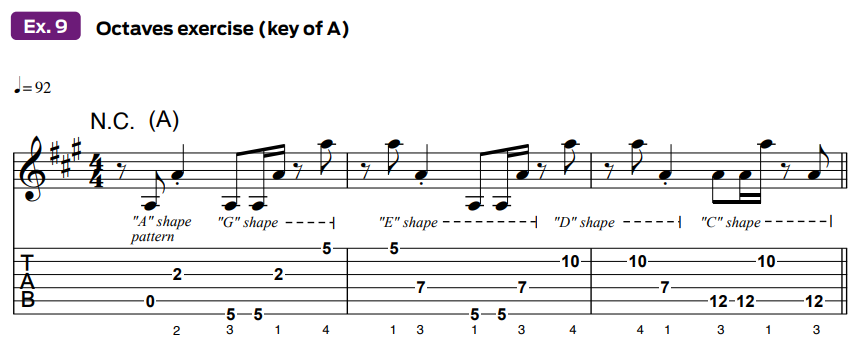
Again, here’s a musical example (Ex. 9) to practice the octave shapes, this time in the key of A.
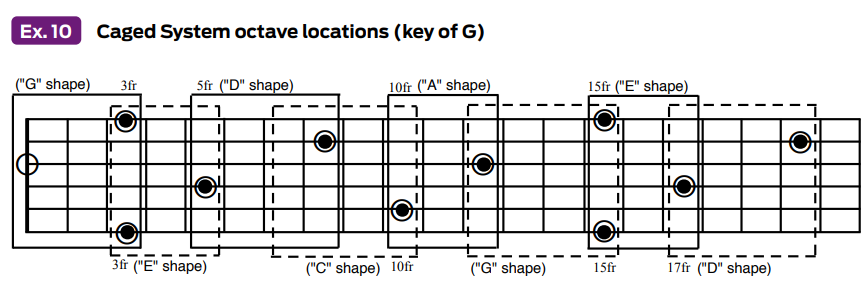
Ex. 10 continues the pattern connecting process, this time in the key of G.
Again, notice that the boxes snap together in the same C-A-G-E-D order, but this time starting from the third letter name, G.
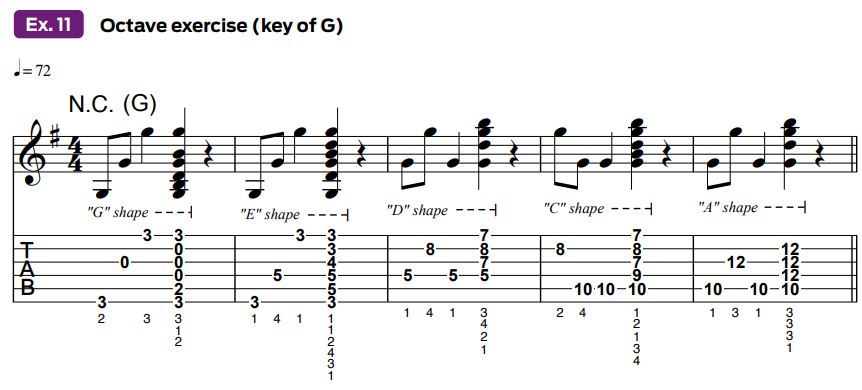
The musical exercise in Ex. 11 combines octave practice with corresponding chord shapes.
So far, we’ve covered the keys of C, A and G.
Let’s continue the survey and hit the two remaining keys – E and D – which, as you know, are important guitar keys!
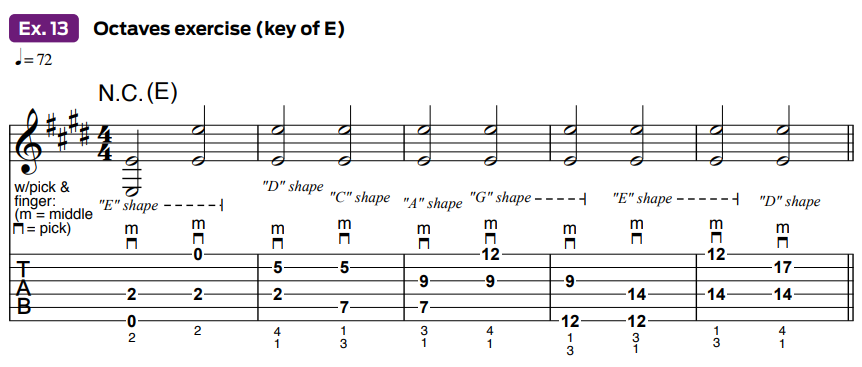
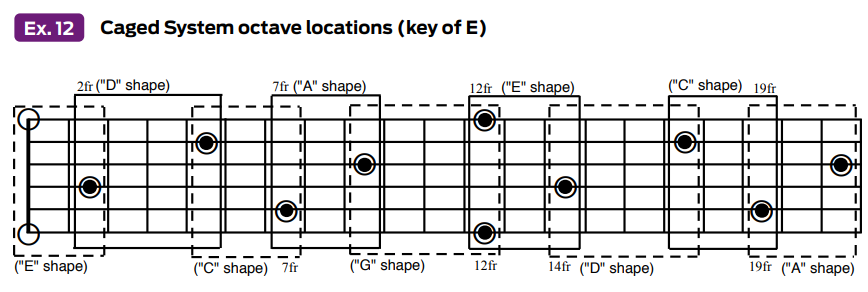
Use Ex. 12 to guide you through the octave shapes in the key of E in preparation for the hybrid-picking exercise in Ex. 13, which has you picking and plucking octave notes together.

Ex. 14 lays out the pattern order for the key of D…
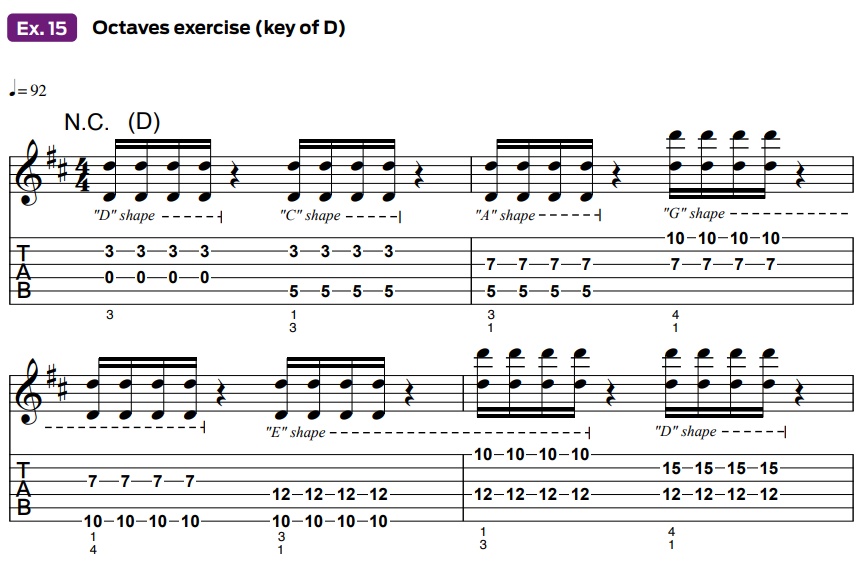
While Ex. 15 offers a 16th-note strumming exercise that will help get you in shape for funky, octave riffing.
You’ve no doubt noticed that the five keys we’ve covered correspond to the five open-position chord voicings from which the CAGED System is derived. The intent was mainly for continuity.
It’s also possible to apply the five-pattern system to any key (Bb, Eb, F#, etc.).
In fact, we highly advise that you apply the octave shapes to all 12 keys. While you’re at it, transpose some or all of the musical exercises presented thus far to other keys as well.
Try to make the chord-voicing exercise in Ex. 5 top priority!
CHORD PROGRESSION PRACTICE
You can start to put the CAGED System to practical use by practicing short chord progressions using shapes derived from the system.
One of the most common progressions is the I - IV - V (one - four - five) cadence. (C - F - G in the key of C; E - A - B in the key of E; etc.)
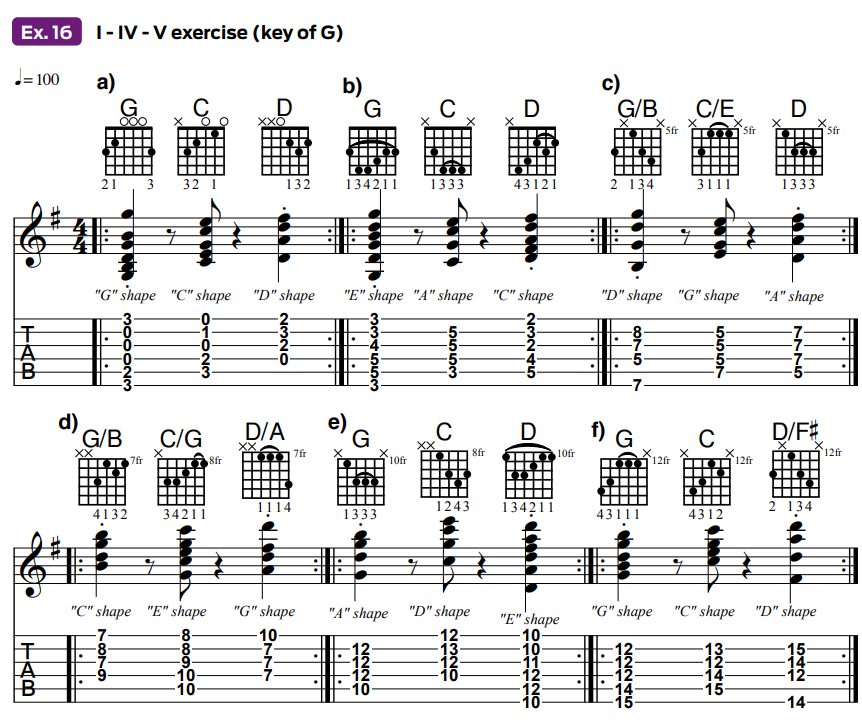
Ex. 16 is a challenging multi-part exercise derived from a one-bar I – IV – V progression in the key of G: G - C - D.
Before launching into the example, look at the first chord in each bar.
Bar 1 (Ex. 16a) starts with an open-position G chord.
Bar 2 (16b) begins with an E-shape pattern of the G chord, which is the next pattern up the fretboard using the CAGED System connecting process.
Bar 3 (16c) begins with a D-shape G chord (G/B is a 1st-inversion form of a G chord).
Bar 4 (16d) starts with the C-shape form of the G chord, and bar 5 (16e) uses the A-shape form.
Finally, bar 6 (16f) utilizes the G shape an octave up from the starting point.
This succession of I-chord lineups follows the principles of the CAGED System method, but the IV and V chords in each bar correspond to the CAGED System process too.
Notice that the C and D chords in each bar are played in the same general area of the fretboard as the initial G chord voicing. That’s obvious if you look at the tablature and chord frames.
Now follow the order of shapes used to create each C chord voicing, bar by bar – C shape, A shape, G shape, E shape, D shape, C shape.
Next, analyze the shape sequence order for the D chords – D shape, C shape, A shape, G shape, E shape, D shape. The CAGED System is fueling the fretboard lineup of not only the I chord but also the IV and V chords!
Don’t fret if you’re not yet fully grasping all of the concepts brought forth in the previous paragraph.
For now, just put this example together and use it as a daily practice routine.
Once you have it down, try putting it together in other keys. The connections will sink in, and the payoff will be immense in many aspects, practically guaranteed!
MINOR KEYS
Although the CAGED System’s basic principles are based on major chord voicings, the system may also be applied to minor chords.
Remember that learning to see all the root-octave locations is the key to harnessing the usefulness of the CAGED System.
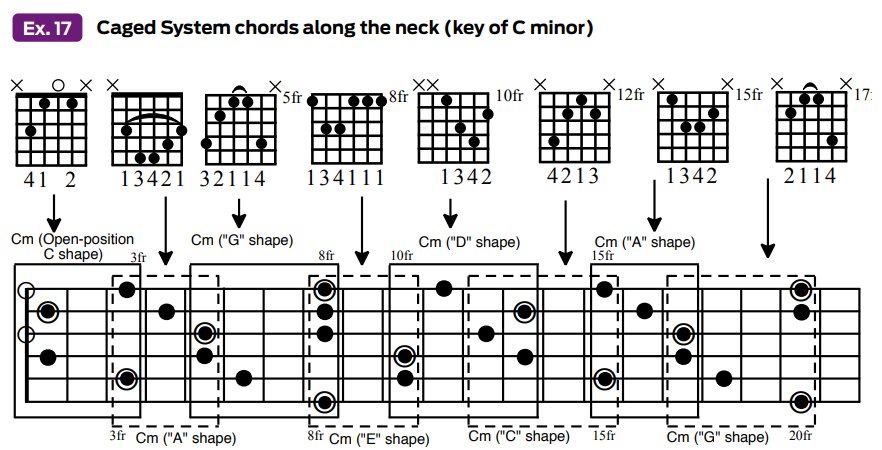
Now look at the neck diagram in Ex. 17.
This is the C minor counterpart to the C major diagram from Ex. 4. Whereas Ex. 4 depicted various shapes and voicings for a C major chord (C, E, G), Ex. 17 does the same for Cm (C, Eb, G).
All of the roots and 5ths are the same in each of the diagrams; only the 3rds have been changed, from major (E) to minor (Eb).
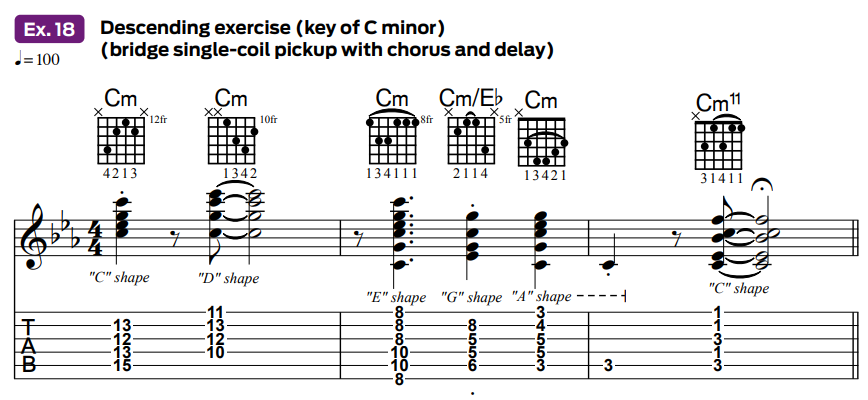
Ex. 18 is a descending musical exercise using several Cm shapes. Inspired by Andy Summers’ craftwork in early Police recordings, it ends on a colorful Cm11 (C, Eb, G, Bb, F) voicing.
There you have it! Remember, this lesson serves as merely an introduction to the CAGED System.
In a future lesson we will explore how it can be used to connect the fretboard for 7th chords, arpeggios, scales, licks and riffs.
Until then, keep practicing!
