All the latest guitar news, interviews, lessons, reviews, deals and more, direct to your inbox!
You are now subscribed
Your newsletter sign-up was successful
Think of a famous rock guitar solo and chances are the minor pentatonic scale lies at its foundation. For many of us, minor pentatonic was the first scale we ever learned to play. But a lot of guitarists rely on only one pattern or position for the scale and are either reluctant or unable to venture out of its boundaries into uncharted territory.
If that sounds like you, read on. In this lesson, you’ll be introduced to the five pentatonic box patterns and, more importantly, learn how to connect them like interlocking jigsaw puzzle pieces along the fretboard. With practice, you’ll soon be soaring up and down the neck at will and with the greatest of ease. For purposes of illustration, we’ll use the five-note A minor pentatonic scale, spelled A C D E G, in which A is the root note (R), C is the minor, or flatted, third (b3), D is the fourth (4), E is the fifth (5) and G is the minor, or flatted, seventh (b7).
PATTERNS 1 AND 2
Ex. 1a illustrates a two-octave pattern for A minor pentatonic in 5th position. Of the five pentatonic patterns (one for each note of the scale), this is by far the most popular and is sometimes referred to as the “primary” pentatonic box. In this lesson, we’ll label and refer to it as Pattern 1.
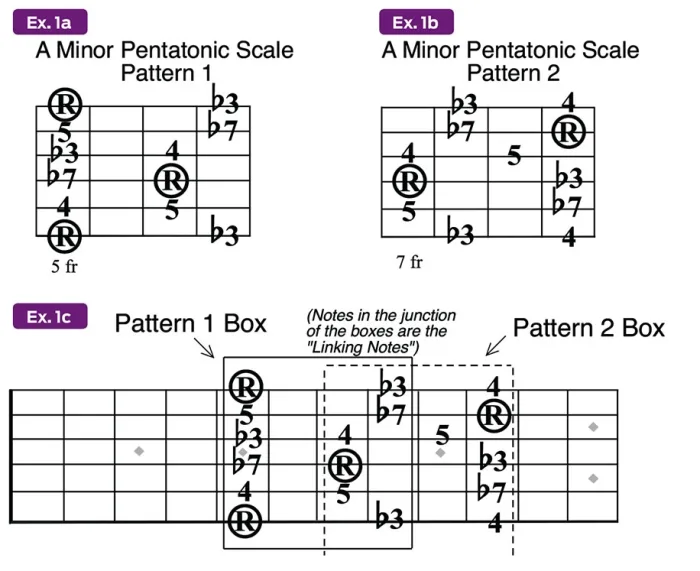
Ex. 1b depicts the adjacent “upper neighbor” pattern of the primary box. That is, it nestles right above Pattern 1 on the fretboard. We’ll call it Pattern 2. To best hear the true tonality of this pattern, start from the lower A root note on the D string’s 7th fret and play up to the highest note, at the 10th fret on the high E string. Then, descend all the way back down to the lowest note of the pattern, at the 8th fret on the low E string, and ascend back up to the starting point, the lowest A root.
Ex. 1c illustrates how Patterns 1 and 2 connect and overlap on the fretboard. Solid lines are used to draw a box around Pattern 1, while dashed lines provide a border around Pattern 2. Notice how they “snap” together like pieces in a jigsaw puzzle. The notes at the 7th and 8th frets are common to both patterns and will be referred to as linking notes. These notes are used in various ways to transfer between patterns. Before we get to the lick examples, try this drill: Play through Pattern 1 in ascending fashion, from the lowest note to the highest, shift up to the top of Pattern 2, at the 10th fret on the high E string. Then, come back down that pattern and resolve at the starting point, the 5th fret of the low E string).
LINKING PATTERNS 1 AND 2
All the latest guitar news, interviews, lessons, reviews, deals and more, direct to your inbox!
Let’s take a look at a few licks that exploit the linking notes of these neighboring, overlapping patterns. Ex. 2a is a typical rock phrase that runs up Pattern 1.
Ex. 2b follows the same melody but transfers it midway to Pattern 2 via a G-string hammer-on and slide maneuver. The D note at the 7th fret on the G string is the linking note. Notice that the fret-hand fingerings shown below the TAB staff advise you to use your second, or middle, finger for the slide. That’s because once you arrive at the 9th fret, you’re in 8th position and sitting in the catbird’s seat for the remainder of the phrase.
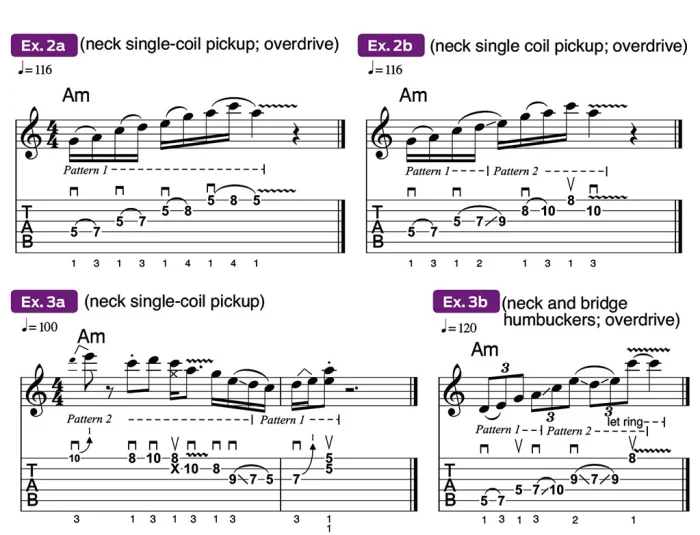
Ex. 3a is a blues phrase similar to something Stevie Ray Vaughan or Albert King would toss off. This one launches from the top of Pattern 2 down into the midpoint of Pattern 1. The initial wholestep bend squeezes another note (E) from Pattern 2 without having to move up the fretboard. Notice the use of the third, or ring, finger to initiate the segue move on the G string. Again, this is designed for ideal positioning once you arrive at the intended destination in the lower pattern. If you “scrunch” the palm of your hand, you’ll find it easier to plant your third finger on the designated fret.
Ex. 3b features a “slip-and-slide” move reminiscent of the soloing style of founding Allman Brothers Band guitarist Dickey Betts, particularly on such songs as “Jessica” and “Ramblin’ Man.” The chief component in this lick is the backward/forward slide on the G string. Be sure to let the phrase-capping notes, E and C, ring together.
PATTERNS 3 AND 4
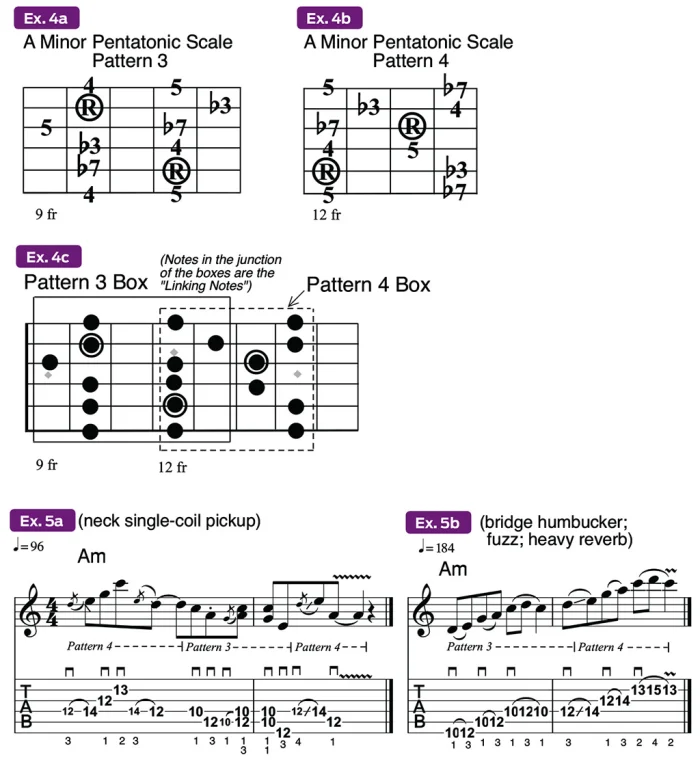
Ex. 4a shows the next-higher A minor pentatonic pattern. This one, labeled Pattern 3, has its lowest root on the A string’s 12th fret, with the octave root at the 10th fret of the B string. The 9th-fret marker corresponds to the note that is furthest down the fretboard (toward the headstock).
Ex. 4b shows the pattern’s upper neighbor, Pattern 4. Notice that both patterns share the same low root, at the 12th fret on the A string. It’s interesting to note that Pattern 4 is the most similar in structure as the primary box, Pattern 1. That is, the first six notes (A C D E G A) follow the same contour and shape, albeit on different strings in this case.
Ex. 4c depicts how the two patterns join together on the fretboard. Here, the illustration uses the more traditional black dot markers to depict the note placement in each pattern. (Ex. 1c used scale degrees to map out the patterns.) Again, the notes in the junction of the two boxes are the linking notes, or the boundary notes common to both patterns. Play Pattern 3 starting on the lowest A root note and ascend, come all the way down Pattern 4, then go back up Pattern 3 to the starting point.
JUGGLING PATTERNS 3 AND 4
Ex. 5a sets Pattern 4 in motion with a Jimi Hendrix–style phrase (think “Purple Haze”) that quickly scoots down into Pattern 3. A pair of double-stops (two-note chords played on adjacent strings) follows, and the passage goes out with a “slight return” to Pattern 4. The suggestion to use the fourth finger, or pinkie, on the final slide may seem a bit unorthodox, but it allows your third finger to stay on the low-string note until the last possible moment.
Ex. 5b brings to mind Jimmy Page’s fuzz-drenched leads in early Led Zeppelin recordings. This lick discloses one of the “hot zones” in the merged border regions of Patterns 3 and 4. Many a blues-rock guitarist has exploited this area to transport melodic motifs and flashy riffs from one octave to another other in one flowing move.
PATTERN 5 AND ITS UPSTAIRS NEIGHBOR
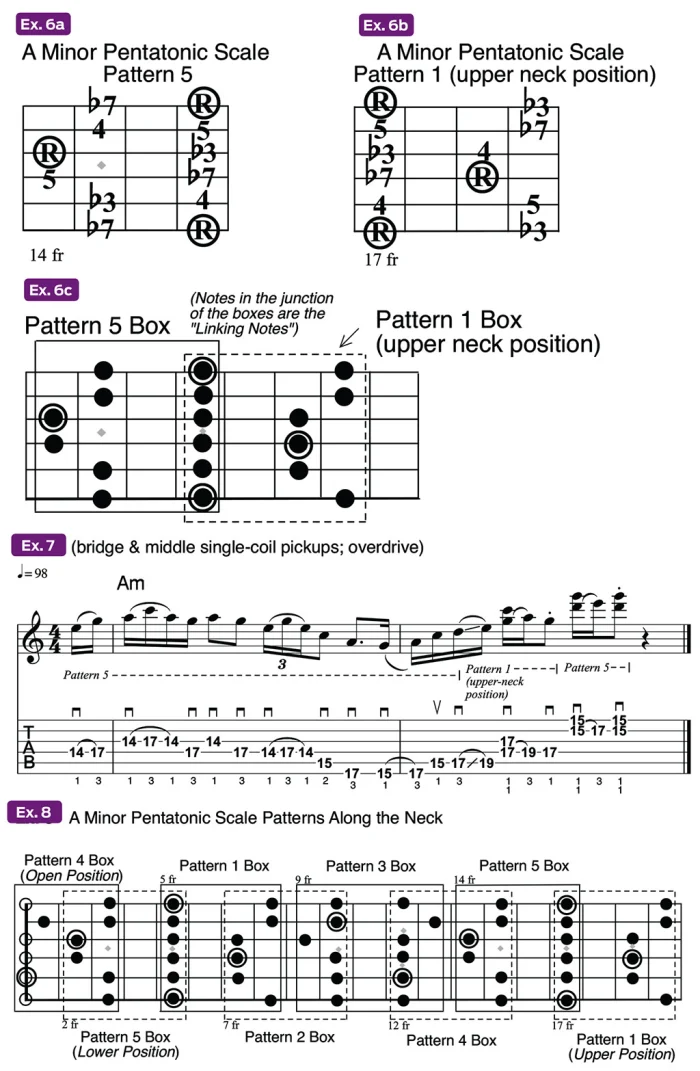
Ex. 6a hosts our fifth and final pentatonic pattern, Pattern 5. As you may discern, it is the most sequential of the lot. For starters, the four-note “mini box” on the bottom two strings matches up with the box shape on the top two high strings. The middle string set — the D and G strings — comprises an elongated box shape, or rectangle, which separates the uniform boxes.
The familiar shape in Ex. 6b is Pattern 1 again but 12 frets and one octave higher, in 17th position. Ex. 6c shows how the two patterns connect on the fretboard. Notice that the linking notes here are all at the same fret, the 17th, marking a distinct and neat borderline between the two patterns. As before, try playing up Pattern 5 and back down Pattern 1 to get the feel of these friendly neighbors.
BRIDGING THE 5 AND 1 TERRITORIES
Inspired by the opening strains of “Layla” (featuring Eric Clapton and Duane Allman), Ex. 7 bursts out of the gate with a fiery passage voiced on the middle string set of Pattern 5. The subsequent phrase falls down the remainder of the pattern, zips up a portion of the upper-neck position of Pattern 1, and goes out on a double-stop with a call-and-response theme that culminates at the top of Pattern 5.
CONNECTING ALL FIVE PATTERNS
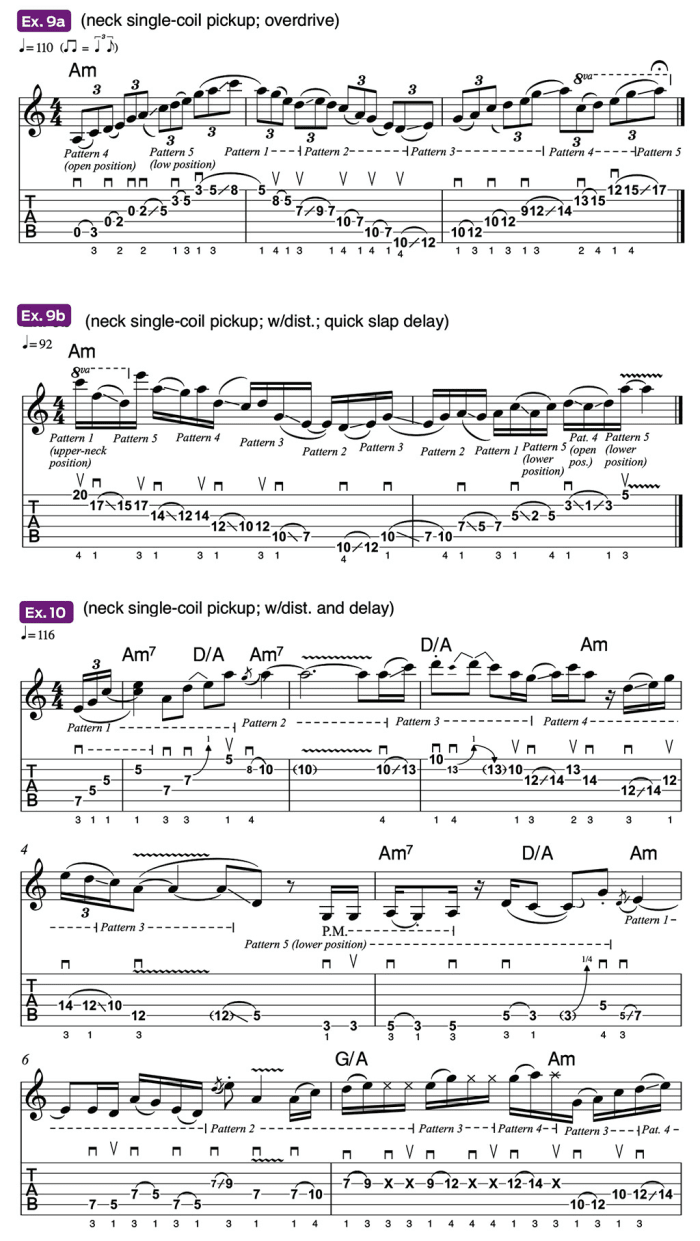
The diagram in Ex. 8 illustrates how the five patterns of the A minor pentatonic scale “snap” into place along the fretboard, like interlocking puzzle pieces. Pattern 4 (originally introduced at the 12th fret in Ex. 4b) begins the lineup, now snapped into place in open position, 12 frets and one octave lower. Pattern 5 is next, now positioned at the 2nd fret, an octave down from where it was introduced up at the 14th fret in Ex. 6a. From there, the patterns fall in line exactly as they’ve been described earlier. (Incidentally, if your guitar has at least 22 frets, you can tack Pattern 2 to the top of the fretboard. Just place the lower root at the 19th fret on the D string. It’s a tight squeeze, but doable.)
MAPPING EXERCISES AND NECK-TRAVERSING LICKS
Here’s where the fun really begins! Ex. 9a offers a challenging “mapping” exercise designed to burn-in the connecting patterns along the entire fretboard. Beginning in open position, each trade-off to the neighboring pattern is performed using a legato finger slide. Hopefully, this will give you ideas for coming up with your own positional segues.
Ex. 9b will really put your legato chops to the test. Chock-full of slides, hammer-ons and pull-offs, the line makes its way down the neck, pattern by pattern, via a unique, adjacent-string scheme. It’s interesting to note that, even though the passage continues down the entire length of the fretboard, the melody actually starts to ascend in pitch at the halfway point.
SOLOING ACROSS THE ENTIRE FRETBOARD
Now, let’s put the five patterns to practical use in an extended solo. Ex. 10 is a 16-bar, A minor pentatonic solo played in a classic rock style over an Am7–D/A–G/A progression. We start out in familiar territory, with a beefy blues lick drawn from the primary pentatonic box (Pattern 1) in 5th position. A grace-note slide on the B string provides transport for a brief stopover in Pattern 2 before another B-string slide takes us up to Pattern 3. Here, a whole-step bend and release on the B string (a customary move often employed in the primary box) launches a crafty passage that echoes the Dickey Betts maneuvers discussed in Ex. 3. The phrase starts out in Pattern 3, sneaks its way up into Pattern 4 and then back down again, concluding with a gliss (glissando) down the A string to arrive in the lower fretboard position of Pattern 5 (see Ex. 8).
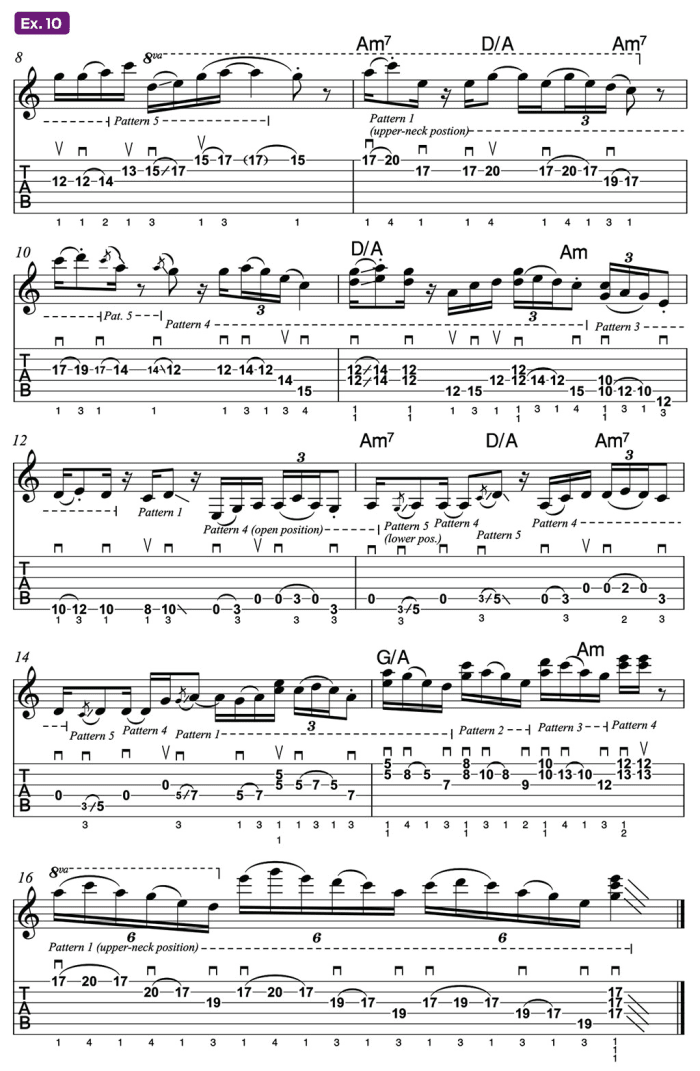
The next four bars (5–8) host an array of lick concoctions that gradually climb the length of the fretboard, pattern by pattern, from 3rd position all the way up to the 17th fret! The journey begins with a syncopated pattern of palm-muted notes on the low-E string that transfers over to the A string, creating an anticipatory climb to Pattern 1. Here, a backward-sounding phrase ends with a grace-note slide on the G string that puts us in Pattern 2 territory. A series of hammer-ons, interspersed with muted string attacks, sends the line up the G string into Pattern 4. Backing off into Pattern 3 again, the passage goes out with a speedy, incremental climb up Patterns 3, 4 and 5, topping out at the 17th fret of the high E string.
In direct contrast, the next four-bar section (bars 9–12) travels back down the fretboard from the 20th fret on the high-E string to the 3rd fret of the low E. The phrase begins with a pair of copycat ideas, and the leadoff motif is cast from the top three strings of Pattern 1 (upper-neck position). Legato fueled and rhythmically syncopated, it’s answered in like fashion but an octave lower, across sections of Patterns 1, 5 and 4. This is followed in bar 11 with a double-stop–enhanced passage inspired by Steve Howe’s scorching riffs and fills in the classic Yes song “Siberian Khatru,” from 1972’s Close to the Edge. In bar 12, things settle down with a rhythmic walk down the low-E string.
There are only four bars left to go, so it’s time to start building to an exciting finish. Now that we’re at the bottom of the fretboard, the logical course is to climb back up again. Our final section begins at the end of bar 12 with a dichotomous passage that’s sort of half country/rockabilly (Brent Mason and Duane Eddy) and half Peter Green (Fleetwood Mac’s original guitarist). It’s based on a series of tradeoffs from Pattern 4 (open position) and Pattern 5 (lower-fretboard position). The initial phrase is inspired by Green’s riffing in “Oh Well (Part 1).” Cast from the low strings of Pattern 4, it’s then answered by a twangy, low E– string slide that matches pitch with the open string preceding it. A back-and-forth head-cutting duel ensues, continuing with variations through bar 14. The penultimate bar (15) serves as a setup for our curtain-closing lick. Like a squirrel, the uniform licks jump in rapid succession along the top portions of Patterns 1, 2, 3 and 4. Leaping to the upper-position primary box (Pattern 1), the solo goes out with a bang using an incendiary sequence that cascades down the pattern in a legato-style five-note sequence.
