Black Hole of Confusion or Wormhole to Enlightenment? The Unique Relationship Between the G and B Strings
The guitar fretboard is divided into two separate and similarly ordered universes. Here's how to make it work for you.

All the latest guitar news, interviews, lessons, reviews, deals and more, direct to your inbox!
You are now subscribed
Your newsletter sign-up was successful
Back in 1996, while perusing an issue of Guitar for the Practicing Musician magazine, I stumbled upon a lesson called the “The Warp Refraction Principle” by columnist Jon Finn. An esteemed player, author and Berklee College of Music professor, Finn is obviously a fellow avid sci-fi fan and knew how to draw me in with that title.
In that gem of a lesson, Jon explained that the guitar fretboard is divided into two separate and similarly ordered universes. The line between them is drawn by a lone interval within the five pairs of adjacent strings produced by standard tuning: (low to high) E, A, D, G, B, E.
In examining each adjacent-string pair, you’ll observe that all but one are a perfect 4th, or two and one half steps, apart – E - A, A - D, D - G and B - E – leaving a single major 3rd interval, equal to two whole steps, between the G and B strings.
Though seemingly inconsequential, this half-step and one-fret difference creates a fair amount of fretboard chaos, especially for those who thrive in the otherwise symmetrical regions.

Playing the same perfect 4th interval, for example, C to F, across all five adjacent-string pairs (Ex. 1) reveals the issue at hand. The dyad played on the G and B strings requires the higher note to be played one fret higher to compensate for the smaller interval between these two strings.
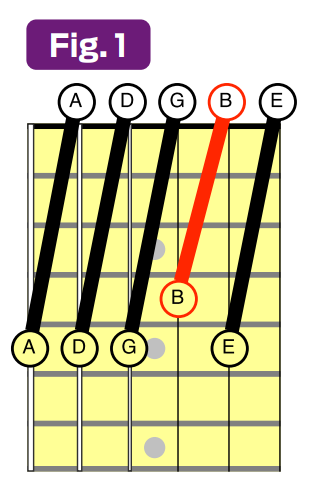
Fig. 1 shows another way to look at this conundrum, by visually examining the distance between adjacent strings. Notice how the red diagonal line from the open B string to the B note on the G string’s 4th fret spans one less fret than the other diagonal lines?
Whichever way it reveals itself to you, the fact remains that the G - B string pair creates the vexing neck vision schism that Finn donned the Warp Refraction Threshold, or WRT, for short.
All the latest guitar news, interviews, lessons, reviews, deals and more, direct to your inbox!
Keeping with his space-fantasy imagery, it’s akin to a guitar neck wormhole that creates the optical illusion that fingerings are offset by one fret.
Jon goes on to paint this more as a mirage and suggests, by organizing the neck into a vision that emphasizes string sets that employ perfect 4ths, that the offset is moot. While the result of Professor Finn’s approach is brilliant, game changing and a must-study, there’s a whole heap of musical and guitar-playing potential nested in the WRT.
Embrace the major 3rd anomaly so that it can help you conjure new chordal and single-note ideas
To that end, I’m going to show you how to embrace the major 3rd anomaly so that it can help you conjure new chordal and single-note ideas.
Let’s start by unpacking the positive effects that WRT can have on your neck vision through chords. I often use chords to visualize and navigate the neck, as well as coordinate and maintain scale fingering systems.
In doing so, I’m constantly moving chords around, and, as a result, often come up against sets of identical chords that call for different fingerings as part of their relocation. The need for the adjustments and what they ultimately are rests on where the G and B strings appear in the chords.
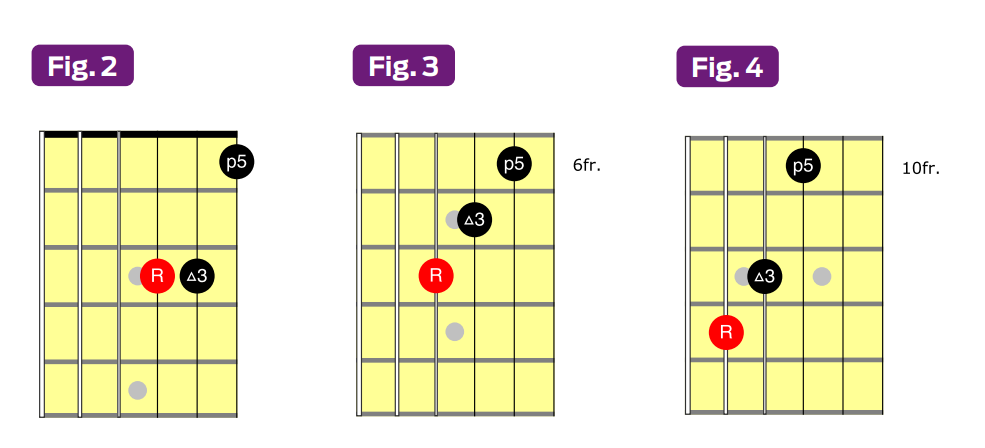
To begin to see how this plays out, let’s look at Figs. 2–4.
Here you’ll find three root-position Bb triads (Bb, D, F), starting on the 3-2-1 string set (Fig. 2), that progress diagonally to the lower sets 4-3-2 and 5-4-3, as illustrated in Figures 3 and 4, respectively.
While these fretboard shapes retain the same pitch, their fingerings vary each time as a result of WRT.
You can do this with any chord by following a three-step process.
First, shift a chord down vertically to a lower adjacent-string set. Next, with the same fingering, move your fret hand horizontally five frets up the neck, or a perfect 4th. Finally, when it arrives at the new location, the note that lands on the G string goes down a half step.
If you’re switching chords to higher string sets, then, conversely, whatever note lands on the B string moves up a half step.

At this point, everyone’s inner Arnold Horshack is on the verge of throwing an overextended hand in the air while feverishly asking about the need to know the same chord in more than one place on the neck.
The answer is simple: Control of creative freedom.
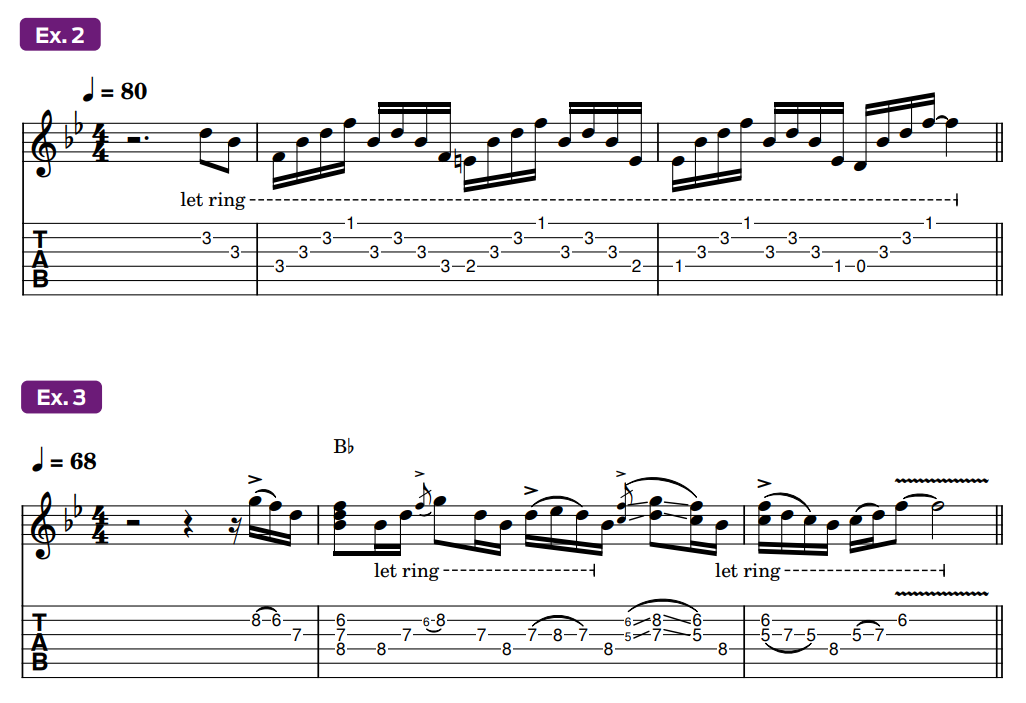
Examples 2–4 highlight some of what the Bb triads seen in Figures 2–4 can do in their respective areas of the fretboard. While the chords are the focus, it’s what’s at your disposal in those positions that can give those passages their individual character.
While the notes in Examples 2-4 could be played in other positions, they would not only succumb to fingering issues that make them needlessly more difficult to play, they would also sound different, due to the variation in string gauge and neck position, both of which affect a note’s timbre on this instrument.
These positional hallmarks will serve as an important factor in your decision-making process when composing, comping and improvising.
At the center of it all is WRT because, without it, aside from open-string possibilities, there would be no fingering differences, and it is those differences that serve as your canvas.
The moral of the story is this: A deeper vision of the neck founded on an informed approach to controlling the WRT affords you a more colorful sonic palette to work with.
A good neck vision rests not only on how well you can navigate WRT but also on how well you can manipulate it to your artistic advantage.
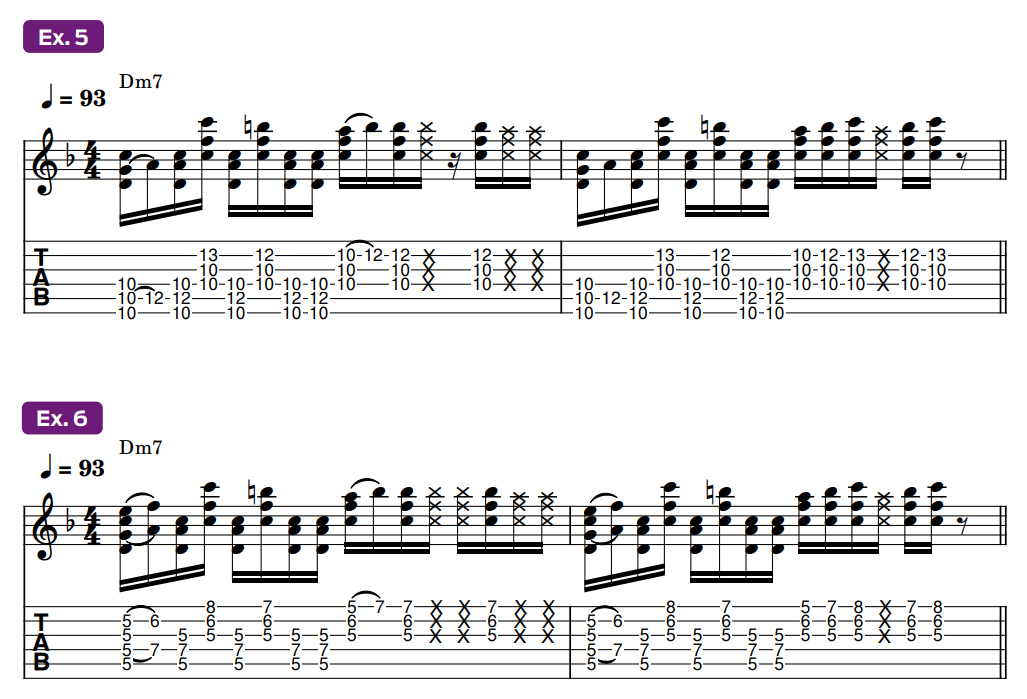
Take Examples 5 and 6, where I make use of a Dm7 chord, first in 10th position (Ex. 5) and then in 5th position (Ex. 6). The almost identical passages are separated by two elements.
In addition to timbre, which is always a variable, there’s a single nested hammer-on that kicks off Ex. 5, compared to the two instances in Ex. 6, thanks to the added hammer-on between the major 2nd (E) and minor 3rd (F) on the B string.
The option to have this kind of oblique motion within a barre chord voicing – toggling between a chord’s minor 3rd and its 2nd (the sus2) or its major 3rd to its 4th (the sus4), using hammer-ons or pull-offs – can be used to add melodic interest to a chord-based riff.
Well-known examples of this factor abound, as it has served as the sulfur behind many celebrated guitar riffs. For instance, a similar sus2-to-minor-3rd application can be heard in Tom Johnston’s strumming on the Doobie Brothers’ “Long Train Running,” whereas notable major 3rd-to-sus4 flavorings are heard in Van Halen’s “Running with the Devil” and “Start Me Up” by the Rolling Stones, to name but a few.
Once again, the existence of this option is due to WRT.
Shifting gears into single-note territory, WRT can inspire a whole new way to work with scale systems on multiple fronts.
Let’s look at some approaches created on a framework that I call “one-octave cells.”
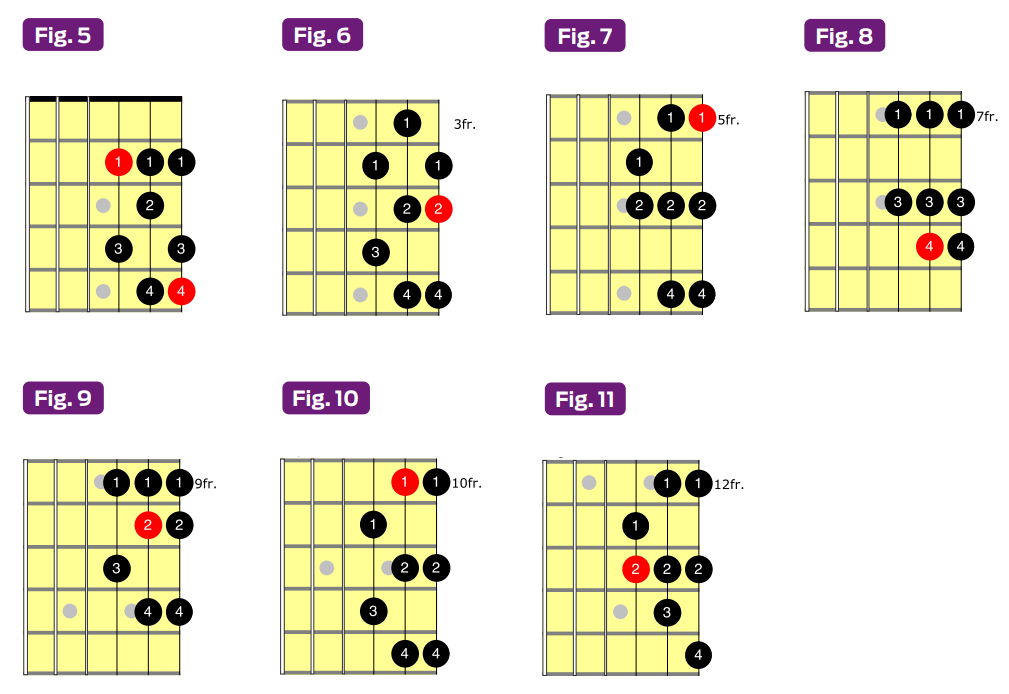
Focusing on the top three strings, I condense scales into similarly mapped-out eight-note sequences, with two notes played on the G string and three notes played on the B and high E, as illustrated with the A major scale (A, B, C# , D, E, F,# , G# ) in Figures 5–11. (The A root note is highlighted in red, and the numbers within the circles indicate fret-hand fingerings.)
Notice that each shape is bookended by the same fingers – 1 and 4 – with the added bonus that the lowest note is fretted by the index finger, whereupon you’ll feel the most balance.
These inviting fingerings and their attributes only exist within WRT, which is a good thing, since much of the action concerning melodies, licks and solos happens on the G, B and high E strings.
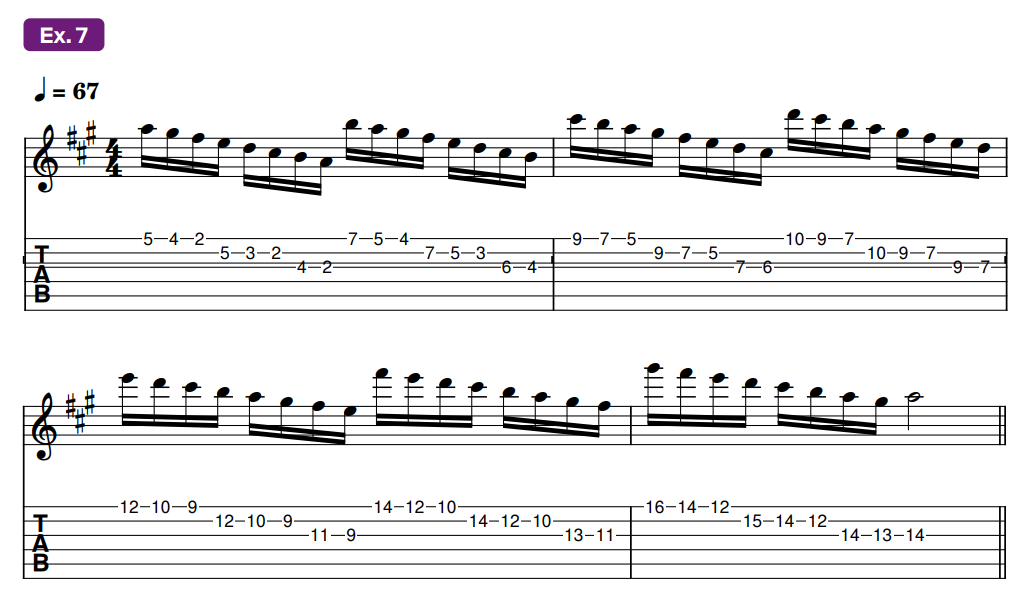
Playing through these seven positions of the A major scale will highlight the compactness of the major 3rd interval between the G and B strings while you hone and bolster not only your neck vision but also your chops and ear training.
Ex. 7 starts it off with a horizontal ascent up the fretboard, made up of a sequence of descending runs within each successive fingering pattern and position that resolves to the root of each of the A major scale’s seven relative modes – A Ionian, B Dorian, C# Phrygian, D Lydian, E Mixolydian, F# Aeolian and G# Locrian.
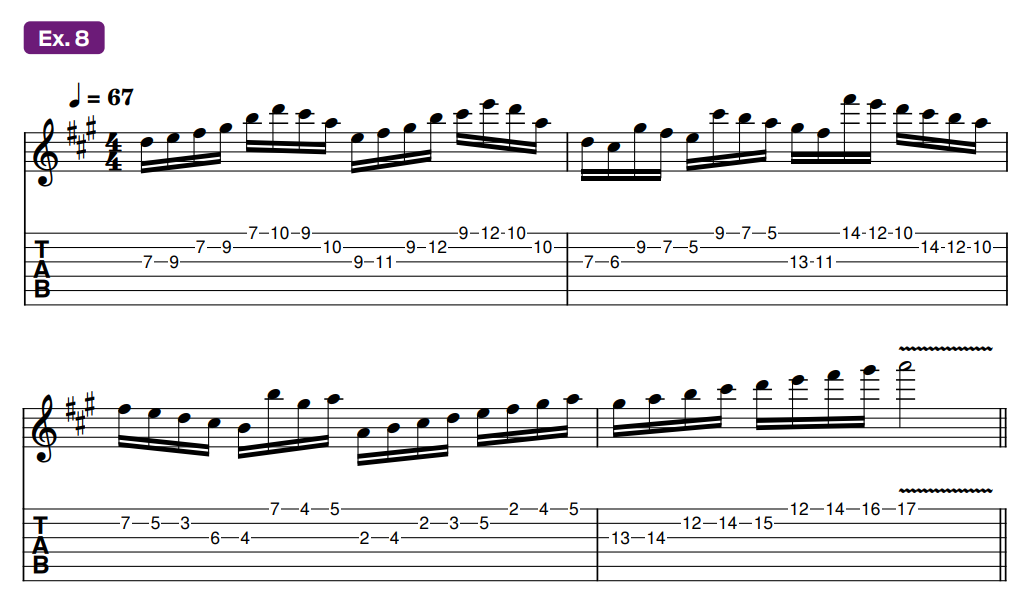
Ex. 8 adds directional changes and melodic skips, and ricochets the note sequencing within each given pattern and position.
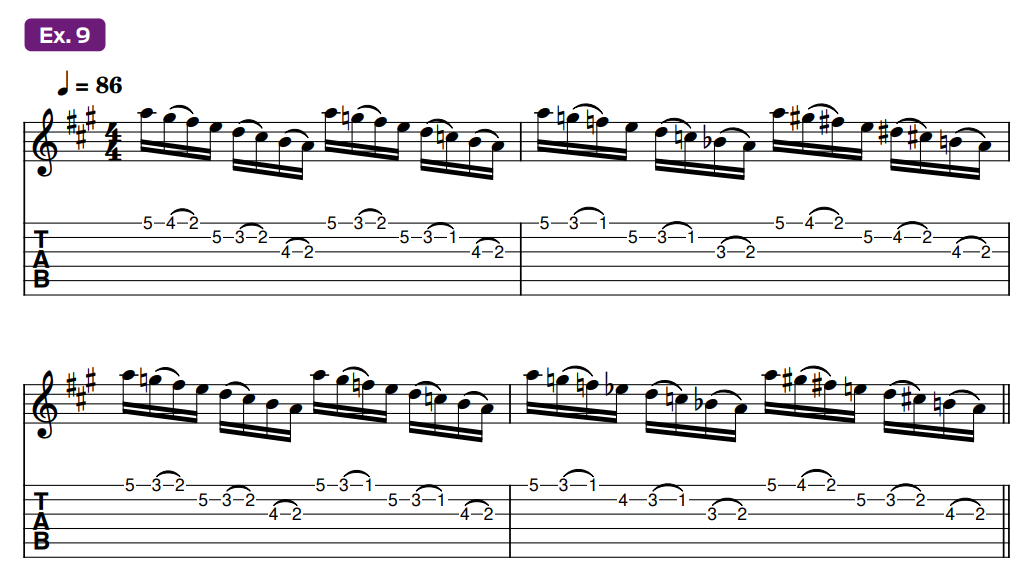
Speaking more to ear training and adding a legato element, Ex. 9 stations the fingerings in one vertical position – 2nd position – so that what was formerly seven iterations of the A major scale is now a sample pack of the seven mode formulas, all transposed to a parallel A tonal center. And so we now have A Ionian followed by A Dorian, A Phrygian, A Lydian, etc.
With the relationship between the WRT and one-octave cells laid out, we can dig deeper.
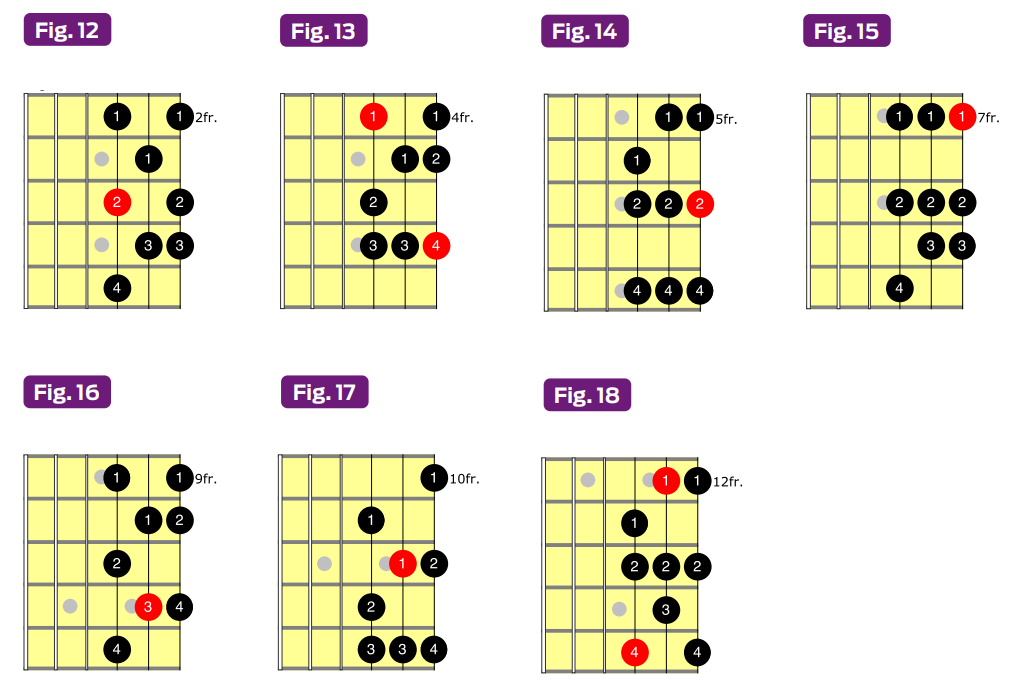
First, we’re going to shift the modal root orientation of our seven A major scale fingering patterns and positions to B Dorian (B, C# , D, E, F# , G# , A), as illustrated in Figures 12–18, with the B root note now highlighted in red in each pattern.
At the same time, we’re changing the notes-per-string architecture of each fingering pattern from “2-3-3” to “3-2-3,” with three notes now played on the G string, two on the B string and three on the high E.
You notice, however, that in some of these shapes, namely those shown in Figures 14, 15 and 18, I’ve added an extra, third note on the B string, which duplicates and repeats the highest note played on the G string.
These alternative fingering options are made possible by WRT and will be duly exploited.
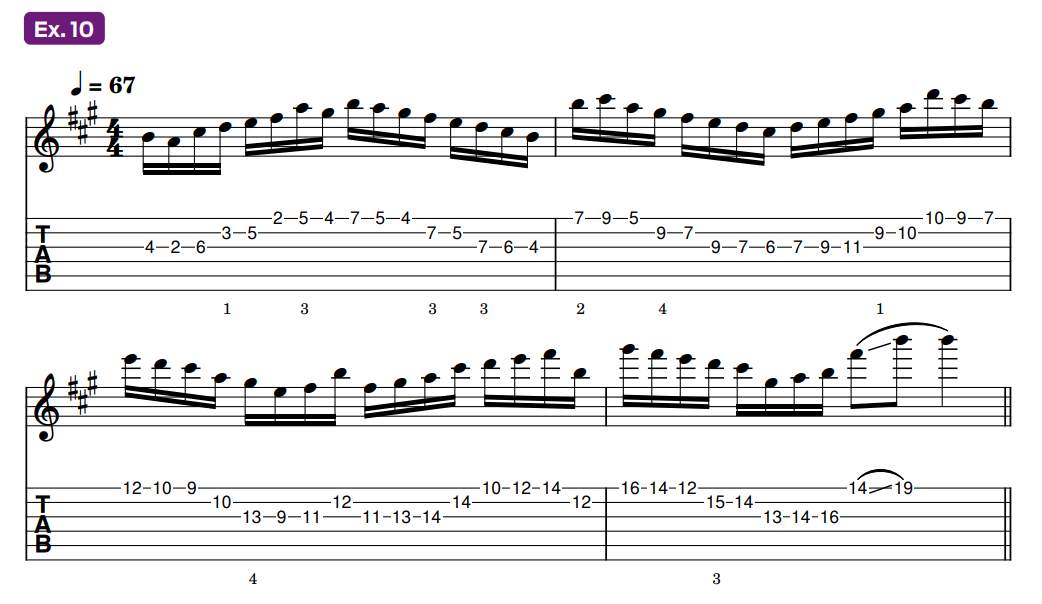


Take note: Reassigning a root note is only the first step in morphing a set of fingerings into a new modal color.
To help establish a connection, check out Examples 10 and 11, where we have a pair of ping-ponging runs that work their way up the neck through our three-string B Dorian patterns, melodically emphasizing our new B root note along the way while acclimating you to the potential of the “hot-rodded” fingering approach, with certain shapes offering the previously illustrated duplicate/ alternate fingerings for the same note on the G and B strings.

When you’re ready, dial in your preferred OD tone and dig into these final four licks.
Ex. 12 wastes no time making use of the new architecture seen in Fig. 12, stringing together groups of 32nd notes and 16th note triplets with strategically placed pull-offs.

Ex. 13 takes the Fig. 15 shape for a ride, demonstrating the two placement and fingering options available for the F# note – at the 11th fret on the G string or on the B string’s 7th fret.

Maintaining a focus on this “clone tone” element, while also offering more involved phrasing options with an alternate picking/legato stew, Ex. 14 overlaps the shapes from Figures 17 and 18 and has us bouncing between the clone tone B notes within the first two beats before seeking out a descending Bm arpeggio that leads to a climatic whole-step bend from A to B on the high E string’s 17th fret.

Ex. 15 leaves you with a scorching lick played in the shape from Fig. 13. This phrase is packed with multiple legato articulations, a quintuplet phrase (in beat 2), a smattering of rhythmic spice and, going from beat 3 to beat 4, a “clone-tone slide” before finally resolving to our B Dorian root note on the high E string’s 7th fret.
For me, Jon Finn’s Warp Refraction Threshold paved a whole new way to view and consider chords and scales, as well as melodic phrasing.
I hope my deep dive into the major 3rd anomaly between the G and B strings in this lesson serves as a catalyst for your own fretboard and musical explorations, in the same way that Jon’s article did for me!
Chris Buono is a top-selling TrueFire Artist with nearly 50 instructional videos, and a featured instructor on guitarinstructor.com. Bookending his years as a Berklee professor, he authored eight books, including the popular Guitarist’s Guide to Music Reading and his most recent publication, How to Play Outside Guitar Licks.

