The Ultimate Chops Builder: 51 Exercises to Give You Killer Technique
51 building blocks and assorted exercises—designed to improve both both fret and pick-hand technique—that many virtuosos used to develop their ability to blaze.
All the latest guitar news, interviews, lessons, reviews, deals and more, direct to your inbox!
You are now subscribed
Your newsletter sign-up was successful
An awestruck concertgoer approaches a virtuoso performer after a show and, after making the usual congratulatory remarks, says, I’d give anything to play like that! To which the performer responds, dryly, “Would you practice eight hours a day, seven days a week, for 20 years?”
Chances are, your guitar heroes did just that: spent countless hours honing their chops. Are you ready to do the same? Good, because in this lesson, we give you all the same building blocks and assorted exercises designed to improve both both fret and pick-hand technique that many of these players used to develop their ability to blaze. So now it’s up to you to put in same amount of practice time they did.
As this lesson is geared solely toward pushing the mechanics of both hands to the next level, it contains no truly melodic passages. Nor does it contain any bending, fingerstyle, hybrid picking, or tapping figures. Instead, you’ll find lines you might describe as “intense” (rapidly repeated, short note groupings, played in position), “textural” (scalar passages featuring various contours, peaks, and valleys), “intervallic” (string skipping and arpeggios), and so forth. Once you get them down, add new lines and patterns the types of passages that will bubble to the surface when you improvise to the categories that interest you.
Lastly, realize that there is no substitute for intently studying the hand movements of technically advanced players. The next time you’re watching either your guitar teacher, that underground legend at your local club, your idol on tour, or even videos, pay strict attention to the hand movements involved. Then, try practicing in front of a mirror to get a feel for the proper positioning of each lick.
SESSION WORK
What follows is a basic guideline for structuring your chops-building practice sessions. This methodology is similar to that used by your favorite technique freaks.
After warming up, take the total time you allot to chops development and divide it into equal segments covering the fundamental picking and fretting styles: alternate picking, legato playing, string skipping, and sweep economy picking. For instance, if you typically spend four hours on chops, that’s about 50 minutes on each subject, with a 10-minute break each hour. In each block, cover all the common finger combinations, picking patterns, and stretches. Moreover, don’t just eye the clock—set an alarm for every 50 minutes. Then, after all those hours spent chipping away at chops builders, try improvising, unloading your newly learned lines over your favorite progressions. Try to make singable phrases the focal point of your improvisations, and reserve your fast stuff for setting up these melodic themes. Also, record yourself as often as you can, then listen back objectively.
BEAT IT
To conquer anything that is beyond your current technical ability, you should first slow things down and evaluate how your hands perform. For instance, during certain scalar moves are you raising your fret hand’s 4th finger higher off the neck than you are your other fingers? If so, your 4th finger’s tip will be fretting notes a millisecond later than those other digits. Since your pick won’t slow down to accommodate the extra time it takes for your 4th finger to hit its mark, the sloppy sound of out-of-sync picking and fretting will result. It may also be the case that you’re over-picking, cramming in, say, five or six pick attacks per beat when your fingers are intending to play 16th notes. (This usually occurs when guitarists attempt to play faster note groupings than their ears can actually hear.)
All the latest guitar news, interviews, lessons, reviews, deals and more, direct to your inbox!
Regardless of their cause, when you detect any clams in your fast phrases, use a metronome to clock and fine-tune your playing speed. First, determine your threshold tempo—the fastest tempo at which you can play a repeating figure without straining (or without your hand coordination falling apart). Next, incrementally increase the metronome’s setting while maintaining proper fretting and picking technique, till you reach your goal tempo (suggested bpm markings are indicated throughout this lesson). Lastly, keep a daily record of your metronome settings to monitor your progress. Before long, you’ll be able to see on paper how much your technique has improved.
GUITAR CALISTHENICS
Practicing your instrument and remaining healthy throughout your life as a player requires the physical training and discipline of an athlete. This means that you should massage your muscles during and after each practice, regularly engage in cardiovascular exercise (to promote good circulation), and maintain a healthy diet as well as proper sleeping habits.
The physical strain we put on the muscles in our hands makes us susceptible to injuries. To play it safe, gently stretch your arms and wrists: while standing, outstretch your arms like doing a push-up in the air, and gently pull your fingertips back toward your face; or do slow windmills with your arms. Then, devote several minutes to warming up your pick and fret hands. And always play with correct posture straight neck and back, minimal fret-hand wrist flexion.
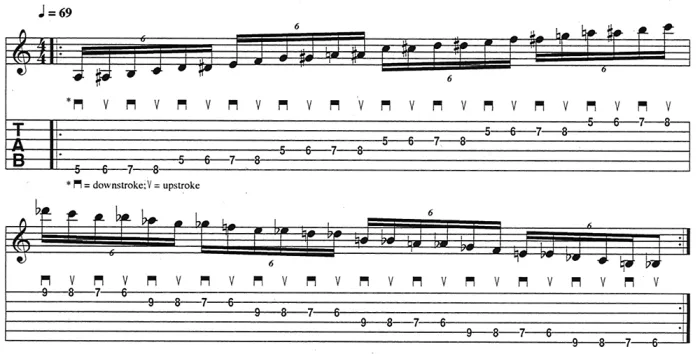
Begin warming up by running your fingers through purely physical exercises, like FIGURE 1, an alternate-picked ascending/ descending 1-2-3-4 finger pattern that moves laterally, i.e. across the neck. Feel free to move this exercise down the neck, to work on widening your fret hand’s stretch, or up the neck, to focus on areas where the frets are closer together. (For a more vigorous warm-up, try playing this on an acoustic guitar.)
FIGURE 1
As you’re warming up, keep your fret-hand’s wrist and forearm straight and relaxed, with each finger lined up parallel to each fret, hovering as close to the strings as possible. Your fret-hand’s thumb should be positioned behind the neck, not hooked over the side, as it would be for bending with the palm perpendicular to the fretboard. Depress each note firmly behind the indicated frets, pressing straight down with your fingertips. Conservation of movement is key to developing super chops, and the above steps will help rein in those flapping fingers.
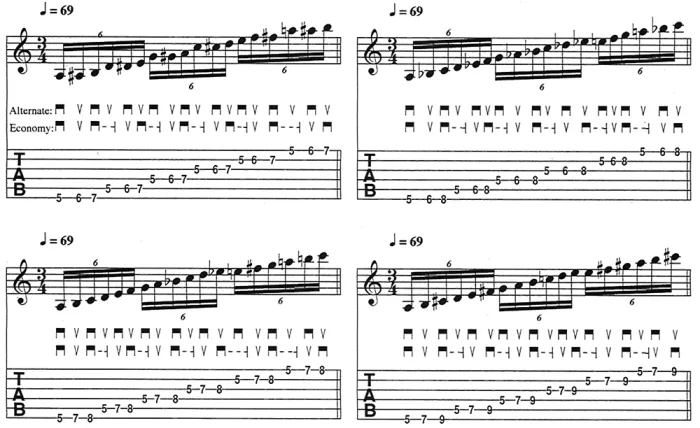
FIGURES 2A–D drill the most common finger patterns (1-2-3, 1-2-4, 1-3-4) for three-notes-per-string scales on all six strings. Try shifting these patterns up the neck chromatically. For a more thorough warm-up, practice FIGURE 2D using both 1-2-4 and 1-3-4 fingerings. Also, note that FIGURES 2A–Dcan be played using a combination of alternate and economy picking, as indicated between notation and tab staves.
FIGURES 2A–D
FIGURES 3A–D contain two-notes-per string fingerings (1-2, 1-3, 1-4), which are commonly used for pentatonic passages and arpeggios. You might find it useful to drill FIGURE 3C using both 1-4 and 1-3 fingerings.
FIGURES 3A–D

Finally, FIGURE 4 illustrates a one-note per-string warm-up that should improve your arpeggios. Now that your fingers are relaxed and limber, you’re ready to delve into more musically rewarding exercises.
FIGURE 4

PICK BOTH WAYS
Before seriously committing to supercharging your picking, you need to determine whether you have the potential to achieve higher speeds with your current approach. To evaluate your picking, try this test: At a slow tempo, repeat one note using alternating downstrokes and upstrokes (e.g., 16th notes at 69 bpm). Now pick that note as fast as possible (e.g. 16th notes at 160+ bpm). When you made the leap from slow to fast, did you modify your picking at all? For instance, did you change the arch or your wrist or grip the pick differently? Or did you notice a new movement in some part of your hand?
If so, your picking approach is flawed. You should be able to play at any tempo without altering your technique. This is a common problem among guitarists who pick with a “fingertip” motion, as if writing with a pencil. (When playing lines that involve switching between strings, many players’ pick hands naturally revert to the fine movements ingrained while perfecting cursive in school.) This approach hampers fast alternate picking. Why? Because at 160+ bpm it’s nearly impossible to wiggle a pick four times (in 16th notes) within a single beat’s span with your fingers alone. Sadly, however, these guitarists practice their trickiest licks using this “pencil picking,” slowing them down and believing that simply by putting in time they’ll eventually pick faster.
The truth is, you need to practice everything using the fast picking style that your body naturally favors—that is, the exact movements you use to pick super fast on a single string. For most players, this involves picking from the wrist (in some cases, with the wrist arched in “quick strumming” position, where the pick hand’s pinkie or heel is used for stability), with no “stiff arming” and, again, no fingertip-based movement. Also, note that most blazing alternate pickers use heavy picks, which slice through the strings more easily than thinner picks, promoting better hand synchronization. Keep all of this in mind as you watch your pick hand run through the examples in this section.
One proven method for developing blazing picking technique is to practice repeating moves between two adjacent strings. FIGURES 5A–B depict two-notes-per-string pentatonic patterns using 1-3 and 1-4 fingerings, while FIGURES 6A–C illustrate common 16th-note-triplet patterns on the same string set. FIGURE 7 puts these moves together in an ascending/ descending (A minor pentatonic, Bb minor pentatonic, etc.) sequence used often by such players as Zakk Wylde and Eric Johnson.
FIGURES 5A–B
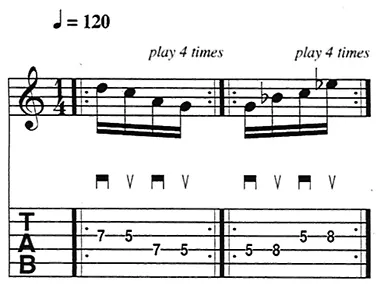
FIGURES 6A–C
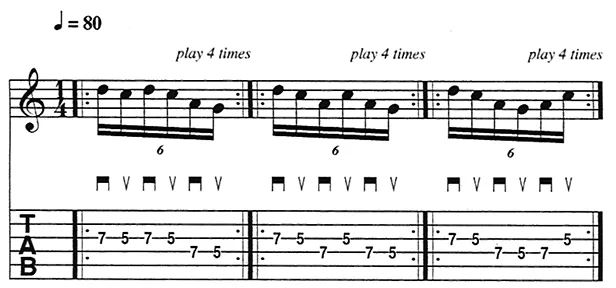
FIGURES 7

Now let’s drill some three-notes-per-string patterns. Mastering these fingerings is key to copping the blazing sounds of Al Di Meola, John McLaughlin, and Steve Morse, among others. FIGURES 8A–B and FIGURES 9A–C depict variations of a three-note pattern on string 4. Again, practice these figures using every finger combination (see FIGURES 2A–D); then, play them on different string sets, and in different positions.
FIGURES 8A–B
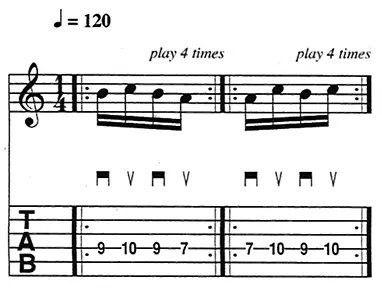
FIGURES 9A–C
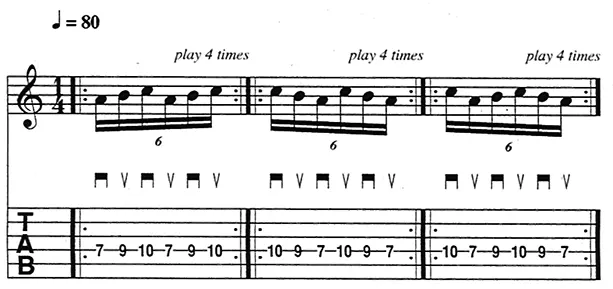
FIGURES 10A–E add another string to the picture, to isolate the common finger patterns encountered in most scalar passages. Listen to yourself critically as you repeat this exercise. There’s a chance that as you pass from the 4th string (with a down stroke) to the 3rd string (with an upstroke) you’ll hear the open 3rd string go clunk. This particular stroke—hitting a new string with an upstroke—is difficult to master. Take it slowly, and be on the lookout for ways to refine your pick’s movements. It’s possible that, through experimenting with different arched-wrist angles, you’ll find a hand position that makes it easier to pass the pick over adjacent strings.
FIGURES 10A–E

Meanwhile, FIGURES 11A–E illustrate other common two-string note combinations, here within the A natural minor scale (A-B-C-D-E-F-G).
FIGURES 11A–E

The three-note pattern in FIGURE 12 will work for any scale or mode that lacks accidentals (e.g., C major, D Dorian, E Phrygian).
FIGURE 12
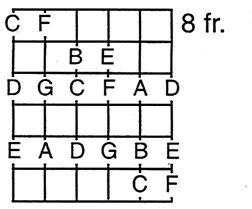
In FIGURES 13–16, the notes within this finger pattern are broken up in a sequential fashion, which puts more demands on your alternate-picking chops. A sequence involves restating the same note pattern—e.g., the ascending four-note line that starts FIGURE 13, or the six-note pattern that kicks off FIGURE 14—beginning on a different pitch within the scale. Play these passages using strict alternate picking, starting with a downstroke. Practice these sequences within all seven three-notes-per-string diatonic scale shapes, and watch your pick hand to ensure you don’t stray from strict alternation.
FIGURES 13–16
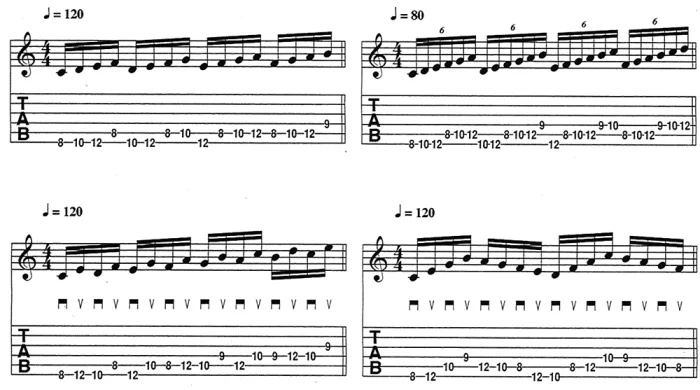
Now, using FIGURE 12’s shape, let’s play around with some speed-picking moves. FIGURE 17 expands on the picking pattern of FIGURE 11D; FIGURE 18 carries the single-string line of FIGURE 9C across all six strings; FIGURE 19 combines FIGURES 10 and 11D; and FIGURE 20 alternates between FIGURES 11C and 11B.
FIGURE 17–20
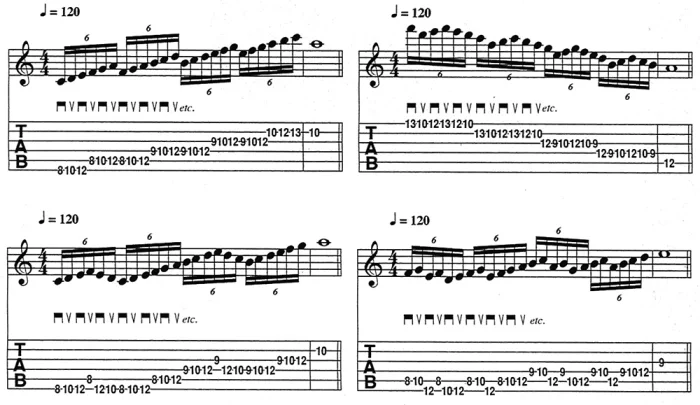
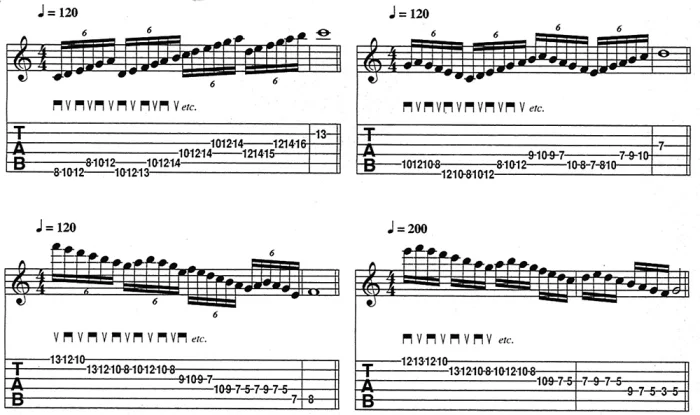
Once you get a handle on these figures, try your hand at linear (moving along the strings) passages that pass through neighboring three-notes-per-string scale positions., like FIGURES 21–24, inspired by Paul Gilbert, Tony MacAlpine, Yngwie Malmsteen, and John Petrucci, respectively.
FIGURES 21–24
SMOOTH MOVES
In the previous examples, the pick and fret hands shared the workload. Now let’s look at legato-style playing, an approach that places more demand on the fret hand and involves techniques like hammer-ons, pull-offs, and slides.
FIGURES 25A–B and FIGURE 26 use all four fret-hand fingers in different combinations, emphasizing hammer-ons and pull-offs. When hammering on, you should press down hard enough so that each hammered note sounds as loud as the picked one. (Note: The quicker your finger slams down, the less pressure is required.) Further, after hammering on, keep your finger fixed to the string for as long as possible don’t lift it until you need to use it on another string. And make sure you pre-fret each note in a series of pull-offs.
FIGURES 25A–B
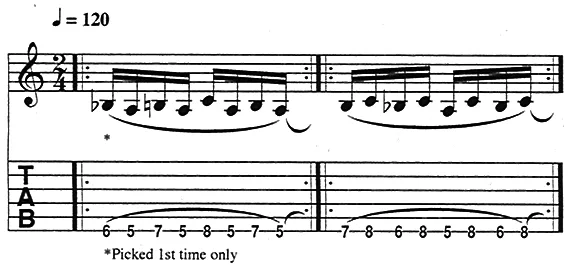
FIGURE 26
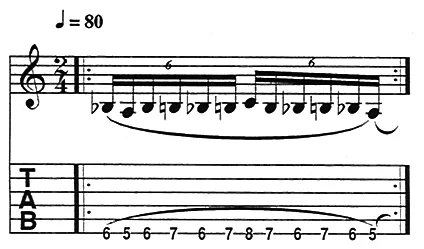
In FIGURE 27 you’ll find a legato version of FIGURES 10–11. (Try some of the other picked examples using legato technique, too.) FIGURE 28 contains a legato fret-hand slide. This line also introduces a new technique, the “hammer-on out of nowhere.” Here, you’ll kick off a series of 2nd-string notes by hammering your 4th finger onto the 10th-fret A, thereby sounding that note without picking. This often overlooked fret-hand approach has been used (usually when descending) by players like Joe Satriani, Steve Vai, Allan Holdsworth, and Shawn Lane.
FIGURES 27–28

FIGURE 29 uses this technique in a new three-notes-per-string pattern.
FIGURE 29
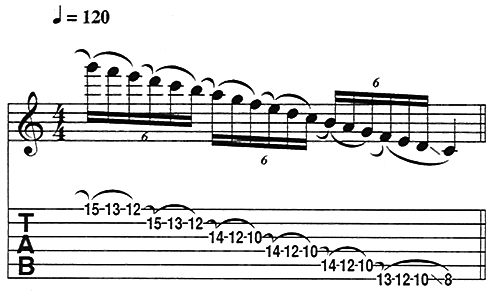
In FIGURES 30–32, assorted legato moves are plugged into the three-notes-per-string shape of FIGURE 12.
FIGURE 30
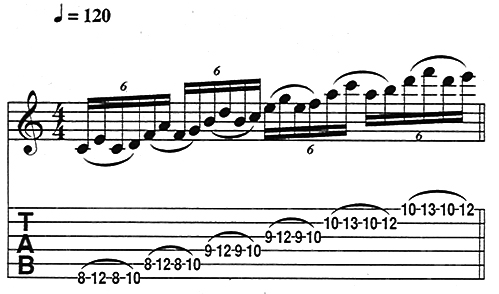
FIGURES 31–32

When you get a handle on FIGURES 30–32, try some more advanced linear legato moves like the Satriani-inspired FIGURE 33, or the hammer-out-of-nowhere workout of FIGURE 34.
FIGURES 33–34

SKIPPING TONES
String skipping is a term used to describe any pattern featuring notes played between non-adjacent strings. At its most rudimentary, this technique could involve simply rearranging a two-notes per-string pentatonic shape, as seen in FIGURE 35, or inserting a skip in a standard three-notes-per-string line, as in FIGURE 36. Both of these passages are played with alternate picking, beginning with a downstroke, and feature skips between strings 6 and 4, 5 and 3, 4 and 2, and 3 and 1.
FIGURES 35–36

FIGURE 37, inspired by John Petrucci, expands upon this approach, using 1-2 and 1-4 fingerings within three-notes-per-string shapes. FIGURE 38, in the style of Steve Morse, repeats the same string-skipping lick up the neck, targeting notes from the A minor scale.
FIGURES 37–38

Of course, the wider the gap between two notes, the bigger the string skip-and the trickier the picking, as seen in the G-major arpeggios of FIGURE 39.
FIGURE 39
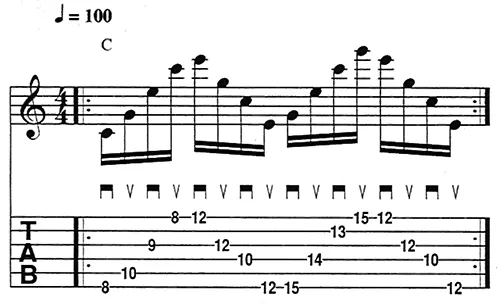
Next, the Paul Gilbert-style FIGURES 40A–B illustrate another way of playing arpeggios, by using a combination of string skips, hammer-ons, and pull-offs. For more string-skipping insanity, check out the rock leads of Nuno Bettencourt; the jazz/fusion passages of Pat Metheny, John Scofield, and Scott Henderson; and the studio wizardry of Carl Verheyen.
FIGURES 40A–B
SWEEPING CHANGES
Sweep picking refers to using a single pick stroke to sound, in succession, notes on two or more neighboring strings. This economical approach, most often used for arpeggios, is favored by jazz guitarists like Joe Diorio and Jimmy Bruno, and by rock stylists like Frank Gambale, Yngwie Malmsteen, and Marty Friedman.
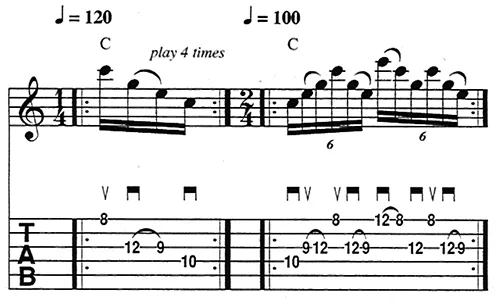
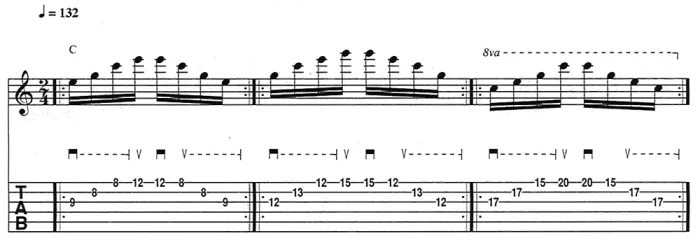
Check out the C and Am arpeggios in FIGURES 41A–C and FIGURES 42A–C, respectively. Playing each bar using alternate picking would require eight pick strokes; with economy picking, however, only four are required. To tackle the ascending portion of these shapes, use a single, controlled down stroke to pass through strings 3-1. First, let the pick fall from the 3rd string to the 2nd, allowing the pick to rest up against the latter. Then, push the pick through the 2nd string, continuing the motion until the pick has passed through all three strings; reverse the process for the descending portions. To keep the the notes from bleeding together and sounding like a strummed chord, depress each note individually as opposed to holding the full arpeggio shape throughout and release it as you finger the next fret.
FIGURES 41A–C
FIGURES 42A–C

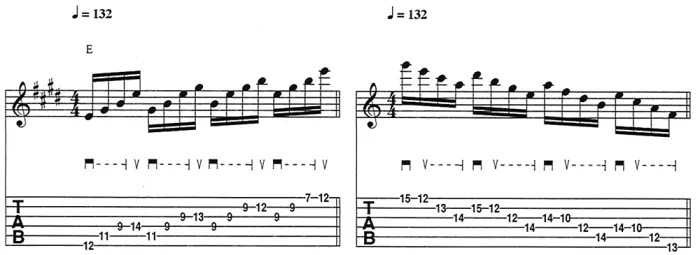
FIGURE 43, which uses the same picking pattern as FIGURES 41–42, blazes through E major arpeggios on different string sets. The descending picking pattern in FIGURE 44, meanwhile, consists of various 7th-chord arpeggios.
FIGURES 43–44
For more three-string-sweep applications, check out FIGURE 45, a Friedman favorite in which Am triads are moved along string set 3-5, and FIGURE 46, a Malmsteen-style series of diminished-7th arpeggios.
FIGURE 45–46

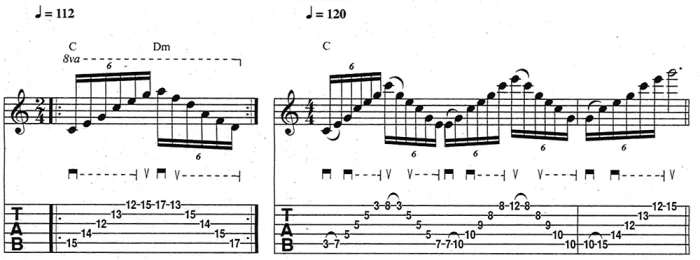
Next, try some moves that cover a broader range, like the five-string sweeps in FIGURES 47–48 and the six-string beasts of FIGURES 49A–B.
FIGURES 47–48
FIGURES 49A–B
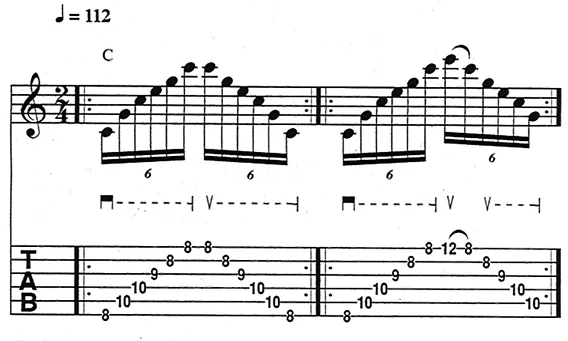
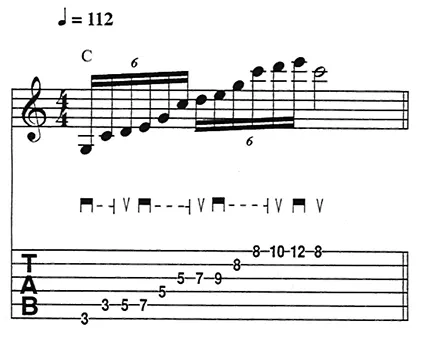
Scalar fragments can also be played using sweep picking, as long as they feature an odd number of notes per string. In FIGURE 50, a G-C D-E pattern is restated across three octaves; many shredders use this approach to create wide-ranging melodic runs. Once you’re comfortable with this one, go back and play the warm-up passages in FIGURES 2A–D using economy picking.
FIGURE 50
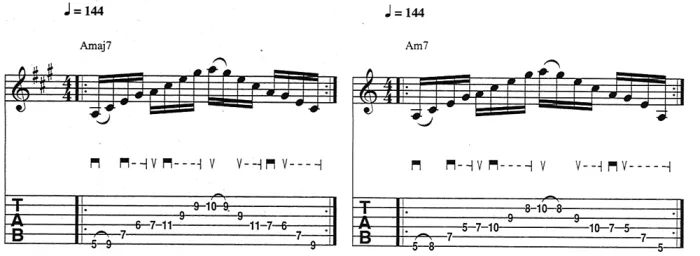
Finally, FIGURES 51A–B contain Amaj7 (A C#-E-G#) and Am7 (A-C-E-G) arpeggios, respectively. (Notice the similarity here to FIGURE 48.) To get the most out of these shapes, try switching up the tones to build new arpeggios, such asA7 (A-C#-E-G), Am7b5 (A-C-Eb G), and A˚7 (A-C-Eb-Gb). Then, go back and make similar adjustments to earlier shapes: turn C (C-E-G) into Cm (C-Eb-G), Am (A-C E) into A major (A-C#-E), and so on. You may also locate each shape’s inversion, then move it to different string sets.
FIGURES 51A–B
Remember that having chops is not only about speed but about getting the best possible sound out of your instrument. You would do well, for one, to practice regularly on a steel-string acoustic, since this instrument has no effects to mask imperfections. You’ll essentially be magnifying every one of your technical flaws. And if on electric you have been slicing your pick through the strings at an overly steep angle, you’ll notice an unpleasantly scratchy warning sound when you do so on acoustic. Also, if you can only pick fast by anchoring your pick hand to your electric guitar’s bridge, you’ll have a terrible time trying to keep your chops intact when picking near your acoustic’s sound hole for a warm, full bodied tone.
Finally, always practice with your guitar held in the same position relative to your chest and limbs, whether you’re sitting or standing. (Tip: Use a guitar strap in either case.) After all, you don’t want to spend countless hours developing killer chops sitting down only to discover that when playing standing at a gig, with your ax hanging low, your hand positions feel completely foreign. You’ll sound more like a chump than like the chops monster you have become.
